Advertisement
MI-4530p Wireless Optical Mini Mouse
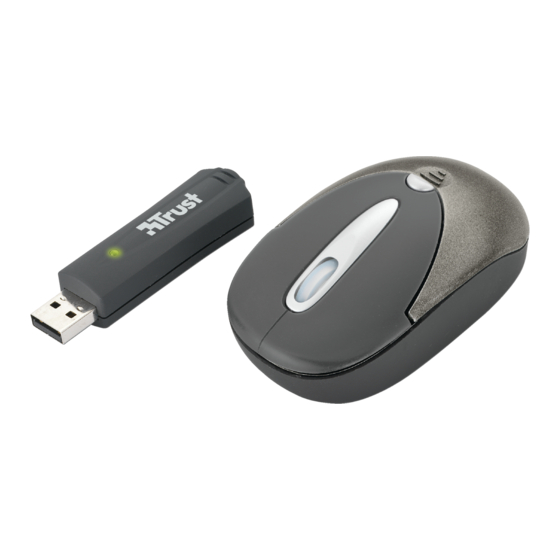
Product information
Mouse
A: Left mouse button
B: Scroll wheel and 3
function)
C: Right mouse button
D: Button to open the battery compartment
E: Battery compartment
F: Connect button
Installation
1
A1; A2
Press the button which opens the battery compartment whilst moving the cover backwards.
B
Insert both batteries as shown in the diagram.
C
Close the battery compartment.
2
Turn on the PC.
Connect the USB receiver to the PC.
3
4
Press the connect button on the receiver (the status LED will flash).
5
Turn on the mouse and press the connect button on the mouse (the status LED will be lit constantly).
6
If another mouse is not connected to the PC, press the ENTER key on the keyboard.
Windows 98: Follow the on-screen instructions. If necessary, insert the Windows 98 CD-ROM into the
7
CD-ROM drive.
General use
It is recommended to use rechargeable batteries.
If the mouse does not react, press one of the mouse buttons to reactivate it.
Altering the speed of the mouse pointer: (1) Open Windows Help ('Start – Help and
Support'). (2) Search for ''Adjust the speed of your mouse pointer'. (3) Follow the
instructions.
Do not use the mouse on a shiny or glass surface.
If the optical sensor is dirty, clean it with a soft brush.
Wireless performance
•
Reduced wireless performance can be caused by:
- Metal objects close to or between the adapter and the other device.
- Empty batteries.
- Other wireless devices close by.
•
Solution
- Replace the batteries.
rd
mouse button (auto scroll
1
G: On/Off switch
H: Movement sensor
I: Sliders
Receiver
J: Connect button
K: Status LED
L: USB connection
UK
Advertisement
Table of Contents

Related Manuals for Trust MI-4530p


Summary of Contents for Trust MI-4530p
- Page 1 MI-4530p Wireless Optical Mini Mouse Product information Mouse G: On/Off switch A: Left mouse button H: Movement sensor B: Scroll wheel and 3 mouse button (auto scroll I: Sliders function) Receiver C: Right mouse button J: Connect button D: Button to open the battery compartment...
- Page 2 This device has a two-year product warranty which is valid from the date of purchase. Go to www.trust.com/warranty for more information. • It is forbidden to reproduce any part of this instruction manual without the permission of Trust International B.V.
Need help?
Do you have a question about the MI-4530p and is the answer not in the manual?
Questions and answers