
Related Manuals for clage Zip HydroTap MINIBOIL


Summary of Contents for clage Zip HydroTap MINIBOIL
- Page 1 Zip HydroTap MINIBOIL ® Gebrauchs- und Montageanleitung Zip HydroTap MINIBOIL ® Operating and installation instructions...
-
Page 2: Table Of Contents
Zip HydroTap ® MINIBOIL Inhaltsverzeichnis 1. Sicherheitshinweise ..................3 2. -
Page 3: Sicherheitshinweise
1. Sicherheitshinweise Montage, erste Inbetriebnahme und Wartung dieses Gerätes dürfen nur durch einen anerkannten Fachhandwerksbetrieb erfol- gen, der dabei für die Beachtung der bestehenden Normen und Installationsvorschriften voll verantwortlich ist. Wir übernehmen keine Haftung für Schäden, die durch Nichtbeachtung dieser Anleitung entstehen! •... -
Page 4: Technische Daten
Zip HydroTap ® MINIBOIL 3. Technische Daten Zip HydroTap ® MINIBOIL Nennspannung / Nennleistung 230 V AC / 1,84 kW Nenndruck kPa / bar 70 – 700 / 0,7 – 7 Temperaturbereich Heißwasser °C 92 – 98 Heißwassertankvolumen Liter Wasseranschluss G ½“... - Page 5 4. Montage Zu beachten sind: • VDE 0100 • EN 806-2 • Bestimmungen der örtlichen Energie- und Wasserversorgungsunternehmen • Technische Daten und Angaben auf dem Typenschild Stellen sie vor der Installation sicher dass: • ausreichend Platz für das Untertischgerät und die Belüftungsreserve vorhanden ist (siehe Montagezeichnung).
-
Page 6: Installation Der Armatur
Zip HydroTap ® MINIBOIL 4. Montage Installation der Armatur Hinweis: Die Armatur darf nicht weiter als 900 mm über dem Boden des Armatur Untertischgerätes installiert werden, um einen zu geringen Wasserdruck zu vermeiden. Hinweis: Die Armatur darf unter keinen Umständen gedreht werden, nachdem Sockel sie fest montiert wurde! 1. -
Page 7: Optional: Installation Des Tableaus
4. Montage Armatur Optional: Installation des Tableaus Das Tableau (Artikelnummer: 441014) ist ein Zubehörelement und kann dazu verwendet werden, die Armatur unabhängig von einer Küchenspüle zu installieren. Sockel 1. Vergewissern Sie sich, dass an der für das Tableau vorgesehenen Stelle ein Wasserzulauf, ein Wasserabfluss, eine Steckdose mit einer Absicherung von mindes- Gewindestange tens 10 A und ausreichend Platz für das Untertischgerät vorhanden ist. -
Page 8: Gebrauch
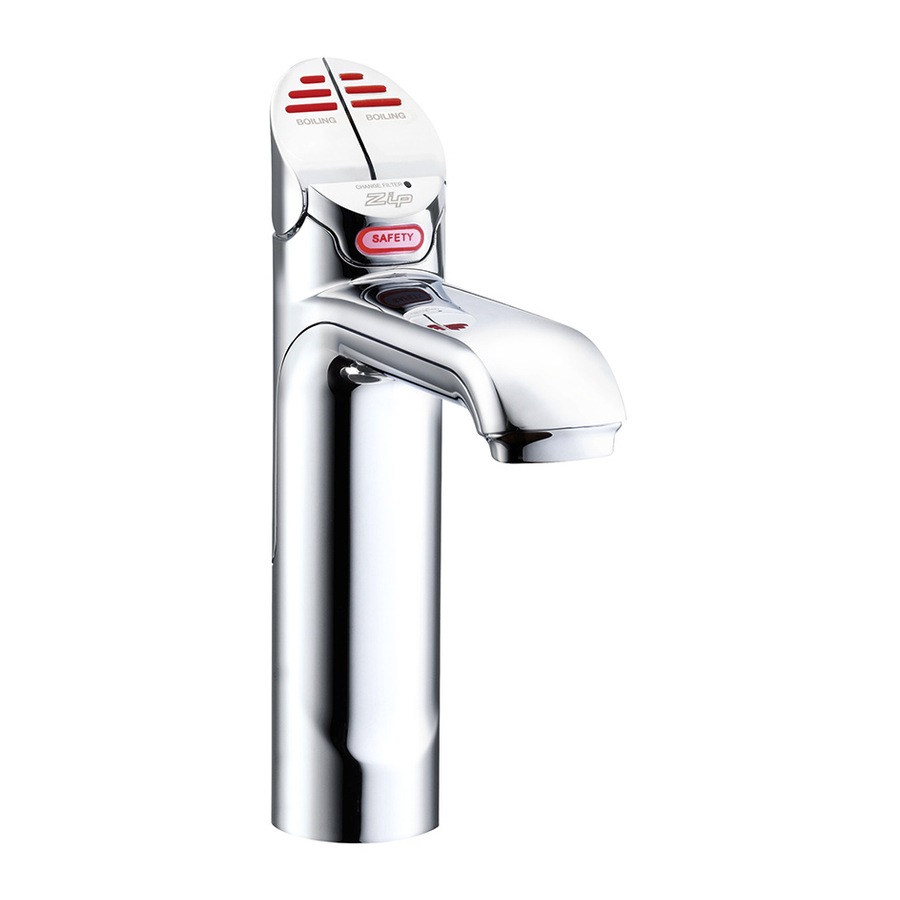
Zip HydroTap ® MINIBOIL 5. Gebrauch Hinweis: Wenn das Gerät für mehrere Tage nicht benutzt wurde, lassen Sie etwa eine Minute lang kaltes Wasser aus der Armatur ablaufen. Bedienung Betätigen Sie die rote Taste, um kochendes Wasser zu zapfen. Wenn die Taste Kochendwasser Kaltwasser niedergedrückt wird, fließt kochendes Wasser solange sie festgehalten wird. -
Page 9: Wartung Und Pflege
6. Wartung und Pflege Reinigung Die Oberflächen des Untertischgerätes und der Armatur nur mit einem feuchten Tuch abwischen. Keine scheuernden, lösungsmittel- oder chlorhaltigen Reinigungsmittel verwenden. Die Untertischeinheit und die Armatur nicht mit einem Wasserstrahl reinigen, da dies die Elektronik beschädigen könnte. Filterwechsel Ein notwendiger Filterwechsel wird vom Gerät entweder nach einer Filter- Nutzungsdauer von 12 Monaten oder einer gefilterten Wassermenge von 4000 Litern... -
Page 10: Problemlösung
Störung der Wasserversorgung. Wasserzulauf auf Blockierungen überprüfen. Möglicher interner Fehler. Kundendienst kontaktieren. Sollte das Gerät weiterhin nicht funktionieren, wenden Sie sich bitte an: CLAGE GmbH Zentralkundendienst Pirolweg 1 – 5 21337 Lüneburg Deutschland Telefon: +49 (0) 4131 · 89 01- 40 Telefax: +49 (0) 4131 ·... -
Page 11: Umwelt Und Recycling
8. Umwelt und Recycling Ihr Produkt wurde aus hochwertigen, wiederverwendbaren Materialien und Kompo- nenten hergestellt. Beachten Sie bei einer Entsorgung, dass elektrische Geräte am Ende ihrer Lebensdauer vom Hausmüll getrennt entsorgt werden müssen. Bringen Sie dieses Gerät daher zu einer der kommunalen Sammelstellen, die Elektronikschrott kostenlos entgegennehmen. - Page 12 Zip HydroTap ® MINIBOIL Notizen Notes...
- Page 14 Zip HydroTap ® MINIBOIL Montageschablone für das Tableau Ø 219 mm Außendurchmesser des Außendurchmesser Tableaus des Tableaus Outside diameter of tray Ø 108 mm Öffnung für die Öffnung für die Tableauvertiefung Hole for tray recess Tableauvertiefung Ø 10 mm 10 mm-Aussparung für Aussparung für den Befestigungsbolzen Hole for fastening bolt den Befestigungsbolzen...
- Page 15 Installation template for the tray Ø 35 mm + 0,5 mm Loch für die Armatur-Anschlussschläuche Loch für die Anschlussschläuche Hole for tap connecting hoses Maßstab 1:3,3 Maßstab: 1:3,3 Scale: 1:3.3 Maßstab 1:1 Maßstab 1:1 Scale: 1:1...
- Page 16 Zip HydroTap ® MINIBOIL...
- Page 17 Contents 1. Safety Instructions ..................14 2.
-
Page 18: Safety Instructions
Zip HydroTap ® MINIBOIL 1. Safety Instructions Installation, initial operation and maintenance of this appliance must only be carried out by an authorised professional, who will then be responsible for adherence to applicable standards and installation regulations. We assume no liability for any damage caused by failure to observe these instructions. -
Page 19: Technical Data
3. Technical Data Model Zip HydroTap MINIBOIL ® Rated voltage / rated power 230 V AC / 1.84 kW Rated pressure kPa / bar 70 – 700 / 0,7 – 7 Hot water temperature range °C 92 – 98 Hot water tank volume litres Water connection G ½"... - Page 20 Zip HydroTap ® MINIBOIL 4. Installation The following regulation must be observed: • Installation must comply with all statutory regulations, as well as those of the local electricity and water supply companies. • The rating plate and technical specifications Before installation, ensure that: •...
-
Page 21: Installing The Tap
4. Installation Installing the tap Note: The tap must not be installed more than 900 mm above the base of the undersink unit. Failure to do this may result in poor water delivery. Note: Under no circumstances should the tap be twisted after the installation is complete. -
Page 22: Optional: Installing The Tray
Zip HydroTap ® MINIBOIL 4. Installation Optional: Installing the tray The tray (article number: 44101) is an accessory which can be used to install the tap independently of a kitchen sink. Spacer 1. Ensure that a water supply, a drain, a socket fitted with at least a 10 A fuse and enough room for the undersink unit are all available at the tray installation location. -
Page 23: Using The Tap
5. Using the Tap Note: If the Zip HydroTap MINIBOIL has not been used for several days, allow ® the tap to run ambient water for about one minute. Operation Dispense Dispense Press the red lever to dispense boiling water. Pull the lever up to dispense boiling water boiling water cold water continually. -
Page 24: Cleaning And Maintenance
Zip HydroTap ® MINIBOIL 6. Cleaning and Maintenance Cleaning The plastic surfaces and taps should only be wiped with a damp cloth. Do not use abrasive or chlorine-based cleaning agents or solvents. Do not clean the undersink unit and tap with a water jet, as that could damage the electronic components. -
Page 25: Troubleshooting
Water interruption. Check water inlet for blockages. Possible internal fault. Contact customer service. If you cannot rectify the fault with the aid of this table, please contact: CLAGE GmbH Central Customer Service Pirolweg 1 – 5 21337 Lüneburg Germany Tel: +49 ·... -
Page 26: Environment And Recycling
Zip HydroTap ® MINIBOIL 8. Environment and Recycling Your product was manufactured from high-quality, reusable materials and components. Please respect in case of discarding that electrical devices should be disposed of separately from household waste at the end of their ser- vice life. -
Page 27: Quick Guide
Kurzanleitung Quick guide Kochendwasser zapfen: Kaltwasser zapfen: Kindersicherung aktivieren / deaktivieren: Die rote Taste und die Safety-Taste gleichzeitig Die blaue Taste drücken. Die blaue Taste und die Safety-Taste drücken. gleichzeitig drücken und 10sek halten. For boiling water: For cold water: Activate / deactivate safety mode: Press the red lever and the Safety button at the Press the blue lever. - Page 28 CLAGE GmbH Pirolweg 1–5 21337 Lüneburg Germany Tel: +49 · 4131 · 89 01- 0 Fax: +49 · 4131 · 83 200 Email: service@clage.de Internet: www.clage.com...
Need help?
Do you have a question about the Zip HydroTap MINIBOIL and is the answer not in the manual?
Questions and answers