Table of Contents
Advertisement
Advertisement
Table of Contents

Related Manuals for X-Rite i1iO


Summary of Contents for X-Rite i1iO
-
Page 2: Safety Information
Safety Information CE Declaration Hereby, X-Rite, Incorporated, declares that this device is in compliance with the essential Consult this documentation in all cases where the Attention symbol appears. This symbol is used to inform you of any potential HAZARD or actions that may require your attention. -
Page 3: Equipment Information
This equipment is intended for use only with UL listed ITE equipment. Use of this equipment in a manner other than that specified by X-Rite, Incorporated may compromise Conecte el cable de alimentación a una toma de corriente de fácil acceso. -
Page 4: Packaging Contents
This quick start guide i1iO Arm i1iO Basisplatte Netzteil Stromkabel USB Kabel Gleitringe diese Kurzanleitung Bras du i1iO Plaque d’appui du i1iO Alimentation électrique Cordon d’alimentation secteur Câble USB Anneaux de glissement Ce manuel de démarrage Braccio i1iO Piastra della base i1iO... -
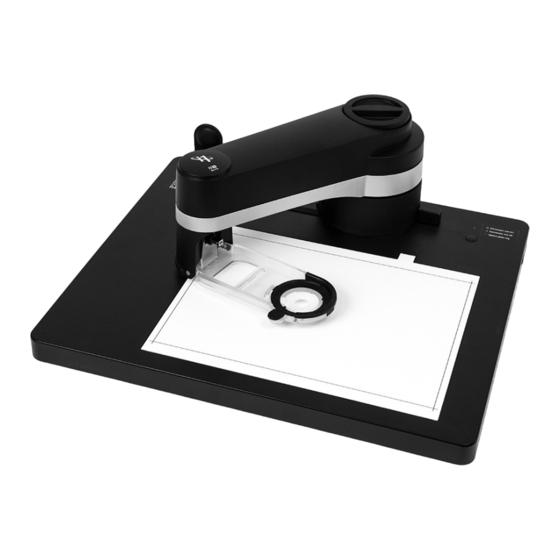
Page 5: Device Overview
Panoramica del dispositivo Visión general del dispositivo 装置の概要 设备概览 i1iO è un sistema di misurazione automatica per il dispositivo i1Pro 3 per misurazione di colori. i1iO fornisce misurazioni veloci e precise per diagrammi di prova riflessivi su vari substrati fino a 10 mm. -
Page 6: Installation
Installation Installation Installazione Instalación 組み立て 安装 Veuillez lire attentivement ces instructions avant de commencer à utiliser votre i1iO. 1. Placez le bras i1iO sur la plaque d’appui i1iO. 2. Tournez la manette du bras dans le sens des aiguilles d’une montre pour fixer le bras sur la plaque d’appui. - Page 7 5. Alinee la conexión USB y monte el dispositivo i1Pro 3 sobre la tabla i1iO. 5. Align the connection of the USB and mount the i1Pro 3 device on the i1iO. 3. ユニットの電源を入れる前に、輸送時の固定用の粘着テープをはがします。輸 送する際には、再度粘着テープを貼りつけてから梱包してください。パッケー...
- Page 8 7. Branchez le i1iO sur l’alimentation secteur au moyen du cordon d’alimentation (1), puis raccordez le câble USB au i1iO (2). Avant de mettre le i1iO sous tension, veillez à ce qu’aucun objet ne soit appuyé ou posé sur l’appareil.
- Page 9 9. Connect the i1iO to your computer using the USB cable. The i1iO will not work if 9. Conecte i1iO a la computadora utilizando el cable USB. i1iO no funciona si se conecta a un connected to a USB hub without a separate power supply.
-
Page 10: Height Adjustment
2. Inserire il substrato sotto il supporto di riferimento bianco. Se debe ajustar la altura del brazo del i1iO antes de la primera utilización y cada vez que se cambie el sustrato. - Page 11 Height Adjustment Höheneinstellung Réglage de la hauteur Regolazione dell’altezza Ajuste de la altura 高さ調整 高度调节 4. Assurez-vous que l’anneau de glissement est en contact permanent avec le substrat lors de la numérisation. Pour les substrats d’une épaisseur maximale d’1 mm, le bras doit être réglé sur la position la plus basse possible.
- Page 12 1. Legen Sie das einzulesende Testchart auf die Elektrostatikfläche, so dass die schwarze • スキャン中は測定エラーを防ぐため、また危険ですので i1Pro3 装置に触れないでくだ 将电源插头连接到便于够及的插座。 El uso inadecuado de este equipo, distinto a lo especificado por X-Rite, Incorporated, puede afectar la Markierung nicht überschritten wird. Bitte beachten Sie: さい 。...
- Page 13 Chart Positioning Positionieren des Charts Positionnement de la charte Posizionamento del diagramma Colocación del gráfico チャートのセット 测试图定位 2. Press the button on the upper right of the base plate to statically adhere the chart to the measuring table. Normally no supplementary adhesive is required for the chart. Ensure that the chart is flat and that there are no bubbles.
-
Page 14: Status Indicators
Status Indicators Statusanzeige Indicateurs d´état Indicatori di stato Indicadores de estado 装置のステータスインジケータ 设备状态指示灯 Indicatore LED sulla base: «Spento» Mat elettrostatico spento: È possibile rimuovere la chart o posizionarla sul tavolo di misurazione. «Verde» Mat elettrostatico acceso: La chart è fissata sul tavolo di misurazione. «Lampeggiante rosso»... - Page 15 útil del anillo deslizante (750 gráficos IT8.7/3 aprox.). The i1iO glider ring must be replaced periodically or in case of damage. The expected end of Para ordenar unidades de recambio del anillo deslizante para el i1iO, póngase en contacto con el life (about.
- Page 16 IMPORTANT: Make sure you install the correct size glider ring for your device. The glider ring 1. Desconecte la alimentación eléctrica del sistema i1iO y quite el dispositivo i1Pro3 de la tabla i1iO. for the i1Pro 3 PLUS has a "+" symbol on the tab. The i1Pro 3 has a "hole" in the tab.
- Page 17 Remplacement de Sostituzione dell‘anello Cambiar el anillo グライダーリング Glider Ring Exchange Gleitringwechsel 滑环更换说明 l’anneau de glissement di scivolamento deslizante の交換手順 3. Neuen Gleitring in der i1Pro 3 Gerätehalterung platzieren, Pfeil auf dem Gleitring muss auf das Schloss auf der Halterung zeigen. 4.
- Page 18 6. Pour réinitialiser le témoin d’indication, appuyez sur le bouton dans la partie supérieure droite de la base et branchez la prise secteur de l’unité i1iO en même temps. Maintenez le bouton enfoncé pendant environ cinq secondes jusqu’à ce que le témoin rouge arrête de clignoter.
-
Page 19: General Maintenance
• Do not store or operate the i1iO device in dirty, greasy or dusty environments. The i1iO denen es wärmer als 35 °C oder kälter als 10 °C ist. Lagern Sie das i1iO nicht in Bereichen, in must be protected from chemical agents, corrosive vapors, strong vibration and mechanical denen es wärmer als 50 °C oder kälter als -10 °C ist. - Page 20 • Veillez à ne pas ranger et à ne pas utiliser l’i1iO dans des environnements sales, graisseux i 35 °C o scendono sotto i 10 °C. Non conservare il dispositivo i1iO negli ambienti in cui le ou poussiéreux. Le i1iO doit être protégé contre les agents chimiques, les émanations temperature superano i 50 °C o scendono sotto i -10 °C.
- Page 21 No utilice nunca disolventes alcalinos ni jabón para limpiar esta zona. 白色基準板は常にきれいな状態で保管してください。必要であれば、白色基準板 のセラミックタイルをイソプロピルアルコールを付けた柔らかい布で拭いてくだ さい。セラミックタイルに損傷がなければ、証明書の再発行は必要ありません。 • i1iO está equipado con una cerámica blanca de referencia estable a largo plazo que actúa セラミック白色リファレンスタイルの精度は、i1Diagnosticsでチェックすることが como una referencia secundaria a la referencia blanca suministrada con el instrumento できます。...
-
Page 22: Troubleshooting
Fehlerbehebung Dépannage Soluzione dei problemi Solución de problemas トラブルシューティング 故障排除 Vous pouvez utiliser le logiciel i1Diagnostics si vous estimez que votre i1iO ne fonctionne pas correctement. Dans ce cas, procédez comme suit : 1. Téléchargez le logiciel i1Diagnostics à l’adresse www.xrite.com/i1diagnostics et installez-le sur votre ordinateur. - Page 23 4. If i1Diagnostics software reports an error, store the test report and contact your nearest 3. i1診断ソフトウェアから指示される手順に従って機能チェックを実行します。 X-Rite Support Center. As an alternative you can also take a look at our online support 4. エラーが報告された場合、テストレポートを保存し、エックスライト社の東 resources http://www.xrite.com/i1Profiler to troubleshoot your issue.
-
Page 24: Warranty
Because we recognize the need for advanced support related to using i1Profiler and X-Rite products in various an equal degree of protection, to an authorized X-Rite service center. Proof of purchase in the form of a bill of sale or... -
Page 25: Garantie
Bitte besuchen Sie hierfür unseren Support unter: www.xrite.com/support/i1Profiler Reparatur oder Aust ausch defekter Teile durch X-Rite nicht erneuert bzw. verlängert. X-Rite haftet in keinem Fall für • GRATIS! Unbegrenzter Zugang zu den interaktiven Trainingsoptionen von i1Profiler. Diese sind auch direkt aus Verluste oder Produktions kosten, zusätzliche Betriebskosten, sonstige Auslagen oder Gewinneinbußen, für eine... -
Page 26: Garanzia
• Accesso gratuito al call center e al supporto via e-mail di X-Rite nel corso del periodo di garanzia per i problemi che siano conseguenza della violazione di una qualsiasi delle garanzie precedenti. Non ci sono garanzie che che derivano dall’uso generale del prodotto, subordinatamente ai requisiti seguenti:... -
Page 27: Servicio Y Asistencia
Por ningún motivo intente desmontar el dispositivo i1iO de X-Rite. El desmontaje no autorizado del instrumento anulará todas las solicitudes de garantía. Póngase en contacto con el Soporte o el Centro de Soporte de X-Rite más próximo si considera que el instrumento ya no funciona o bien no funciona correctamente. - Page 28 資産に生じた特別、 間接的、 重要、 付随的な他の損害に責任を負いません。 暗示 ・ 明示、 明確 ・ 含蓄を 無償サポート : 以下を条件とします。 問わずここに設定される保証以外のものはありません。 ここに含まれる保証内容は他のすべての保証 - 正規登録者のユーザー を代表し、 明確 ・ 含蓄を問わず市販性や特定用途への適合性を含めた一切の保証をいたしません。 明 - i1Profilerソフトウェアの最新バージョンが使用されている 確に設定されてない表現または声明は、 エックスライト社を保証などに対して法的に拘束しません。 - 現在サポートされているハードウェアおよびOSで使用されている 保証サービスを取得するには、 お客様は製品を元の箱または同等レベルの保護を提供する箱に梱包 し、 エックスライト社の東京サービスセンターまで実際に持参または輸送費負担で送付する必要があ 様々なワークフローにおいて、 i1Profilerに対する高度なサポートや保証期間後のサポートが必要と ります。 保証期間中にサービスをお受けになる場合は、 領収書などの購入日を証明する記録が必要 なるため、 エックスライト社のカラースペシャリストによる有料サポートおよびトレーニングをご用意 です。 しております。 詳細はwww.xrite.com/i1Profilerをご覧ください。 エックスライト社のi1iOは絶対に分解しないでください。 ユーザーにより分解された場合、 製品保証 は無効となります。 装置が作動しない、 あるいは正しく機能しないと思われる場合はエックスライト社 の東京サービスセンターまでお問い合わせください。...
- Page 29 服务和支持 保修 保修注册 重新鉴定 服务中心请访问 i1iO 网站:http://www.xrite.com ,查询附近的爱色丽服务中心或联系您的爱色丽 要想获取技术支持、保修服务及最新软件更新和产品新闻,请登录:www.xrite.com/register,注册 您的 i1iO 新系统。 经销商以获取详细信息。 保修条款 支持选项 除非本地法规另行规定,自购买之日起十二 (12) 个月内,如果此产品发生物料和工艺上的缺 我们相信,对于您新购买的爱色丽产品,您一定相当满意。同时,我们深谙按需支持和培训在当 陷,爱色丽承担保修义务。在保修期间,爱色丽将自行判断免费更换还是免费维修有缺陷的产品 今快速发展的复杂工作流程中的必要性。因此,我们将向注册用户提供以下在线和免费支持工 部件。(消耗品不在保修范围内。)本保修条款不适用于交付后出现的损坏、任何方式的更改或 具。 因忽视处置而造成损坏的任何产品。对于违反上述保修条款的情况,爱色丽全权负责免费维修或 替换在此保修期内被合理断定为存在缺陷的任何部件。爱色丽所作的任何维修或更换,不会使其 支持工具网址:www.xrite.com/support/i1Profiler 它过期的保修承诺重新生效,也不会使同一保修期限的相应顺延。在任何情况下,对于因违背前 • 可无限次免费访问 i1Profiler 互动培训视频;也可通过 i1Profiler 软件访问培训视频。 述任何保修条款而对买方的制造成本、管理费用、其它花费、利益损失、信誉损失、或对于任何 • 可无限次免费访问爱色丽在线服务台,该服务台提供了与常见问题有关的帮助支持文章。 其它人身或财产造成的特殊、间接、继发、偶然或其它损失,爱色丽概不负责。这里所规定的保 • 如满足下述条件,可在保修期间免费访问爱色丽的电邮支持和电话服务中心,从而咨询常见 修承诺不衍生任何其它明示或暗示的保修条款。此处明确阐述的保修条款将替代所有其它明示或...
-
Page 30: Specification
Specification Technische Daten Spécifications Specifica Especificación 仕様 技术规格 Test chart: i1iO supports optimized testcharts for high-speed scanning measurement and standard testcharts for patch-mode measurement Media length: 230 mm (9”) Media width: 320 mm (12.6”) Media thickness: max. 10 mm (0.39”) Minimal patch size: i1Pro 3 PLUS - 16 x 16 mm (0.63”...
Need help?
Do you have a question about the i1iO and is the answer not in the manual?
Questions and answers