
Related Manuals for Koss MS-547


Summary of Contents for Koss MS-547
- Page 1 OWNER’S MANUAL PLL SYNTHESIZER STEREO RADIO WITH COMPACT DISC PLAYER DIGITAL MS-547...
-
Page 2: Installation
INSTALLATION Notes: • Choose the mounting location where the unit will not interfere with the normal driving function of the driver. • Before finally installing the unit, connect the wiring temporarily and make sure it is all connected up properly and the unit and the system work properly. •... -
Page 3: Din Rear-Mount (Method B)
1. Dashboard 1. Dashboard 2. Nut (5mm) 2. Nut (5mm) 3. Spring washer 3. Spring washer 4. Screw (5 x 25mm) 4. Screw (5 x 25mm) 5. Screw 5. Screw 6. Strap 6. Strap Be sure to use the strap to secure the Be sure to use the strap to secure the back of the unit in place. -
Page 4: Using The Detachable Front Panel
USING THE DETACHABLE FRONT PANEL To Detach the Front Panel 1. Press the release button (REL), then the front panel will be folded down. 2. Remove the front panel by pulling its middle-hand outward. Front Panel 3. For safekeeping, store the front panel in the supplied protective case immediately after being removed. - Page 5 To Reinstall the Front Panel 1. Push the front panel into the main body. A ‘click’ sound should be heard. 2. Note that if the front panel fails to lock in position properly, press control button may not function and LCD display may be missing some segments. Pushing the release button and then reinstall the front panel again.
-
Page 6: Wiring Connection
WIRING CONNECTION CD CHANGER MAIN UNIT CONNECTOR SOCKET ANTENNA CONNECTOR (GREEN) SUBWOOFER CABLE IGNITION (BROWN) SWITCH (B+) Rch RED FRONT RCA CABLE YELLOW MEMORY CHOKE Lch WHITE BACK-UP (GREY) BLACK GROUND (B–) Rch RED REAR RCA CABLE BLUE Lch WHITE POWER ANTENNA WHITE... -
Page 7: Location And Function Of Controls
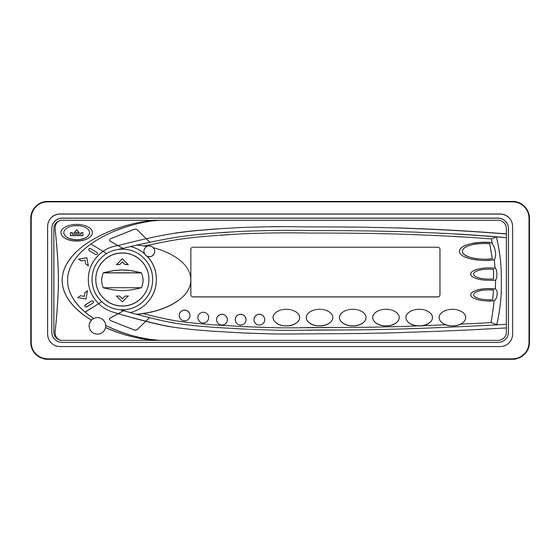
LOCATION AND FUNCTION OF CONTROLS 25 16 (1) ON/OFF Press PWR button (1) to turn on. Press PWR again to turn it off. If the power is off, press BND button (12) or MOD button (13) also can turn on the unit. (2) DISC PLAY Gently insert a compact disc with the label side facing up into the disc slot (2). -
Page 8: Set The Clock
(4) SUB-WOOFER Press SUB.W. button (4) to toggle sub-woofer output, when sub-woofer on, display will show “ SW”. (5) LOCAL/ILLUMINATION Press LOC/ILL button (5) and release immediately to control the brightness of VFD. Press the button for a several seconds to select between local mode and distance mode when tuning. - Page 9 (13) SELECT LISTENING MODE Press MOD button (13) to choose desired listening mode. (e.g. radio mode to CD mode to CDC mode). (14) VACUUM FLUORESCENT DISPLAY The VFD (14) can show the current state of the unit. (15 & 16) SELECT STATIONS Press and release a TUNE/TRACK button (16) or TUNE/TRACK button (15)
- Page 10 (22 & 23) SELECT DISC During CDC mode, press D.DN button (22) to select previous disc and D.UP button (23) to select next disc. ATTENTION: DURING CDC MODE, TURN OFF THE UNIT AND CHANGE THE DISC IN THE CD MAGAZINE, THEN TURN IT ON. IF THE UNIT CAN’T WORK WELL, PLEASE PRESS D.DN BUTTON (22) OR D.UP BUTTON (23) FOR ONE TIME.
-
Page 11: Specification
SPECIFICATION GENERAL Power Supply Requirements : DC 12 Volts, Negative Ground Chassis Dimensions : 178 (W) x 163 (D) x 50 (H) Tone Controls - Bass (at 100 Hz) : +10 dB / –10 dB - Treble (at 10 KHz) : +10 dB / –10 dB Maximum Output Power : 40W x 4 (ch) -
Page 12: Troubleshooting
TROUBLE SHOOTING Before going through the check list, check wiring connection. If any of the problems persist after check list has been made, consult your nearest service dealer. Symptom Cause Solution No power. The car ignition is not on. If the power supply is properly connected to the car accessory terminal, switch the ignition key to “ACC”.
Need help?
Do you have a question about the MS-547 and is the answer not in the manual?
Questions and answers