Advertisement
Quick Links
MA: DS032023/04.2017
Montageanleitung
Installation instructions
HELM GT-L 50
für Holztüren bis 50 kg
ohne Einzugsdämpfung
einflügelig
Türstärken
von 30 - 50 mm
HELM GT-L 50
for timber doors up to 50 kg
without soft closing device
single leaf
(with calculations)
Door thickness from
30 up to 50 mm
(mit Berechnungen)
Advertisement

Related Manuals for Helm GT-L 50


Summary of Contents for Helm GT-L 50
- Page 1 Montageanleitung Installation instructions HELM GT-L 50 für Holztüren bis 50 kg ohne Einzugsdämpfung einflügelig (mit Berechnungen) Türstärken von 30 - 50 mm HELM GT-L 50 for timber doors up to 50 kg without soft closing device single leaf (with calculations)
-
Page 2: Technische Informationen
HELM GT-L 50 Allgemeine Informationen / General information Technische Informationen Technical information • maximales Flügelgewicht 50 kg • Maximum leaf weight 50 kg • alle Abmessungen in Millimeter • all dimensions in millimeter Benötigtes Werkzeug / Required tools SW 3 / 4 Nm AF 3 / 4 Nm SW 8, 10, 13 Größe 2,5 / 3 / 4... - Page 3 HELM GT-L 50 Allgemeine Informationen / General information Lieferumfang Scope of delivery 1. Laufschiene / Track 6. Fangstopper rechts / Door catcher, right-hand side 2. Blende / Pelmet 7. Untere Führung / Bottom guide 3. Abdeckkappen / Caps 8. Befestigungswinkel Rollapparat / 4. Rollapparat /...
-
Page 4: Montage / Installation
HELM GT-L 50 Montage / Installation Türabstand bei Wandmontage Door space with wall mount Türabstand Door space (TA) TA = 23,2 – Y Abstand Führung Space lead (AF): AF = (TD : 2) + TA Legende: Legend: TA = Türabstand TA = Door space AF = Abstand Führung... - Page 5 HELM GT-L 50 Montage / Installation Wandmontage Deckenmontage Wall mount Ceiling mount Bohrhöhe (BH) Türhöhe (TH) Drilling height (BH): Door height (TH): BH = LH + X + 35 TH = LH – 61 – 10 Türhöhe (TH) Door heigth (TH): TH = BH – 39 – 10...
- Page 6 HELM GT-L 50 Montage / Installation Wandmontage Deckenmontage Wall mount Ceiling mount Bohrhöhe (BH) Türhöhe (TH) Drilling height (BH): Door height (TH): BH = LH + X + 35 TH = LH – 61 – 10 Türhöhe (TH) Door heigth (TH): TH = BH – 39 – 10...
- Page 7 HELM GT-L 50 Montage / Installation Wandmontage Deckenmontage Wall mount Ceiling mount Bohrhöhe (BH) Türhöhe (TH) Drilling height (BH): Door height (TH): BH = LH + X + 35 TH = LH – 61 – 10 Türhöhe (TH) Door heigth (TH): TH = BH – 39 – 10...
- Page 8 HELM GT-L 50 Montage / Installation Wandmontage Deckenmontage Wall mount Ceiling mount Bohrhöhe (BH) Türhöhe (TH) Drilling height (BH): Door height (TH): BH = LH + X + 35 TH = LH – 61 – 10 Türhöhe (TH) Door heigth (TH): TH = BH – 39 – 10...
- Page 9 HELM GT-L 50 Montage / Installation Wandmontage Deckenmontage Wall mount Ceiling mount Bohrhöhe (BH) Türhöhe (TH) Drilling height (BH): Door height (TH): BH = LH + X + 35 TH = LH – 61 – 10 Türhöhe (TH) Door heigth (TH): TH = BH – 39 – 10...
- Page 10 HELM GT-L 50 Montage / Installation Wandmontage Deckenmontage Wall mount Ceiling mount Bohrhöhe (BH) Türhöhe (TH) Drilling height (BH): Door height (TH): BH = LH + X + 35 TH = LH – 61 – 10 Türhöhe (TH) Door heigth (TH): TH = BH – 39 – 10...
- Page 11 HELM GT-L 50 Montage / Installation Montage Installation Größe 2,5 Size 2,5 Die Fangstopper stirnseitig in die Laufschiene einschieben und am jeweiligen Schienenende grob positionieren, ohne eine Befestigungsbohrung zu verdecken. Slide door catchers into track and position in desired location without covering any fixing bore holes.
- Page 12 HELM GT-L 50 Montage / Installation Montage Installation Die Laufschiene waagerecht und lotrecht an die Wand bzw. Decke montieren. Wichtig: Nur Befestigungsmaterial verwenden, das für den vorhandenen Untergrund geeignet ist. Install track level either onto wall or ceiling. NOTE: Fix track only with suitable load bearing materials (stud or solid wood blocking).
- Page 13 HELM GT-L 50 Montage / Installation Montage Installation SW 8 / AF 8 Größe 3 / Size 3 Die Sicherungsschraube (1) an den Rollapparaten soweit herunter drehen, bis sie mit dem Rollapparat bündig ist. Lower safety screw (1) on the trolleys until it is flush with trolley.
- Page 14 HELM GT-L 50 Montage / Installation Montage Installation Mit einem Lot die Position der unteren Führung ermitteln. Bohr- bild übertragen, bohren und die untere Führung befestigen. Use a plumb bob to determine the position of the bottom guide. Transfer drilling pattern, drill and fix the bottom guide.
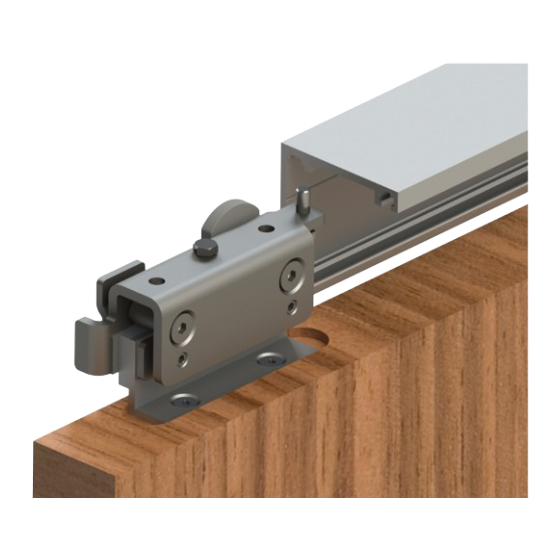
- Page 15 HELM GT-L 50 Montage / Installation Montage Installation Wichtig: Die Laufflächen der Schiene und die Rollen vor dem Einsetzen des Türblattes säubern. Die Rollapparate sind mit wartungsfreien Kugellagern ausgestattet und dürfen nicht nachgefettet werden. as Türblatt in die Laufschiene hängen und über die Sechs- kantschraube (2) mit Hilfe einer Wasserwaage ausrichten.
- Page 16 HELM GT-L 50 Montage / Installation Montage Installation Blende nach Abbildung unten an den Klemmadaptern ansetzen und an der oberen Klemmstelle andrücken. Place pelmet at the bottom part of the clamp adapter and clip-on at the top. Die Stirnseiten der Profile mit z.B. UV-Spezialreiniger oder Aceton reinigen, anschließend die Abdeckkappen seitlich auf die Blende kleben.
-
Page 17: Wartung
HELM GT-L 50 Pflege- und Wartungshinweise / Service notes Pflege Care Die Reinigung von eloxiertem Aluminium darf nicht mit Säuren oder anderen alkalischen Reinigern erfolgen. Weiterhin sollten zur Reinigung keine Scheuer- mittel und auch keine Stahlwolle verwendet werden. Staub, Flecken und leichte Verschmutzungen lassen sich mit lauwarmem Wasser entfernen. - Page 18 Woelm GmbH Woelm Austria GmbH Hasselbecker Str. 2- 4 Seewalchen 5a D - 42579 Heiligenhaus A - 5201 Seekirchen Tel.: + 49 (0) 20 56 - 18 - 0 Tel.: + 43 (0) 62 12 - 25 02 Fax: + 49 (0) 20 56 - 18 - 21 Fax: + 43 (0) 62 12 - 69 95 www.woelm.de www.woelm.at...
Need help?
Do you have a question about the GT-L 50 and is the answer not in the manual?
Questions and answers