Advertisement
Quick Links
1.
2.
1
B
3.
A
4
3
2
C
6
5
Desmontar y desestimar los tornillos (A) del transpor-
tin trasero original.
Remove and put aside the screws (A) of the original
rear carrying case.
Démonter et rejeter les vis (A) du siège arrière origi-
nel.
Schrauben (A) des hinteren Originalgepäckträgers
abnehmen und beiseite legen.
Smontare e scartare le viti (A) del sedile posteriore
originale.
2
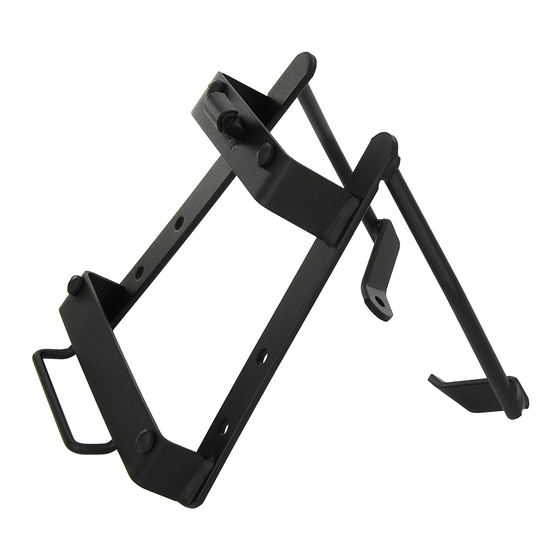
Posicionar los distanciadores (1).
Position the spacers (1).
Placer les entretoises (1).
Abstandshalter (1) anbringen.
Posizionare i distanziatori (1).
A continuación montar el soporte KIT TOP (2) en
zona (B), mediante los distanciadores (1) las arande-
las (3) y los tornillos (4).
Y en zona (C), mediante los tornillos (5) y las arande-
las (6).
Next, assemble the Kit Top support (2) in area (B)
using the spacers (1), washers (3), and screws (4).
And in area (C) using the screws (5) and the washers
(6).
Ensuite monter le support KIT TOP (2) dans la zone
(B), avec les entretoises (1) les rondelles (3) et les
vis (4).
Et dans la zone (C), avec les vis (5) et les rondelles
(6).
Anschließend KIT TOP Stütze (2) in der Zone (B), mit
Hilfe der Abstandshalter (1), der Scheiben (3) und
der Schrauben (4) anmontieren.
Und in der Zone (C), mit Hilfe der Schrauben (5) und
der Scheiben (6).
In seguito montare il supporto KIT TOP (2) nella zona
(B), con i distanziatori (1) le rondelle (3) e le viti (4).
E nella zona (C), con le viti (5) e le rondelle (6).
Advertisement

Subscribe to Our Youtube Channel
Related Manuals for Shad NADSA W0FG64ST


Summary of Contents for Shad NADSA W0FG64ST
- Page 1 Desmontar y desestimar los tornillos (A) del transpor- tin trasero original. Remove and put aside the screws (A) of the original rear carrying case. Démonter et rejeter les vis (A) du siège arrière origi- nel. Schrauben (A) des hinteren Originalgepäckträgers abnehmen und beiseite legen.
- Page 2 Para poder desmontar la tapeta del transportin trasero de la moto (D), reali- ce los diferentes pasos según nos mues- tra los dibujos ( E-F-G ). To be able to disassemble the cover of the rear carrying case (D) of the motorcycle, follow the steps as shown in our diagrams ( E-F-G ).
- Page 3 Consejo para un correcto montaje del kit: No apretar los tornillos del todo hasta asegurarse que el KIT esta correctamente colocado y alineado. Este modelo de KIT es compatible con las maletas laterales originales de BMW. Advice for correct fitting of the kit: Do not fully tighten the screws until it is ensured that the KIT is correctly attached and aligned. This KIT model is compatible with the BMW´s original side cases.
- Page 5 Consejo para un correcto montaje del kit: No apretar los tornillos del todo hasta asegurarse que el KIT está correctamente colocado y alineado. Nota: Este soporte no es compatible con las maletas laterales originales de BMW. Advice for correct fitting of the kit: Do not fully tighten the screws until sure that the kit is correctly positioned and aligned. Note: this support is not compatible for original lateral suitcases of BMW.
- Page 6 (5) y traseros (6). Fitting of D1B50PA luggage rack: Assemble the luggage rack of Shad (A) according to the template, by means of inside sheets, and fix them by using the screws (3), washers (4), front spacers (5) and back (6).
- Page 7 Consejo para un correcto montaje del kit: No apretar los tornillos del todo hasta asegurarse que el KIT esté correctamente colocado y alineado. Advice for correct fitting of the kit: Do not fully tighten the screws until it is ensured that the KIT is correctly attached and aligned.
- Page 8 ATENCION: Este soporte KIT TOP no es compatible con el equipamiento original de maletas de BMW. ATTENTION: This KIT TOP rack is not compatible with the original equipment for BMW cases. ATTENTION: Ce support KIT TOP n’est pas compatible avec l’équipement original de valises BMW. ACHTUNG: Die Stützen KIT TOP sind nicht kompatibel mit der originalen Kofferausstattung von BMW.
- Page 9 Consejo para un correcto montaje del kit: No apretar los tornillos del todo hasta asegurarse que el KIT esté correctamente colocado y alineado. Advice for correct fitting of the kit: Do not fully tighten the screws until it is ensured that the KIT is correctly attached and aligned.
- Page 10 Consejo para un correcto montaje del kit: No apretar los tornillos del todo hasta asegurarse que el KIT está correctamente colocado y alineado. Nota importante: No montar el modelo SH50 sobre este soporte. Advice for correct fitting of the kit: Do not fully tighten the screws until it is ensured that the KIT is correctly attached and aligned.
- Page 11 Consejo para un correcto montaje del kit: No apretar los tornillos del todo hasta asegurarse que el KIT está correctamente colocado y alineado. Nota: Este soporte no es compatible con las maletas laterales originales de BMW. Advice for correct fitting of the kit: Do not fully tighten the screws until sure that the kit is correctly positioned and aligned. Note: this support is not compatible for original lateral suitcases of BMW.
- Page 12 Consejo para un correcto montaje del kit: No apretar los tornillos del todo hasta asegurarse que el KIT está correctamente colocado y alineado. Nota: Este soporte no es compatible con las maletas laterales originales de BMW. Advice for correct fitting of the kit: Do not fully tighten the screws until sure that the kit is correctly positioned and aligned. Note: this support is not compatible for original lateral suitcases of BMW.
Need help?
Do you have a question about the NADSA W0FG64ST and is the answer not in the manual?
Questions and answers