Table of Contents
Advertisement
Available languages
Available languages
Quick Links
Vulsini
Elektrischer Kamin
Fireplace Heater
Cheminée électrique
Camino elettrico
Chimenea eléctrica
10035037 10035038
10035039 10035040
Hinweis: Dieses Produkt ist nur für gut isolierte Räume
oder für den gelegentlichen Gebrauch geeignet.
Note: This product is only suitable for well insulated
spaces or occasional use.
Advertencia: Este producto está indicado únicamente
en lugares abrigados o para una utilización punctual.
Remarque : Ce produit ne peut être utilisé que dans des
locaux bien isolés ou de manière occasionnelle.
Nota: Questo prodotto è adatto solo per spazi ben
isolati o uso occasionale.
Advertisement
Chapters
Table of Contents

Related Manuals for Klarstein Vulsini


Summary of Contents for Klarstein Vulsini
- Page 1 Vulsini Hinweis: Dieses Produkt ist nur für gut isolierte Räume Elektrischer Kamin oder für den gelegentlichen Gebrauch geeignet. Fireplace Heater Note: This product is only suitable for well insulated Cheminée électrique spaces or occasional use. Camino elettrico Advertencia: Este producto está indicado únicamente en lugares abrigados o para una utilización punctual.
-
Page 3: Table Of Contents
Sicherheitshinweise 4 English 39 Español 75 Geräteübersicht 5 Français 111 Displayanzeigen 6 Italiano 147 Inbetriebnahme und Bedienung 7 Fehlerbehebung 1 1 Hinweise zur Entsorgung 14 Hersteller 14 Installation Vulsini Dawn 15 Installation Vulsini Nightfall 24 Installation Vulsini Hideaway 32 TECHNISCHE DATEN Artikelnummer 10035037 10035038 Artikelname Vulsini Vulsini Dawn Stromversorgung 220-240 V ~ 50 Hz... -
Page 4: Sicherheitshinweise
SICHERHEITSHINWEISE • Prüfen Sie vor der Benutzung die Angabe zur Spannung auf dem Typenschild und schließen Sie das Gerät nur an Steckdosen an, die der Nennspannung des Geräts entsprechen. • Falls das Netzkabel beschädigt ist, lassen Sie es von einer ausgebildeten Fachkraft ersetzen. •... -
Page 5: Geräteübersicht
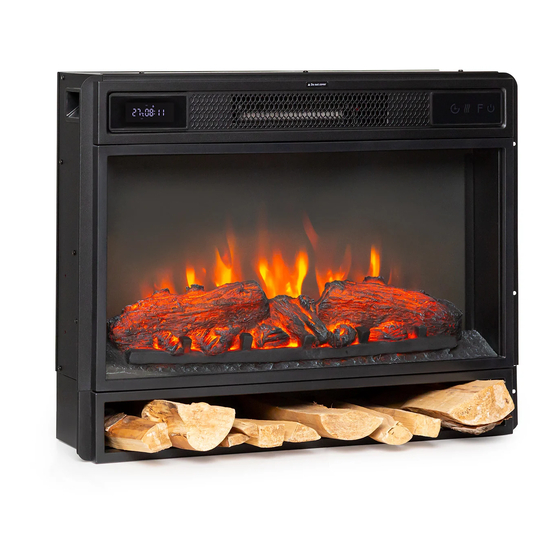
GERÄTEÜBERSICHT Vorderansicht Display Bedienfeld Hinweis: • Das Gerät kann sowohl mit der im Lieferumfang enthaltenen Fernbedienung als auch mit dem Bedienfeld, welches sich auf der rechten oberen Seite des Gerät befindet, verwendet werden. • Das Gerät verfügt über einen Netzschalter, über welchen die Stromzufuhr reguliert wird. -
Page 6: Displayanzeigen
Rückansicht Hauptschalter DISPLAYANZEIGEN Timeranzeige F°/ C° Flammenanzeige Temperatur Heizanzeige Hintergrundeleuchtung Holz-Knistern Zeit Timermodus Auto-Modus Timer-Endzeit Wochentag Timer-Startzeit... -
Page 7: Inbetriebnahme Und Bedienung
Hinweis: Wenn Sie den Kamin einschalten, leuchtet die Zeit auf. Nach 60 Sekunden geht der Kamin automatisch aus. Sie können ihn mit einer beliebigen Taste wieder einschalten. Die Hintergrundbeleuchtung und die Funktion „Holz-Knistern“ sind bei diesem Modell nicht verfügbar. INBETRIEBNAHME UND BEDIENUNG Manuelle Bedienung Timer Heizfunktion... - Page 8 Verwendung der Fernbedienung Stellen Sie vor der Verwendung der Fernbedienung sicher, dass der Netzstecker des Geräts eingesteckt ist und dass sich der Netzschalter in der Position „ON“ befindet. Hinweis: Stellen Sie bei der Verwendung der Fernbedienung sicher, dass Sie die Fernbedienung auf den Bildschirm des Geräts ausrichten, wenn Sie eine der Tasten drücken.
- Page 9 Funktion Beschreibung Einstellung Zeiteinstellung: Halten Sie das Einstellungssymbol 3 Sekunden lang gedrückt, bis „00:00“ blinkt. Drücken Sie die Taste [+] um die Stunde und [-] um die Minute einzustellen. Wöchentlicher Timer Drücken Sie auf das Zahnradsymbol, um den wöchentlichen Timer zu aktivieren und drücken Sie anschließend auf das Kalendersymbol, um Sonntag –...
- Page 10 Wichtige Hinweise zum Batteriewechsel • Alte und neue Batterien dürfen nicht gemischt werden. • Verwenden Sie nur Standard AAA-Batterien. Achten Sie darauf, dass Kinder die Batterien nicht verschlucken. • Nicht-aufladbare Batterien dürfen nicht wieder aufgeladen werden. • Setzen Sie die Batterien mit korrekter Polarität ein (siehe Abbildung).
-
Page 11: Fehlerbehebung 1
FEHLERBEHEBUNG Problem Mögliche Ursache Lösungsansatz Auf dem Bildschirm wird Kurzschluss. Kontaktieren Sie den „EE“ angezeigt. Kundendienst, damit der Thermostatsensor ausgetauscht wird Auf dem Bildschirm wird Es wird keine warme Luft Bringen Sie den „88“ angezeigt. ausgeblasen und der Netzschalter in die Ventilator funktioniert Position „off“... - Page 12 Problem Mögliche Ursache Lösungsansatz Es wird keine warme Luft Abkühlzyklus Der normale Betrieb wird ausgeblasen. vor dem Ausschalten für einige Minuten fortgesetzt. Die Zeit hängt von der aktuellen Temperatur ab. Während dieser Zeit wird kalte Luft ausgeblasen. Die Thermostateinstellung Passen Sie die verhindert, dass die Temperatureinstellung so Heizfunktion aktiviert...
- Page 13 Problem Mögliche Ursache Lösungsansatz Die Fernbedienung Keine Batterien. Ersetzen Sie die Batterien funktioniert nicht, wenn Schlechte Achten Sie darauf, dass Tasten gedrückt werden. Signalübertragung. die Entfernung zwischen Transmitter und Receiver nicht zu groß ist. Drücken Sie die Tasten der Fernbedienung mit einer gleichmäßigen Bewegung und sanftem Druck.
-
Page 14: Hinweise Zur Entsorgung
HINWEISE ZUR ENTSORGUNG Befindet sich die linke Abbildung (durchgestrichene Mülltonne auf Rädern) auf dem Produkt, gilt die Europäische Richtlinie 2012/19/EU. Diese Produkte dürfen nicht mit dem normalen Hausmüll entsorgt werden. Informieren Sie sich über die örtlichen Regelungen zur getrennten Sammlung elektrischer und elektronischer Gerätschaften. -
Page 15: Installation Vulsini Dawn
INSTALLATION VULSINI DAWN Übersicht... - Page 16 Teileliste Beschreibung Stk. Obere Platte Untere Platte Linke Seitenplatte Rechte Seitenplatte Oberes kleines Brett Linke Frontplatte Rechte Frontplatte Linker Fuß Rechter Fuß Linkes kleines Brett Rechtes kleines Brett Elektrischer Kamin Beschreibung Stk. Kreuzschlitzschraube 38 + 1 Metallklemme Dübel Schraube Platte mit 2 Schrauben M4*12 Gewindeschneidschraube Antikippvorrichtung...
- Page 17 Zusammenbau...
- Page 22 Schieben Sie den Elektrischen Kamin in das Gehäuse und befestigen Sie ihn mit den M4*12 Schrauben.
- Page 23 Mauer Eine Seite des Seils wird mit einer Schraube an der Wand befestigt, die andere Seite des Seils wird auf dem Kaminsims befestigt und dann das Seil enger gezogen.
-
Page 24: Installation Vulsini Nightfall
INSTALLATION VULSINI NIGHTFALL Übersicht... - Page 25 Teileliste Beschreibung Stk. Obere Platte Untere Platte Linke Seitenplatte Rechte Seitenplatte Linke Frontplatte Rechte Frontplatte Obere Frontplatte Linke Rückplatte Rechte Rückplatte Fußleiste Einstebbares Regal Elektrischer Kamin Beschreibung Stk. Metallbolzen 19 + 1 Metallnocke 19 + 1 Dübel 24 + 1 Schraube Regalstift 16 + 1...
- Page 26 Zusammenbau...
- Page 31 Schieben Sie den Elektrischen Kamin in das Gehäuse und befestigen Sie ihn mit den M4*12 Schrauben.
-
Page 32: Installation Vulsini Hideaway
INSTALLATION VULSINI HIDEAWAY Übersicht... - Page 33 Teileliste Beschreibung Stk. Obere Platte Untere Platte Seitenplatte Frontplatte Elektrischer Kamin Beschreibung Stk. Metallbolzen Metallklemme Dübel Schraube Verbindungsstück M4*12 Gewindeschneidschraube...
- Page 34 Zusammenbau...
- Page 37 Schieben Sie den Elektrischen Kamin in das Gehäuse und befestigen Sie ihn mit den M4*12 Schrauben.
- Page 39 CONTENT Safety Instructions 40 Device Overview 41 Display Indicators 42 Start-up and Operation 43 Troubleshooting 47 Hints on Disposal 50 Producer 50 Installation Vulsini Dawn 51 Installation Vulsini Nightfall 60 Installation Vulsini Hideaway 68 TECHNICAL DATA Item number 10035037 10035038 Item name Vulsini Vulsini Dawn...
-
Page 40: Safety Instructions
SAFETY INSTRUCTIONS • Check that the voltage indicates on the data plate corresponds with that of the local network before connecting the appliance to the mains power supply. • If the supply cord is damaged, it must be replaced by a qualifi ed engineer in order to avoid a hazard. -
Page 41: Device Overview
DEVICE OVERVIEW Front view Display Control panel Note: • The device can be used with the supplied remote control as well as with the control panel, which is located on the upper right side of the device. • The unit has a power switch which regulates the power supply. The power switch must be in the „On“... -
Page 42: Display Indicators
Rear view Main switch DISPLAY INDICATORS Timer F°/ C° Flame indicator Temperature Heater Backlight Wood Cracking Time Timer mode Auto mode Timer shutdown Weekday Timer start... -
Page 43: Start-Up And Operation
Note: When you switch on the heater, the time will light up. After 60 seconds the heater will automatically switch off. You can switch it on again with any button. Backlight and the Wood Cracking function are not available on this model. START-UP AND OPERATION Manual operation Heating... - Page 44 Using the Remote Control Before using the remote control, make sure that the power plug of the appliance is plugged in and that the power switch is in the „ON“ position. Note: When using the remote control, make sure that you align the remote control with the screen of the product when you press any of the buttons.
- Page 45 Function Description Setting Time setting: Press and hold the setting symbol for 3 seconds until "00:00" flashes. Press the [+] button to set the hour and [-] to set the minute. Weekly timer Press the gear icon to activate the weekly timer and then press the calendar icon to select Sunday - Saturday.
- Page 46 Important notes on battery replacement • Old and new batteries must not be mixed. • Use only standard AAA batteries. Make sure that children do not swallow the batteries. • Non-rechargeable batteries must not be recharged. • Insert the batteries with correct polarity (see illustration).
-
Page 47: Troubleshooting
TROUBLESHOOTING Problem Possible cause Approach EE" is displayed on the Short circuit. Contact customer service screen. to have the thermostat sensor replaced 88" is displayed on the No warm air is blown out Set the power switch to screen. and the fan does not work. the "off"... - Page 48 Problem Possible cause Approach No warm air is blown out. Cooling cycle Normal operation will continue for a few minutes before switching off. The time depends on the current temperature. Cold air is blown out during this time. The thermostat setting Adjust the temperature prevents the heating setting so that the...
- Page 49 Problem Possible cause Approach The remote control does No batteries. Replace the batteries not work when buttons are Poor signal transmission. Make sure that the pressed. distance between transmitter and receiver is not too great. Press the buttons on the remote control with a smooth movement and gentle pressure.
-
Page 50: Hints On Disposal
HINTS ON DISPOSAL According to the European waste regulation 2012/19/EU this symbol on the product or on its packaging indicates that this product may not be treated as household waste. Instead it should be taken to the appropriate collection point for the recycling of electrical and electronic equipment. -
Page 51: Installation Vulsini Dawn
INSTALLATION VULSINI DAWN Overview... - Page 52 Parts List Description Obere Platte Untere Platte Linke Seitenplatte Rechte Seitenplatte Oberes kleines Brett Linke Frontplatte Rechte Frontplatte Linker Fuß Rechter Fuß Linkes kleines Brett Rechtes kleines Brett Elektrischer Kamin Description Kreuzschlitzschraube 38 + 1 Metallklemme Dübel Schraube Platte mit 2 Schrauben M4*12 Gewindeschneidschraube Antikippvorrichtung...
- Page 53 Assembly...
- Page 58 Slide the electric fireplace into the housing and fasten it with the M4*12 screws.
- Page 59 Wall One side of the cable is fixed to the wall with a screw, the other side of the cable is fixed to the mantelpiece and then the cable is tightened.
-
Page 60: Installation Vulsini Nightfall
INSTALLATION VULSINI NIGHTFALL Overview... - Page 61 Parts list Description Upper plate Lower plate Left side plate Right side plate Left front panel Right front panel Upper front panel Left back plate Right rear panel Baseboard Adjustable shelf Electric fireplace Description Metal bolts 19 + 1 Metal cam 19 + 1 Dowels 24 + 1...
- Page 62 Assembly...
- Page 67 Slide the electric fireplace into the housing and fasten it with the M4*12 screws.
-
Page 68: Installation Vulsini Hideaway
INSTALLATION VULSINI HIDEAWAY Overview... - Page 69 Parts list Description Upper plate Lower plate Side plate Front panel Electric fireplace Description Metal bolts Metal clamp Dowels Screw Connector M4*12 thread tapping screw...
- Page 70 Assembly...
- Page 73 Slide the electric fireplace into the housing and fasten it with the M4*12 screws.
- Page 75 Indicaciones de seguridad 76 Descripción del aparato 77 Indicadores de la pantalla 78 Puesta en marcha y funcionamiento 79 Solución de problemas 83 Retirada del aparato 86 Fabricante 86 Instalación vulsini dawn 87 Instalación vulsini nightfall 96 Instalación vulsini hideaway 104 DATOS TÉCNICOS Número del artículo 10035037 10035038 Nombre del artículo...
-
Page 76: Indicaciones De Seguridad
INDICACIONES DE SEGURIDAD • Antes de utilizar el aparato, compruebe la tensión en la placa técnica del mismo y conecte el aparato solamente a tomas de corriente que se adecuen a dicha tensión. • Si el cable de alimentación está dañado, deberá ser sustituido por un servicio técnico. •... -
Page 77: Descripción Del Aparato
DESCRIPCIÓN DEL APARATO Delantera Pantalla Panel de mando Nota: • La unidad puede utilizarse con el mando a distancia suministrado, y con el panel de control, que se encuentra en la parte superior derecha de la unidad. • La unidad tiene un interruptor de encendido que regula el suministro de energía. El interruptor de encendido debe estar en la posición „On“... -
Page 78: Indicadores De La Pantalla
Vista posterior Interruptor principal INDICADORES DE LA PANTALLA Indicador del temporizador F°/ C° Indicador de la llama Indicador de Temperatura Iluminación de fondo calentamiento Crepitar del madera Tiempo Temporizador Modo automático Fin del temporizador Días de la semana Comienzo del temporizador... -
Page 79: Puesta En Marcha Y Funcionamiento
Nota: Cuando encienda el calentador, el tiempo se iluminará. Después de 60 segundos el calentador se apagará automáticamente. Puedes volver a encenderlo con cualquier botón. La retroiluminación y la función Wood Crackle no están disponibles en este modelo. PUESTA EN MARCHA Y FUNCIONAMIENTO Uso manual Temporizador Función... - Page 80 Uso del control remoto Antes de usar el mando a distancia, asegúrese de que el enchufe de la unidad está conectado y que el interruptor de encendido está en la posición “ON“. Nota: Cuando utilice el mando a distancia, asegúrese de dirigirlo hacia la pantalla del dispositivo cuando pulse uno de los botones.
- Page 81 Función Descripción Configuración Ajuste de la hora: Mantenga pulsado el símbolo de ajuste durante 3 segundos hasta que „00:00“ parpadee. Presione [+] para fijar la hora y [-] para fijar los minutos. Programador semanal y luego haga clic en el icono del calendario para seleccionar el domingo - sábado.
- Page 82 Notas importantes sobre el reemplazo de las pilas • Las pilas viejas y nuevas no deben mezclarse. • Utilice sólo pilas AAA estándar. Asegúrese de que los niños no se traguen las pilas. • Las pilas no recargables no deben ser recargadas.
-
Page 83: Solución De Problemas
SOLUCIÓN DE PROBLEMAS Problema Posible causa Solución En la pantalla aparece Cortocircuito Contacte con el servicio “EE” de atención al cliente para que le cambien el sensor del termostato En la pantalla aparece No sale aire caliente y el Ponga el interruptor de “88“... - Page 84 Problema Posible causa Solución No sale aire caliente. Ciclo de enfriamiento El funcionamiento normal continuará durante unos minutos antes de apagarse. El tiempo depende de la temperatura actual. El aire frío se expulsa durante este tiempo. El ajuste del termostato Ajuste la temperatura impide que se active la de manera que el...
- Page 85 Problema Posible causa Solución El mando no funciona al Las pilas están gastadas Cambie las pilas pulsar los botones Hay mala conexión Asegúrese de que la distancia entre el mando y el receptor no es demasiado larga. Presione los botones del mando a distancia con un movimiento suave y una suave presión.
-
Page 86: Retirada Del Aparato
RETIRADA DEL APARATO Si el aparato lleva adherida la ilustración de la izquierda (el contenedor de basura tachado) entonces rige la normativa europea, directiva 2012/19/UE. Este producto no debe arrojarse a un contenedor de basura común. Infórmese sobre las leyes territoriales que regulan la recogida separada de aparatos eléctricos y electrónicos. -
Page 87: Instalación Vulsini Dawn
INSTALACIÓN VULSINI DAWN Vista general... - Page 88 Lista de piezas Núm. Descripción Uds. Panel superior Panel inferior Panel lateral izquierdo Panel lateral derecho Tablero pequeño superior Panel delantero izquierdo Panel delantero derecho Pata izquierda Pata derecha Tablero pequeño izquierdo Tablero pequeño derecho Chimenea eléctrica Núm. Descripción Uds. Tornillo de estrella 38 + 1 Abrazadera metálica...
- Page 89 Montaje...
- Page 94 Desplace la chimenea eléctrica hacia el interior de la estructura y fíjela con los tornillos M4x12.
- Page 95 Pared Una parte del cable queda fijado a la pared con un tornillo, mientras que la otra parte se fija a la repisa y luego se tensa el cable.
-
Page 96: Instalación Vulsini Nightfall
INSTALACIÓN VULSINI NIGHTFALL Vista general... - Page 97 Lista de piezas Núm. Descripción Uds. Panel superior Panel inferior Panel lateral izquierdo Panel lateral derecho Panel delantero izquierdo Panel delantero derecho Panel delantero superior Panel trasero izquierdo Panel trasero derecho Listón Balda ajustable Chimenea eléctrica Núm. Descripción Uds. Perno metálico 19 + 1 Leva metálica 19 + 1...
- Page 98 Montaje...
- Page 103 Desplace la chimenea eléctrica hacia el interior de la estructura y fíjela con los tornillos M4x12.
-
Page 104: Instalación Vulsini Hideaway
INSTALACIÓN VULSINI HIDEAWAY Vista general... - Page 105 Lista de piezas Núm. Descripción Uds. Panel superior Panel inferior Panel lateral Panel delantero Chimenea eléctrica Núm. Descripción Uds. Perno metálico Abrazadera metálica Taco Tornillo Conector Tornillo autorroscante M4x12...
- Page 106 Montaje...
- Page 109 Desplace la chimenea eléctrica hacia el interior de la estructura y fíjela con los tornillos M4x12.
- Page 111 Aperçu de l‘appareil 1 13 Affichages de l‘écran 1 14 Mise en marche et utilisation 1 15 Résolution des problèmes 1 19 Informations sur le recyclage 122 Fabricant 122 Installation de la vulsini dawn 123 Installation de la vulsini nightfall 132 Installation de la vulsini hideaway 140 FICHE TECHNIQUE Numéro d'article 10035037...
-
Page 112: Consignes De Sécurité 1
CONSIGNES DE SÉCURITÉ • Avant utilisation, vérifi ez la tension sur l‘étiquette de l‘appareil et ne branchez l‘appareil que sur des prises correspondant à la tension de l‘appareil. • Si le câble d‘alimentation est endommagé, faites-le remplacer par un professionnel qualifi é. -
Page 113: Aperçu De L'appareil 1
APERÇU DE L‘APPAREIL Vue de face Ecran Panneau de commande Remarque : • L‘appareil peut être utilisé à la fois avec la télécommande incluse et avec le panneau de commande situé sur le côté supérieur droit de l‘appareil. • L‘appareil dispose d‘un interrupteur d‘alimentation qui régule l‘alimentation. L‘interrupteur d‘alimentation doit être en position „On“... -
Page 114: Affichages De L'écran 1
Vue de dos Interrupteur principal AFFICHAGES DE L‘ÉCRAN Affichage de la F°/ C° Témoin de flamme minuterie Témoin de Température Rétroéclairage chauffage Crépitement du bois Heure Mode minuterie Heure de fin de la Mode auto Jour de la semaine minuterie Heure de début de la minuterie... -
Page 115: Mise En Marche Et Utilisation 1
Remarque : Lorsque vous allumez la cheminée, l‘heure s‘allume. Après 60 secondes, la cheminée s‘éteint automatiquement. Vous pouvez la rallumer avec n‘importe quelle touche. Le rétroéclairage et la fonction „crépitement du bois“ ne sont pas disponibles sur ce modèle. MISE EN MARCHE ET UTILISATION Utilisation manuelle Minuterie Fonction... - Page 116 Utilisation de la télécommande Avant d‘utiliser la télécommande, assurez-vous que la fiche d‘alimentation de l‘appareil est branchée et que l‘interrupteur d‘alimentation est en position „ON“. Remarque : Lorsque vous utilisez la télécommande, assurez-vous de la pointer vers l‘écran de l‘appareil lorsque vous appuyez sur l‘une des touches. Un son est émis. Il peut y avoir un léger retard dans la transmission du signal de l‘émetteur au récepteur.
- Page 117 Fonction Description Paramètre Réglage de l'heure : maintenez le symbole de réglage pendant 3 secondes jusqu'à ce que "00:00" clignote. Appuyez sur la touche [+] pour régler l'heure et [-] pour les minutes. Minuterie Appuyez sur l'icône d'engrenage pour activer hebdomadaire la minuterie hebdomadaire, puis sur l'icône de calendrier pour sélectionner dimanche-samedi.
- Page 118 Remarques importantes pour le changement des piles • Ne mélangez pas des piles neuves et des piles usagées. • Utilisez uniquement des piles AAA standard. Assurez-vous que les enfants n‘avalent pas les piles. • Ne rechargez pas des piles non rechargeables. •...
-
Page 119: Résolution Des Problèmes 1
RÉSOLUTION DES PROBLÈMES Problème Cause possible Solution L'écran affiche "EE". Court-circuit. Contactez le service client pour faire remplacer la sonde du thermostat L'écran affiche "88". L'appareil ne souffle Mettez l'interrupteur pas d'air chaud et le d'alimentation sur "off" ventilateur ne fonctionne et attendez au moins pas. - Page 120 Problème Cause possible Solution Pas de production d'air Cycle de refroidissement Le fonctionnement chaud. normal continue pendant quelques minutes avant de s'éteindre. La durée dépend de la température actuelle. Pendant ce temps, l'appareil souffle de l'air froid. Le réglage du thermostat Réglez la température de empêche l'activation de la sorte que le thermostat...
- Page 121 Problème Cause possible Solution La télécommande ne Pas de piles. Remplacez les piles fonctionne pas les touches Mauvaise transmission du Assurez-vous que la ne réagissent pas. signal. distance entre l'émetteur et le récepteur n'est pas trop grande. Appuyez doucement sur les touches de la télécommande avec un mouvement régulier.
-
Page 122: Informations Sur Le Recyclage
INFORMATIONS SUR LE RECYCLAGE Vous trouverez sur le produit l’image ci-contre (une poubelle sur roues, barrée d‘une croix), ce qui indique que le produit se trouve soumis à la directive européenne 2012/19/UE. Renseignez- vous sur les dispositions en vigueur dans votre région concernant la collecte séparée des appareils électriques et électroniques. -
Page 123: Installation De La Vulsini Dawn
INSTALLATION DE LA VULSINI DAWN Aperçu... - Page 124 Liste des pièces N° Description qté Panneau supérieur Panneau inférieur Panneau latéral gauche Panneau latéral droit Petite planche supérieure Panneau frontal gauche Panneau frontal droit Pied gauche Pied droit Petite planche de gauche Petite planche de droite Cheminée électrique N° Description qté...
- Page 125 Assemblage...
- Page 130 Glissez la cheminée électrique dans le boîtier et fixez-la avec les vis M4 * 12.
- Page 131 Un côté de la corde se fixe au mur avec une vis, l‘autre côté de la corde se fixe à la cheminée. Serrez ensuite la corde.
-
Page 132: Installation De La Vulsini Nightfall
INSTALLATION DE LA VULSINI NIGHTFALL Aperçu... - Page 133 Liste des pièces N° Description qté Panneau supérieur Panneau inférieur Panneau latéral gauche Panneau latéral droit Panneau frontal gauche Panneau frontal droit Panneau frontal supérieur Panneau arrière gauche Panneau arrière droit Plinthe Etagère réglable Cheminée électrique N° Description qté Boulons métalliques 19 + 1 Came métallique 19 + 1...
- Page 134 Assemblage...
- Page 139 Glissez la cheminée électrique dans le boîtier et fixez-la avec les vis M4 * 12.
-
Page 140: Installation De La Vulsini Hideaway
INSTALLATION DE LA VULSINI HIDEAWAY Aperçu... - Page 141 Liste des pièces N° Description qté Panneau supérieur Panneau inférieur Panneau latéral Panneau frontal Cheminée électrique N° Description qté Boulon métallique Pince métallique Cheville Pièce de raccordement M4*12 vis auto taraudeuse...
- Page 142 Assemblage...
- Page 145 Glissez la cheminée électrique dans le boîtier et fixez-la avec les vis M4 * 12.
- Page 147 INDICE Avvertenze di sicurezza 148 Descrizione del prodotto 149 Visualizzazioni a display 150 Messa in funzione e utilizzo 151 Correzione degli errori 155 Smaltimento 158 Produttore 158 Installazione vulsini dawn 159 Installazione vulsini nightfall 168 Installazione vulsini hideaway 176 DATI TECNICI Codice articolo 10035037 10035038 Nome articolo Vulsini...
-
Page 148: Avvertenze Di Sicurezza
AVVERTENZE DI SICUREZZA • Prima dell‘uso, controllare la tensione sulla targhetta del dispositivo e collegare il dispositivo solo ad una presa che corrisponde alla tensione indicata. • Se il cavo di alimentazione è danneggiato, farlo sostituire da un tecnico qualifi cato. •... -
Page 149: Descrizione Del Prodotto
DESCRIZIONE DEL PRODOTTO Vista frontale Display Pannello di controllo Nota: • Il dispositivo può essere utilizzato sia con il telecomando contenuto nel volume di consegna sia tramite il pannello di controllo, che si trova sul lato destro in alto del camino. -
Page 150: Visualizzazioni A Display
Vista posteriore Interruttore principale VISUALIZZAZIONI A DISPLAY Indicatore timer F°/ C° Indicatore fiamma Indicatore Temperatura Retroilluminazione calore Fuoco scoppiettante Modalità timer Modalità auto Fine timer giorno settimanale Inizio timer... -
Page 151: Messa In Funzione E Utilizzo
Nota: Quando si accende il camino lampeggia l’ora. Dopo 60 secondi il camino si spegne automaticamente. È possibile riaccenderlo premendo un tasto qualsiasi. La retroilluminazione e la funzione “fuoco scoppiettante” non sono disponibili su questo modello. MESSA IN FUNZIONE E UTILIZZO Utilizzo manuale Timer Funzione... - Page 152 Utilizzo del telecomando Prima di utilizzare il telecomando assicurarsi che la spina del dispositivo sia inserita nella presa e che l’interruttore si trovi in posizione “ON”. Nota: Assicurarsi di orientare il telecomando verso il display quando si preme uno dei tasti. Viene emesso un segnale acustico. È possibile che ci sia un leggero ritardo tra la trasmissione del segnale dal trasmettitore al ricevitore.
- Page 153 Funzione Descrizione Impostazione Impostazione ora: tenere premuto il simbolo per 3 secondi finché non lampeggia “00:00”. Premere il tasto [+] per impostare l’ora e [-] per impostare i minuti. Timer settimanale Premere il simbolo della ruota dentata per attivare il timer settimanale. Poi premere il simbolo del calendario per selezionare domenica - sabato.
- Page 154 Avvertenze importanti sulla sostituzione delle pile • Non mischiare le pile nuove con quelle vecchie. • Utilizzare solo pile standard AAA. Assicurarsi che i bambini non le ingoino. • Le pile non ricaricabili non devono essere ricaricate. • Inserire le pile facendo attenzione alla polarità corretta (vedi figura).
-
Page 155: Correzione Degli Errori
CORREZIONE DEGLI ERRORI Problema Possibile causa Soluzione Il display indica “EE”. Cortocircuito. Contattare il servizio d’assistenza per sostituire il sensore del termostato. Il display indica “88”. Non viene buttata fuori Posizionare l’interruttore aria calda e il ventilatore su “off” e aspettare non funziona. - Page 156 Problem Mögliche Ursache Lösungsansatz L’aria calda non viene Ciclo di raffreddamento Il dispositivo funziona buttata fuori. normalmente per alcuni minuti prima di spegnersi. La durata dipende dalla temperatura attuale. In quel lasso di tempo viene buttata fuori aria fredda. L’impostazione del Regolare la temperatura termostato impedisce in modo tale che il...
- Page 157 Problema Possibile causa Soluzione Il telecomando non Non ci sono le pile. Sostituire le pile. funziona quando si Pessima trasmissione del Assicurarsi che non ci premono i tasti. segnale. sia troppa distanza tra trasmettitore e ricevitore. Premere i tasti del telecomando con un movimento regolare e una pressione dolce.
-
Page 158: Smaltimento
SMALTIMENTO Se sul prodotto è presente la figura a sinistra (il cassonetto mobile sbarrato), si applica la direttiva europea 2012/19/UE. Questi prodotti non possono essere smaltiti con i rifiuti normali. Informarsi sulle disposizioni vigenti sulla raccolta separata di dispositivi elettrici ed elettronici. Non smaltire i vecchi dispositivi con i rifiuti domestici. -
Page 159: Installazione Vulsini Dawn
INSTALLAZIONE VULSINI DAWN Panoramica... - Page 160 Lista dei componenti N° Descrizione Quantità Pannello superiore Pannello inferiore Pannello laterale sinistro Pannello laterale destro Asse piccola superiore Pannello frontale sinistro Pannello frontale destro Piede d’appoggio sinistro Piede d’appoggio destro Asse piccola sinistra Asse piccola destra Camino elettrico Lettera Descrizione Quantità.
- Page 161 Assemblaggio...
- Page 166 Inserire il camino elettrico nell’alloggiamento e fissarlo con le viti M4 x 12.
- Page 167 Muro Un lato del cavo viene fissato al muro con una vite e l’altro lato viene fissato alla mensola del camino. Il cavo viene poi stretto.
-
Page 168: Installazione Vulsini Nightfall
INSTALLAZIONE VULSINI NIGHTFALL Panoramica... - Page 169 Lista dei componenti N° Descrizione Quantità Pannello superiore Pannello inferiore Pannello laterale sinistro Pannello laterale destro Pannello frontale sinistro Pannello frontale destro Pannello frontale superiore Pannello posteriore sinistro Pannello posteriore destro Asse piede d’appoggio Mensola regolabile Elektrischer Kamin Camino elettrico Lettera Descrizione Quantità...
- Page 170 Assemblaggio...
- Page 175 Inserire il camino elettrico nell’alloggiamento e fissarlo poi con le viti M4 x 12.
-
Page 176: Installazione Vulsini Hideaway
INSTALLAZIONE VULSINI HIDEAWAY Panoramica... - Page 177 Lista dei componenti N° Descrizione Quantità Pannello superiore Pannello inferiore Pannello laterale Pannello frontale Camino elettrico Lettera Descrizione Quantità. Bullone in metallo Camma metallica Dado Vite Connettore Vite autoperforante M4 x 12...
- Page 178 Assemblaggio...
- Page 181 Inserire il camino nell’alloggiamento e fissarlo con le viti M4 x 12.
Need help?
Do you have a question about the Vulsini and is the answer not in the manual?
Questions and answers