Table of Contents
Advertisement
Available languages
Available languages
Quick Links
See also:
User Manual
Advertisement
Table of Contents

Related Manuals for Klarstein 10012127


Summary of Contents for Klarstein 10012127
- Page 1 Zitruspresse orange Elektrischer Kamin Lausanne 10008166 10008167 10008168 10012127...
-
Page 2: Installation
Sehr geehrter Kunde, zunächst möchten wir Ihnen zum Erwerb Ihres Gerätes gratulieren. Bitte lesen Sie die folgenden Anschluss- und Anwendungshinweise sorgfältig durch und befolgen Sie diese um möglichen technischen Schäden vorzubeugen. Warnung Bei Verwendung dieses Elektrogeräts sollten Sie grundlegende Vorsichtsmaßnahmen beachten, um die Gefahr von Bränden, Stromschlägen oder Verletzungen zu vermeiden. -
Page 3: Bedienung
Zur Befestigung entnehmen Sie bitte die Maße der unteren Abbildung 1. Befestigen Sie die obere Halteklammer an der Wand. Empfohlene Maße finden Sie in der Abbildung 2. Um die Bohrungen zu setzen verwenden Sie einen Bohrer der Größe 6. Befestigen Sie die untere Halteklammer am Gerät und markieren Sie die Positionen der Bohrungen an der Wand, indem Sie das Gerät vorsichtig an die Wand halten(Es werden zwei Personen dazu benö- tigt). -
Page 4: Wartung
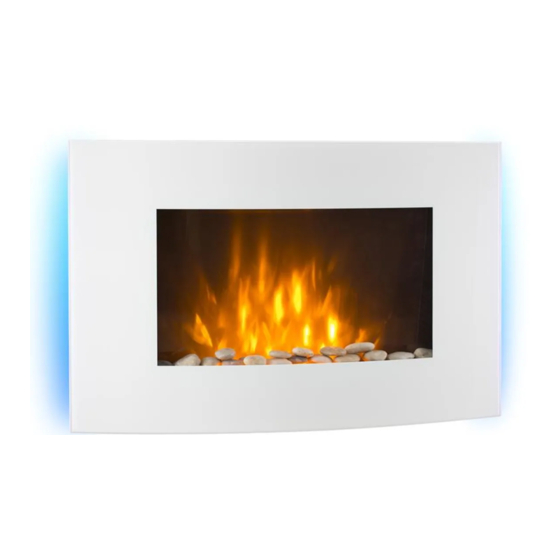
Drücken Sie die „O/I“-Taste einmal um den „Feuer-Effekt“ einzuschalten, eine Indikator-LED leuchtet auf. Drücken Sie dieselbe Taste 3 Sekunden lang um die Dimm-Funktion zu aktivieren, halten Sie die Taste gedrückt bis sie mit der Helligkeit zufrieden sind. Drücken Sie die „POWER“-Taste einmal, um die niedrige Heizstufe (1000W) einzuschalten. Drücken Sie die „POWER“-Taste zweimal, um die höchste Heizstufe (2000W) einzuschalten. Drücken Sie die ... -
Page 5: Safety Instructions
Hinweise zur Batterieentsorgung Batterien dürfen nicht in den Hausmüll gegeben werden. Als Endverbraucher sind Sie zur Rückgabe gebrauchter Batterien gesetzlich verpflichtet. Sie können Batterien nach Gebrauch in der Verkaufsstelle oder deren unmittelbarer Nähe (z.B. in kommunalen Sammelstellen oder im Handel) unentgeltlich zurückgeben. Sie können Batterien auch per Post an uns zu- rücksenden. - Page 6 • Never immerse the product in water or any other liquid for any reasons. • Do not use this heater in the immediate surroundings of a bath, a shower or a swimming pool. • Do not use the appliance outdoors. • ...
- Page 7 This appliance is designed to be permanently fixed to a wall at a minimum height of 300mm.The wall bracket must be fitted horizontally and the cable routed to the bottom right of the heater. A distance of 600mm from bottom of heater to floor is recommended for optimum viewing of fuel bed; see Fig.1 for recommend fixing dimensions. For optimum viewing, mark the top four screws fixing positions on wall in accordance with the recom- mend fixing dimensions- see Fig.2. note: ensure that the bracket is level by using a Spirit level whilst marking out the hole positions. Drill holes with a No. six drill bit. Fix the wall bracket using that the plug and screws provided. Attach the lower fixing bracket the base of the fire using the two small black screws supplied; ensure the ...
-
Page 8: Remote Operation
Instructions for use The appliance can be operated either by the switches located on the top right hand side of the fire or by the supplied remote control. Manual operation This is done by operating the switches located at the top right hand side of the fire .The standby rocker switch must first be switched on, the fire will beep to indicate that it is powered up. Press the O/I button once to turn on the appliance and fire effect. A red indicator light will show to indicate that the fire is ON. Press the O/I button for 3 seconds this will operate the dimmer mode, hold the button down until the desired brightness is obtained. Press the POWER button once for the low heat setting 1000W; press twice for the high heat setting 2000W; press three to switch off the heat setting. Press the BACK LIGHT button to adjust the colors of LED decoration, 7 colors available. remote operation The standby rocker switch located at the top right hand side of the fire must first be switched on; the ... - Page 9 Safety Cut-off This appliance is fitted with a safety cut-off which will operate if the fire overheats (e.g. due to blocked air vents). For safety reasons, the fire will NOT automatically reset. To reset the appliance, disconnect the appliance from the mains supply for at least 15 minutes. Recon- nect to the mains supply and switch on the appliance. Cleaning and Maintenance Warning- Always disconnect from the mains supply before cleaning heater. For general cleaning use a soft clean duster - never use harsh abrasive or cleaners.
Need help?
Do you have a question about the 10012127 and is the answer not in the manual?
Questions and answers