Table of Contents
Advertisement
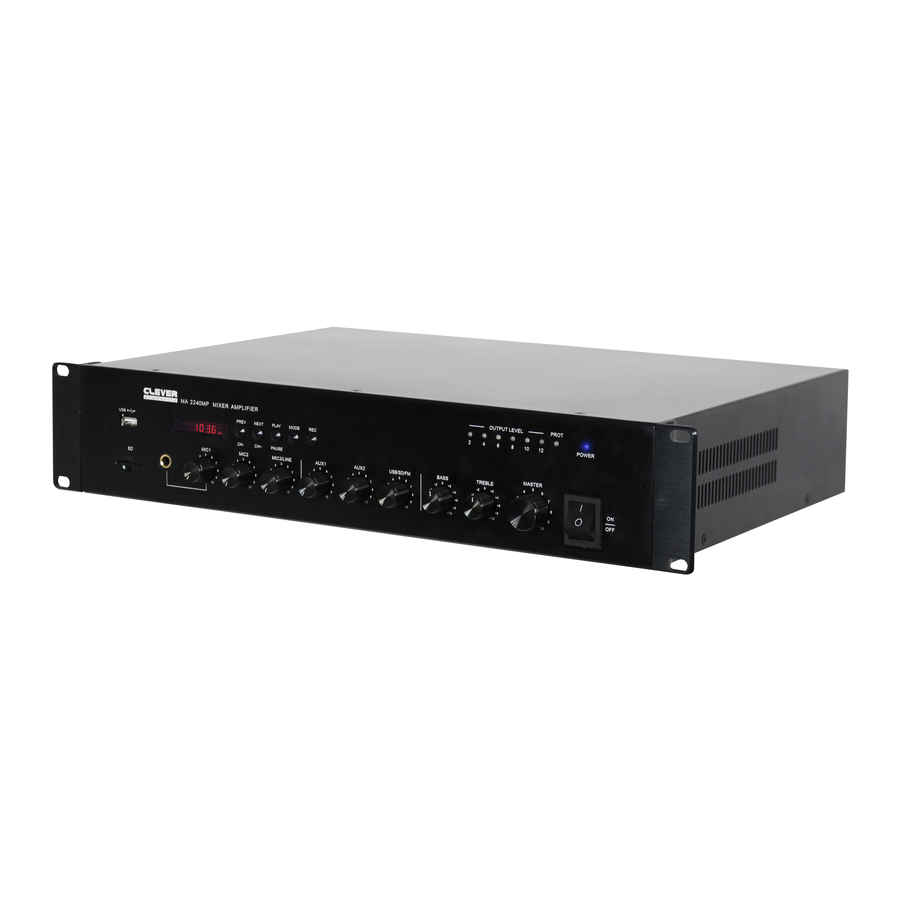
Mixer Amplifier series
with MP3 & FM Tuner
MA 260MP MIXER
USB
MIC1
5
4
6
SD
3
7
2
8
1
9
0
10
MA 2120MP MIXER
USB
MIC1
5
4
6
SD
3
7
2
8
1
9
0
10
MA 2240MP MIXER
USB
MIC1
5
4
6
SD
3
7
2
8
1
9
0
10
CRAM14 - MA 260MP
CRAM15 - MA 2120MP
CRAM16 - MA 2240MP
User Manual
AMPLIFIER
PREV
NEXT
PLAY
MODE
REC
CH-
CH+
PAUSE
MIC2
MIC3/LINE
AUX1
5
5
5
4
6
4
6
4
6
3
7
3
7
3
7
3
2
8
2
8
2
8
2
1
9
1
9
1
9
1
0
10
0
10
0
10
AMPLIFIER
PREV
NEXT
PLAY
MODE
REC
CH-
CH+
PAUSE
MIC2
MIC3/LINE
AUX1
5
5
5
4
6
4
6
4
6
3
7
3
7
3
7
3
2
8
2
8
2
8
2
1
9
1
9
1
9
1
0
10
0
10
0
10
AMPLIFIER
PREV
NEXT
PLAY
MODE
REC
CH-
CH+
PAUSE
MIC2
MIC3/LINE
AUX1
5
5
5
4
6
4
6
4
6
3
7
3
7
3
7
3
2
8
2
8
2
8
2
1
9
1
9
1
9
1
0
10
0
10
0
10
Order codes:
2
4
AUX2
US B/S D/F M
BASS
TREBLE
0
5
5
-2
+2
-2
4
6
4
6
-4
+4
-4
7
3
7
8
2
8
-6
+6
-6
9
1
9
-8
+8
-8
0
10
0
10
-10
+10
-10
2
4
AUX2
US B/S D/F M
BASS
TREBLE
0
5
5
-2
+2
-2
4
6
4
6
7
3
7
-4
+4
-4
8
2
8
-6
+6
-6
9
1
9
-8
+8
-8
0
10
0
10
-10
+10
-10
2
4
AUX2
US B/S D/F M
BASS
TREBLE
0
5
5
-2
+2
-2
4
6
4
6
7
3
7
-4
+4
-4
8
2
8
-6
+6
-6
9
1
9
-8
+8
-8
0
10
0
10
-10
+10
-10
OUTPUT LEVEL
PROT
6
8
10
12
POWER
MASTER
5
4
6
0
+2
3
7
ON
+4
2
8
+6
OFF
+8
1
9
+10
0
10
OUTPUT LEVEL
PROT
6
8
10
12
POWER
MASTER
5
4
6
0
+2
3
7
ON
+4
2
8
+6
OFF
+8
1
9
+10
0
10
OUTPUT LEVEL
PROT
6
8
10
12
POWER
MASTER
5
4
6
0
+2
3
7
ON
+4
2
8
+6
OFF
+8
1
9
+10
0
10
Advertisement
Table of Contents

Related Manuals for Clever Acoustics MA 260MP


Summary of Contents for Clever Acoustics MA 260MP
- Page 1 TREBLE OUTPUT LEVEL PROT MA 2240MP MIXER AMPLIFIER POWER PREV NEXT PLAY MODE PAUSE MASTER MIC1 MIC2 MIC3/LINE AUX1 AUX2 US B/S D/F M BASS TREBLE Order codes: CRAM14 - MA 260MP CRAM15 - MA 2120MP CRAM16 - MA 2240MP...
-
Page 2: Safety Advice
Safety advice WARNING FOR YOUR OWN SAFETY, PLEASE READ THIS USER MANUAL CAREFULLY BEFORE YOUR INITIAL START-UP! • Before your initial start-up, please make sure that there is no damage caused during transportation. • Should there be any damage, consult your dealer and do not use the equipment. • To maintain the equipment in good working condition and to ensure safe operation, it is necessary for the user to follow the safety instructions and warning notes written in this manual. • Please note that damages caused by user modifications to this equipment are not subject to warranty. CAUTION! CAUTION! TAKE CARE USING KEEP THIS EQUIPMENT THIS EQUIPMENT! AWAY FROM RAIN, HIGH VOLTAGE-RISK MOISTURE AND LIQUIDS OF ELECTRIC SHOCK!! IMPORTANT:... - Page 3 Product overview & technical specifications Mixer Amplifier series The MA 260MP, MA 2120MP and MA 2240MP are ideal for installation into shops, offices and commercial premises, and feature three microphone inputs, two AUX inputs plus integral MP3 player and FM radio turner. MIC 1 features switchable +48V phantom power and adjustable VOX priority over the other inputs. Individual gain controls for microphone and AUX inputs plus controls for bass, treble and master volume. • 19" rack mountable chassis (removable rack ears) OUTPUT LEVEL PROT MA 260MP MIXER AMPLIFIER POWER PREV NEXT PLAY MODE • 70V, 100V, and low impedance 4-16Ω loudspeaker PAUSE MASTER outputs MIC1 MIC2 MIC3/LINE AUX1 AUX2 US B/S D/F M BASS TREBLE • Integral MP3 (USB/SD) player with FM radio tuner...
- Page 4 Panel & connection identification OUTPUT LEVEL PROT MA 2240MP MIXER AMPLIFIER POWER PREV NEXT PLAY MODE PAUSE MASTER MIC1 MIC2 MIC3/LINE AUX1 AUX2 US B/S D/F M BASS TREBLE DO NOT USE 4-16 ,70V AND 100V AT THE SAME TIME 240V 50Hz T2AL 250V DC INPUT...
-
Page 5: Remote Control Identification
Remote control identification Remote control identification: 01 - Power button 02 - PLAY/PAUSE/CONFIRM button 03 - MODE button 04 - Number control 05 - LAST/NEXT buttons 06 - REWIND/FAST FORWARD buttons 07 - VOL + button 08 - VOL - button 09 - EQ button www.cleveracoustics.co.uk Mixer Amplifier series User Manual... -
Page 6: Rack Installation
Rack installation Rack Installation The MA Series are rack mountable. The rack you use should be a Double Door Rack where you can open the front and rear panel. When mounting the amplifier into the rack, please make sure that there is enough space around the amplifier. Be careful when mounting the amplifier into the rack. Put the heaviest products into the lower part of the rack. The front panel is not designed to absorb acceleration forces occuring during transportation. Inputs Short cables runs improve the sound quality remarkably. Input cables should be short and direct, since high frequencies will mostly be absorbed if the cables are unnecessarily long. Besides that a longer cable may lead to humming and noise problems. If the cable runs are unavoidable, you should use balanced cables. Outputs The high damping factor of your amplifier supplies a clear sound reproduction. Unnecessarily long and thin cables used for low impedance (4-16Ω) speakers will influence the damping factor and thus the low frequencies in a negative way. In order to safeguard good sound quality, the damping factor should lie around 50. The longer a cable has to be the thicker it should be. For longer cable runs please ensure the 100V outputs are used for 100V speakers. Connect your speaker systems via the speaker terminals (COM = -VE) Examples: 1) COM + 4-16Ω 2) COM + 70V 3) COM + 100V Note: Please do not use more than one pair of output terminals. Connections To The Mains Before connecting the amplifier to the local mains voltage outlet should be checked to ensure the available supply is 240V~AC 50Hz. This product is CLASS1 and requires a protective mains earth to be connected at all times. DO NOT remove or disconnect the earth. -
Page 7: Machine Operation
Machine operation Machine operation 1. After connecting all audio sources and powering on the mixer amplifier, adjust the level of each audio input to achieve the desired “mix”. Care should be taken to when adjusting microphone input volumes and the master volume, adjust both of these in small increment’s to avoid feedback (howl around). The goal is to achieve a clear balance between music and voice ensuring announcements can be clearly heard. 2. Microphone input No.1 features adjustable voice operated override (VOX), this will mute all other inputs. After 3 seconds of no signal to MIC1 inputs the other input will return to their original state. The VOX mute level can be adjusted on the rear panel. 3. The Clever Acoustics amplifiers all feature output VU meter’s with PEAK indication. Should the PEAK indicator illuminate (flashing) the output of the amplifier is too high, turn the master volume anti-clockwise to reduce the output. 4. The Clever Acoustics amplifiers all feature protection with LED indication. Should the PROTECT indicator il- luminate, turn the master volume control anti-clockwise fully and switch off the amplifier for 15 seconds as the amplifier may have entered PROTECT mode temporarily due to a peak signal, care should then be taken to ensure all input levels are set correctly. If the amplifier persists to enter PROTECT mode the amplifier should be switched off and left to cool for 5-10 minutes before switching back on. If the PROTECT indicator remains lit this indicates a problem with the amplifier or amplifier load (ie Short Circuit). 5. The Clever Acoustics amplifiers all feature protection with LED indication. Should the TEMP (over temperature protection) indicator illuminate, turn the master volume control anti-clockwise fully and switch off the amplifier for 15 seconds as the amplifier may have entered TEMP (over temperature protection) mode temporarily due to the internal temperature reaching the preset limit, care should then be taken to ensure all input levels are set correctly and that all ventilation slots are clear of obstruction. If the amplifier persists to enter TEMP mode the amplifier should be switched off and left to cool for 5-10 minutes before switching back on. If the TEMP indicator remains lit this indicates a problem with the output level (ie bass heavy music), amplifier cooling or amplifier load (ie Short Circuit). 6. Speaker & Amplifier systems can produce high sound pressure levels, please operate all controls with caution to ensure people are not exposed to excessive or dangerous sound pressure levels. www.cleveracoustics.co.uk Mixer Amplifier series User Manual... -
Page 8: Panel Connections
AUX 2 AUX 1 (48V) 240V~50Hz INPUTS MIC1 INPUT COM 4-16Ω 100V LINE MIC3/LINE MIC2 MAINS MIC 1 12V DC INPUT (MA 260MP) 24V DC INPUT (MA 2120MP) 24V DC INPUT (MA 2420MP) AUDIO SOURCES www.cleveracoustics.co.uk Mixer Amplifier series User Manual... -
Page 9: Speaker Connections
Speaker connections Speaker connections Total impedance Total impedance 81Ω (MA 260MP) 167Ω (MA 260MP) 41Ω (MA 2120MP) 83Ω (MA 2120MP) 42Ω (MA 2420MP) 20Ω (MA 2420MP) Notes: • Both the 4 - 16Ω and 100V terminals cannot be used at the same time. • Impedances indicated in the figures represent the total speaker system (load) impedances. • Loads presented to the amplifier must be equal to or greater than listed above. Speaker impedances must be measured using a true impedance meter, do not standard multimeters. WARNING! Be sure to attach the supplied terminal cover attached after connection. - Page 10 XLR/RCA connections Balanced XLR jack connection Jack plug www.cleveracoustics.co.uk Mixer Amplifier series User Manual...
- Page 11 Warnings Problem chart Problem Cause Solution No power The power cord is not connected. Check the power cord and any extension cabled. No sound The power cord of the respective Check the power cord and if the product is not connected prop- plugs are properly connected erly or not at all. with the sockets. The connection socket or the Clean the socket and/or the plug is dirty. plug. Noise The input signal is too strong. Reduce the input signal via the gain control. Distorted sound Load impedance is to low. Check load impedance vs am- plifier specification, reduce as required. CAUTION - DANGER TO LIFE DISCONNECT FROM THE MAINS BEFORE STARTING MAINTENANCE OPERATION Cleaning and Maintenance We recommend a frequent cleaning of the product. Please use a soft lint free and moistened cloth.
-
Page 12: Weee Notice
WEEE notice Correct Disposal of this Product (Waste Electrical & Electronic Equipment) (Applicable in the European Union and other European countries with separate collection systems) This marking shown on the product or its literature, indicates that it should not be disposed with other household wastes at the end of its working life. To prevent possible harm to the environment or human health from uncontrolled waste disposal, please separate this from other types of wastes and recycle it responsibly to promote the sustainable reuse of material resources. Household users should contact either the retailer where they purchased this product, or their local government office, for details of where and how they can take this item for environmentally safe recycling. Business users should contact their supplier and check the terms and conditions of the purchase contract. This product should not be mixed with other commercial wastes for disposal. www.cleveracoustics.co.uk Mixer Amplifier series User Manual...
Need help?
Do you have a question about the MA 260MP and is the answer not in the manual?
Questions and answers