Table of Contents
Advertisement
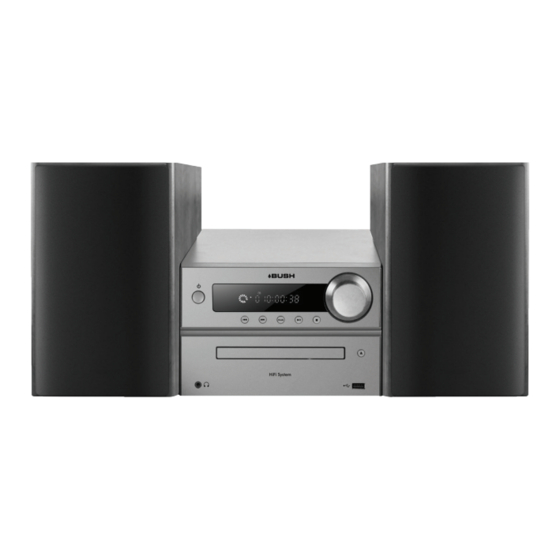
Micro Hi-Fi MCS-512
332/8978
Set up & Operating Instructions - Please keep for future reference
Important - Please read these instructions fully before using your product
These instructions contain important information which will help you get the very best from
your Micro Hi-Fi and ensure safe and correct set up and operation.
Advertisement
Table of Contents

Related Manuals for Bush MCS-512


Summary of Contents for Bush MCS-512
- Page 1 Micro Hi-Fi MCS-512 332/8978 Set up & Operating Instructions - Please keep for future reference Important - Please read these instructions fully before using your product These instructions contain important information which will help you get the very best from...
-
Page 2: Table Of Contents
Micro Hi-Fi Contents Important safety information . . . 3 Random ....11 Instructions for use... . . 5 Programmed play mode . -
Page 3: Important Safety Information
Important safety information Your Micro Hi-Fi should be treated with care. The information below has been provided in the interest of safety and will help you to enjoy this product and the benefits it brings for many years. - Do NOT block or cover slots, - Keep the product and all its parts out of reach of small holes or openings on the... - Page 4 - Do NOT attempt to open the - If the Hi-Fi will not be used for product. This product does not a long period of time, remove contain any user serviceable the CD and make sure that the parts. Unauthorised handling of mains power is unplugged.
-
Page 5: Instructions For Use
Instructions for use Check the package contents Setting up The package contains: 1. Plug the speakers into the left and right speaker sockets on the • 1 x Micro Hi-Fi with attached back of the Hi-Fi. mains power lead and plug •... -
Page 6: Using Your Micro Hi-Fi
Using your Micro Hi-Fi Switch on Adjusting the volume Press and release the power Turn the rotary volume control button to the left of the display on the front of the Micro Hi-Fi, on the Micro Hi-Fi or on the anti-clockwise to decrease the remote control. -
Page 7: Equalizer
Equalizer or EQ setting Loudness Press and release the ‘Loudness’ You can change the sound of button on the remote control to your Micro Hi-Fi, using the EQ enhance the bass level. setting, there are 4 options and EQ off available (Rock, Classic, Press and release the ‘Loudness’... -
Page 8: Your Micro Hi-Fi
Your Micro Hi-Fi Front view: Previous track Next track Display Rotary volume control Power On/Off CD Drawer Open/Close Headphone socket Mode Play/Pause Stop USB socket the CD Drawer Back view: Speaker sockets Audio out sockets Line in audio sockets Wire FM aerial socket MICRO HIFI CHAMPAGNE MICRO HIFI CHAMPAGNE 332/8978... - Page 9 Your Micro Hi-Fi Remote control: Power On/Off Open/Close the CD drawer Preset Numeric keypad Station + / - Program Memory FF + / FF- (radio) Next track Fast backward Play Pause Fast forward A-B music sampling Previous track Mode Stop CD/USB Repeat Search...
-
Page 10: Using The Cd Player
Using the CD Player CD mode 3. Press and release the button on the front of the Micro Hi-Fi or Check that your Micro Hi-Fi is in on the remote control, to close CD mode. If you are not already the CD drawer. -
Page 11: Next Track
Next track: Repeat Press and release the button Press and release the ‘Repeat’ on the Micro Hi-Fi or on the button on the remote control. remote control. ‘rEP ONE’ is displayed and the current track will be repeated. Previous track: Press and release the ‘Repeat’... -
Page 12: A-B Music Sample
In CD mode, with the CD you 1. With the music track playing, wish to programme in the CD press and release the ‘A-B’ button compartment and stopped: on the remote control at the beginning of the section of music 1. -
Page 13: Caring For Compact Discs
Caring for compact discs USB mode - Do NOT touch the playback side Note: USB mode is accessed from of the CD. CD mode. Please make sure that you are in CD mode. If there is a - Do NOT attach paper or tape or CD in the CD tray, please make any other material to the disc. -
Page 14: Using The Fm Radio
Using the FM radio Wire FM aerial Tuning to an FM station Please make sure that the FM In FM radio mode: wire aerial on the back of the 1. Press and release the ‘Search’ Micro Hi-Fi is fully extended button on the remote control. -
Page 15: Store An Fm Station Preset
Store an FM station preset The Micro Hi-Fi will tune to that preset location and station and When you search for stations on begin to play. your Micro Hi-Fi (see Tuning to an FM station on page 14), your Note: Alternatively, you can Micro Hi-Fi will automatically repeatedly press and release the store each station found into its... -
Page 16: Bluetooth Mode
Bluetooth mode Bluetooth (BT) mode 4. When found, your Hi-Fi will be displayed as ‘BUSH Audio’ . Select Check that your Micro Hi-Fi is in the device name to begin pairing. Bluetooth mode. If you are not already in BT mode, briefly press 5. -
Page 17: Line In Mode
Line in mode Line in mode Audio out Check that your Micro Hi-Fi is 1. Using the audio cables in Line in mode. If you are not supplied, you can connect to an already in Line in mode, briefly external audio system. Plug the press and release the ‘Mode’... -
Page 18: Troubleshooting
Troubleshooting If you are experiencing problems with your Micro Hi-Fi, there are some quick and easy checks that you can do, which may help to solve the problem. Problem Solution No sound / power: - If using mains power, check that the mains power wall socket is switched on and that you are not in standby mode. - Page 19 Problem Solution The function buttons - Check that mains power wall socket is do not respond: switched on and that the Micro Hi-Fi is not in standby mode. - Check that you are trying to use the function buttons for the mode that you are in.
- Page 20 Problem Solution Unable to pair with a - Check that you are in Bluetooth mode. If Bluetooth device: you are not already in BT mode, briefly press and release the ‘Mode’ button on the front of the Micro Hi-Fi or on the remote control, until you are in BT mode (check the display).
-
Page 21: General Information
General information This symbol indicates that this product should not be treated as normal household waste and it should be recycled. Please take it to your nearest collection facility or for further details contact your local council or visit www.recycle-more.co.uk Batteries contain substances that may be harmful to the environment and human health. -
Page 22: Guarantee
PRODUCT GUARANTEE This product is guaranteed against manufacturing defects for a period of: year This product is guaranteed for twelve months from the date of original purchase. Any defect that arises due to faulty materials or workmanship will either be replaced, refunded or repaired free of charge where possible during this period by the dealer from whom you purchased the unit. - Page 24 Nov 14/Issue: 1...
Need help?
Do you have a question about the MCS-512 and is the answer not in the manual?
Questions and answers