Table of Contents
Advertisement
Advertisement
Table of Contents

Related Manuals for Bush 426/9665


Summary of Contents for Bush 426/9665
-
Page 1: Instruction Manual
Instruction Manual 426/9665... -
Page 2: Table Of Contents
CD Micro with Bluetooth and DAB Contents Important safety information......3 Using the FM Radio ........14 Instructions for use .........5 Wire radio aerial ........14 Check the package contents .....5 FM Radio mode ........14 Where to put your Micro ......5 Tuning to an FM station ..... -
Page 3: Important Safety Information
Important safety information Your CD Micro with Bluetooth and DAB should be treated with care. The information below has been provided in the interest of safety and will help you to enjoy this product and the benefits it brings for many years. •... - Page 4 • Do NOT place foreign objects into the CD compartment. • The underneath and sides of this product may become warm after a long period of use. This is normal. • If the Micro will not be used for a long period of time, remove the CD and make sure that the mains power is unplugged and the battery is removed from the remote control.
-
Page 5: Instructions For Use
Instructions for use Check the package contents The package contains: • 1 x CD Micro with Bluetooth and DAB with an attached mains power lead and plug • 2 x Separate speakers (1 x Left and 1 x Right) • 1 x Remote control •... -
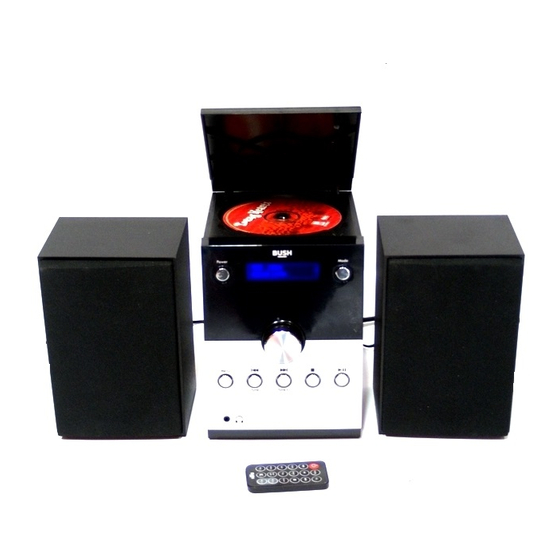
Page 6: Your Cd Micro With Bt And Dab
Your CD Micro with Bluetooth and DAB Front View CD Compartment Backlit display Power on/off Mode Skip forward/Tune + Rotary volume control Push to select Skip back/Tune - Play/Pause Menu Headphone socket Stop Back view Line in Left and Right speaker sockets Wire radio aerial Mains power cable... -
Page 7: Your Cd Micro With Bt And Dab
Your CD Micro with Bluetooth and DAB Remote control Mode Power on/off Skip back Play/Pause Skip forward Select Stop Clock Prog Scan Repeat Backlight Volume + Menu Mute Pair Volume - Battery compartment (at base) 1 x CR2025 battery required (Supplied) Notes: The remote signal may not be received if there is an obstacle between the remote and the Micro. -
Page 8: Using Your Micro
Using your Micro Switch on Press and release the ‘Power’ button on the Micro or the button on the remote control to Switch on . The first time you use the Micro or if the DAB station list is empty, your Micro will automatically begin to scan for DAB radio stations. -
Page 9: Equalizer Or Eq Setting
Equalizer or EQ setting You can change the sound of your Micro using the EQ setting, there are 5 options available (Flat, Pop, Classic, Rock, and Jazz). Press and release the ‘EQ’ button on the remote control to display and change the EQ setting. -
Page 10: Using The Dab Radio
Using the DAB Radio Wire radio aerial Please make sure that the wire aerial on the back of the Micro is fully extended and adjusted before you attempt to tune to a DAB radio station (a vertical position is recommended). This will ensure that the maximum signal strength is available when the Micro begins to scan. -
Page 11: Prune Dab Stations
Prune DAB stations You can remove the DAB stations in the station list that cannot be received in your area. These are listed with a ‘?’ prefix. Press and hold the ‘Menu’ button on the Micro or on the remote control. Use the buttons on the Micro or on the remote control to move to <Prune>. -
Page 12: Dab Display Information
DAB display information When listening to a DAB station you can change the information that will appear on the display. There are several different types of information that are sent by the broadcaster. • Dynamic Label Segment (DLS) This is scrolling text information supplied by the broadcaster. Information could be the name of an artist or music title, DJ’s name, contact details for the radio station etc. -
Page 13: Dynamic Range Control (Drc)
Dynamic range control (DRC) In DAB mode: The dynamic range for each radio programme is set by the broadcaster for each radio station and may be different for the types of programme broadcast, such as pop or classical music or a chat show. The dynamic range control signal is transmitted in parallel with the audio signal for each programme and with your radio you can use this control signal to expand or compress the dynamic range (the difference between the loudest and quietest sounds) of the reproduced audio signal. -
Page 14: Using The Fm Radio
Using the FM Radio Wire radio aerial Please make sure that the wire aerial on the back of the Micro is fully extended and adjusted before you attempt to tune to an FM radio station (a vertical position is recommended). This will ensure that the maximum signal strength is available when the Micro begins to scan. -
Page 15: Audio Mode
There are now two different options to choose from and the current setting will have an ‘*’ next to it. • Strong stations The scan will only stop when a strong signal strength is received which should also result in a better audio quality. It is possible that the station you are scanning for may be missed using this option. -
Page 16: Tune To An Fm Station Preset
4. Press the rotary control on the Micro to ‘Select’ or the ‘Select’ button on the remote control. The display will confirm ‘Preset X stored’, where ‘X’ is the number of the preset (1-10). Note: If there is already an existing FM station stored under a preset, it will be over written when you store the new station. -
Page 17: Using The Cd Player
Using the CD Player Note: Please make sure that you remove the cardboard shipping protector from within the CD compartment before you try to use CD mode. CD mode Check that your Micro is in CD mode. If you are not already in CD mode, briefly press and release the ‘Mode’... -
Page 18: Programmed Play Mode
• Pause Press and release the button on the Micro or on the remote control. The elapsed time of the track will flash in pause mode. Press and release the button again to continue to play the track/CD. • Next track: Press and release the button on the Micro or on the remote control. -
Page 19: Repeat And Random Modes
Repeat and Random modes Press and release the ‘Repeat’ button on the remote control. ‘RP1’ is displayed. Continuously press and release the ‘Repeat’ button to cycle through the available options of : • ‘Repeat’ (current track) ‘RP1’ is displayed. • ‘Repeat all’... -
Page 20: Bluetooth Mode
Note: Some products will automatically search for a new device and so the ‘Add new device’ option is not available. 4. When found, your Micro will be displayed as ‘BUSH Audio’. Select the device name to begin pairing. 5. When pairing is complete ‘Search’ will stop flashing in the display and ‘Connected’... -
Page 21: Listening To Music/Audio Using Bluetooth
Notes: If your previously paired device is within range but does not automatically connect, go to the Bluetooth connectivity settings on your device and select ‘BUSH Audio’ to reconnect. Alternatively, press and release the ‘Pair’ button on the remote control to restart the Bluetooth pairing process (see page 20). -
Page 22: Aux In Mode
Aux in mode Aux in mode Check that your Micro is in Aux in mode. If you are not already in Aux in mode, briefly press and release the ‘Mode’ button on the front of the Micro or on the remote control, until you are in Aux in mode (check the display). -
Page 23: Troubleshooting
Troubleshooting If you are experiencing problems with your Micro, there are some quick and easy checks that you can do, which may help to solve the problem. Problem Solution No sound / power: • Adjust the volume using the rotary control on the Micro or the ‘Vol +’... - Page 24 Problem Solution The function buttons do • Check that mains power wall socket is switched on not respond: and that the Micro is not in Standby mode. • Check that you are trying to use the function buttons for the mode that you are in. •...
-
Page 25: Factory Reset
Factory reset You can reset your Micro and restore all of the original factory settings. Note: All of your settings, including the radio station list, any radio presets and paired Bluetooth device records will be deleted when you reset the Micro In DAB mode: Press and hold the ‘Menu’... -
Page 26: General Information
General information This symbol indicates that this product should not be treated as normal household waste and it should be recycled. Please take it to your nearest collection facility or for further details contact your local council or visit www.recycle-more.co.uk Batteries contain substances that may be harmful to the environment and human health. -
Page 27: Product Guarantee
PRODUCT GUARANTEE This product is guaranteed against manufacturing defects for a period of Year This product is guaranteed for twelve months from the date of original purchase. Any defect that arises due to faulty materials or workmanship will either be replaced, refunded or repaired free of charge where possible during this period by the dealer from whom you purchased the unit. - Page 28 May 15/Issue:1.1...
Need help?
Do you have a question about the 426/9665 and is the answer not in the manual?
Questions and answers