Advertisement
Quick Links
Advertisement

Related Manuals for Aprimatic Over


Summary of Contents for Aprimatic Over
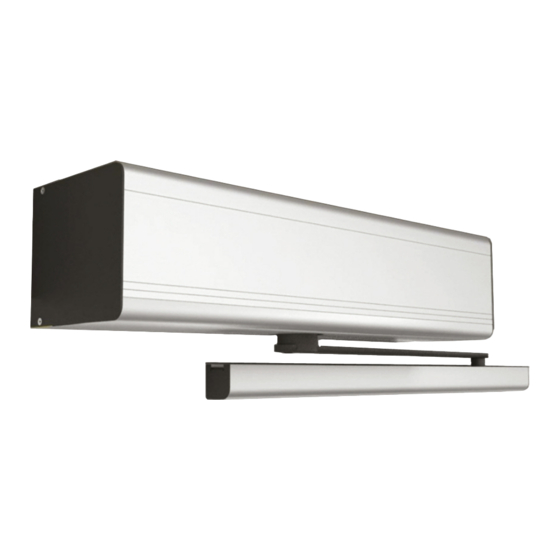
- Page 1 INSTALLATION AND MAINTENANCE MANUAL FOR SWING DOOR Over – Over Evo – Over Heavy...
- Page 3 Make sure the existing structure is up to standard in terms of strength and stability. Aprimatic srl is not responsible for failure to use Good Working Methods in building the frames to be motorised or for any deformation occurring during use.
-
Page 4: Technical Data
FSD1 Battery power device for emergency Battery power device for emergency Battery power device for emergency opening: OVER opening: OVER HEAVY opening: OVER HEAVY Signal of door position ‐ Signal of door position N.B. The technical data above refer to average conditions of use and cannot be certain in each case. Each automatic entrance variables such as: friction, balancing and environmental conditions that may substantially change both the duration and the quality of the operation of the automatic or some of its components, including the automation. -
Page 5: Standard Installation
Note: Components and codes are those most commonly used in systems for automatic swing doors. The full range of equipment and accessories is also available in the sales list. The given operating and performance features can only be guaranteed with use of APRIMATIC accessories and safety devices. - Page 6 Check the correct operation in case of installation on doors that divide environments at different pressures. 4.1 INSTALLATION OF OVER AUTOMATION WITH SWSA SLIDING ARM Use the sliding arm to pull with doors which open inside (view from the automation).
- Page 7 4.2 INSTALLATION OF OVER AUTOMATION WITH ARTICULATED ARM Use the articulated arm to push with doors which open outside (view from the automation). Remove the cover and fix the automation in a stable and leveled way to the wall using the measurements shown in the figure;...
- Page 8 4.3 INSTALLATION OF OVER EVO AUTOMATION WITH SLIDING ARM Use the sliding arm to pull with doors which open inside (view from the automation). If the door has the hinge on the right, disassemble the gear motor group from the automation and move the spring group from the left side to the right side of the automation, as shown in the figure.
- Page 9 Note: if necessary, you can change the measure H, between the automation and the door, by replacing the spacer, using the codes listed in the table. OVER EVO automation Sliding arm + spacer H17 Sliding arm Sliding arm + spacer H51 PRE‐CHARGING OF THE CLOSING SPRINGS...
- Page 10 4.4 INSTALLATION OF OVER EVO AUTOMATION WITH ARTICULATED ARM Use the articulated arm to push with doors which open outside (view from the automation). If the door has the hinge on the left, disassemble the gear motor group from the automation and move the spring group from the left side to the right side of the automation, as described in chapter 4.5.
- Page 11 Attach the cover profile to the base profile. To prevent the cover from being opened without the use of a tool, you can secure the cover to the heads at the holes, using the screws 2,9 x9,5 not supplied by us. www.Aprimatic.it...
- Page 12 4.5 INSTALLATION OF OVER HEAVY AUTOMATION WITH SLIDING ARM Use the sliding arm to pull with doors which open inside (view from the automation). Remove the cover and fix the automation in a stable and leveled way to the wall using the measurements shown in the figure;...
- Page 13 4.6 INSTALLATION OF OVER HEAVY AUTOMATION WITH ARTICULATED ARM Use the articulated arm to push with doors which open outside (view from the automation). Remove the cover and fix the automation in a stable and leveled way to the wall using the measurements shown in the figure;...
- Page 14 5. INSTALLATION OF BATTERY POWER DEVICE 5.1 Fix inside automation, on left side, the battery power device (OVER for OVER automation, or OVER HEAVY for OVER EVO and OVER HEAVY automation). 5.2 Connect the battery power device to the BAT connector of the electronic control, using the supplied cable.
- Page 15 During installation, maintenance and repair operations, cut off the power supply before opening the cover to access the electrical parts. To handle electronic parts, wear earthed antistatic conductive bracelets. APRIMATIC declines all responsibility in the event of components which are not compatible with the safe and correct operation of the product.
- Page 16 Standard micro USB connection. Allows connection to a personal computer. Buttons Description OPEN Open the door. ↑ Scroll the menu and increase of selected values. ↓ Scroll the menu and reduction of selected values. ENTER Button to select the menu and save the selected data. Exit the menu. www.Aprimatic.it...
- Page 17 Connect the 0‐1‐H‐L terminals of the function selector, by cable (not supplied by us), to the 0‐ 1‐H‐L terminals of the electronic control. Note: for lengths over 10 m, use a cable with 2 twisted‐pairs. After connecting, the function selector is working.
- Page 18 = terminal 0 brown wire = terminal 1 yellow wire = terminal 1 green wire = terminal 3A or 3B For more information, check the installation manual of the sensor. Example www.Aprimatic.it...
- Page 19 = terminal 1 purple wire = 8A terminal (remove the jumper 41‐8A) red wire = terminal 41 yellow wire = do not connect white wire = do not connect gray wire = do not connect black wire = do not connect www.Aprimatic.it...
- Page 20 When selected, the door is permanently open. Note: the door can still be handled manually. Automatic bi‐directional operation. When selected, the door open and close automatic in bidirectional mode. Closed door. When selected, the door is permanently closed. If the electric lock is present, the door is closed and locked. www.Aprimatic.it...
- Page 21 Connect the terminals of the radio receiver [MRC4E], by cable not supplied by us, to the terminals of the electronic control as follows: terminal + = terminal 1 terminal – = terminal 0 terminal CH1 = terminal 1 terminal CH1 = terminal 3A,or terminal 3B For more information, refer to the installation manual of the radio receiver. www.Aprimatic.it...
- Page 22 Setting the automation type. Choose between the following values: OVER OVER = OVER automation (LIGHT) OVER EVO = OVER EVO automation (SPRING) OVER HEAVY = OVER HEAVY automation (HEAVY) LEAF Setting the weight of the door. Choose between the following values:...
- Page 23 YES = upload the menu settings from the micro SD memory SOUT You can save the menu settings of automation in use, in the micro SD memory. Choose between the following values: NO = no save YES = save the menu settings of automation in the micro SD memory www.Aprimatic.it...
- Page 24 12 = 12V electric lock 24 = 24V electric lock LKSH Setting of closing push for hooking the electric lock. Choose between the following values: NO = no push MIN = light push MED = medium push MAX = heavy push www.Aprimatic.it...
- Page 25 SLAV = automation which closes first SDLY Door with 2 leaves, setting of delay of movement between Master‐Slave. Choose between the following values: NO = leaves without overlap MIN = minimum delay MED = medium delay MAX = maximum delay www.Aprimatic.it...
- Page 26 ‐ approach the badges, that you want to store, one at a time, to the function selector (in front of logo), the buzzer emits 1 beep of confirmation storage, ‐ wait for 20 seconds, the buzzer emits 2 beeps at the end of the storage procedure. Note: if the badge is not stored, the buzzer emits no beeps. www.Aprimatic.it...
- Page 27 Note: in the case of programming error or missing firmware (W103), proceed as follows: disconnect the power supply, insert the micro SD memory, give power supply, and repeat the programming procedure from this menu. Displaying the firmware version of function selector (eg = 0200). ‐ ‐ ‐ ‐ www.Aprimatic.it...
- Page 28 W160 Synchronization error Check the ADV > SYNC menu W256 ‐ Power on ‐ W257 ‐ Firmware update ‐ W320 Signaling of maintenance Check the INFO > SERV menu W330 Tuning between motor and electronics Wait about 3‐30 seconds www.Aprimatic.it...
- Page 29 Note: if the door is with articulated arm, set as follow: MENU > ARM > PUSH (confirm by pressing ENTER for 1 second). Note: if the door is OVER EVO (SPRING model), set as follow: MENU > DOOR > OVER EVO (confirm by pressing ENTER for 1 second).
-
Page 30: Troubleshooting
The opening and safety devices are Verify that the opening sensors are not subject itself. unstable or detect moving bodies to vibration , do not perform false detections or the presence of moving bodies in the field of action. www.Aprimatic.it... - Page 31 ‐ Check the state of wear of the hinges (if necessary replace them). ‐ Verify correct mounting of the arm on the door. ‐ In the case of OVER EVO automation, check the correct force of the closing spring. ‐ If present, verify proper engagement of the electric lock.
- Page 32 www.Aprimatic.it...
Need help?
Do you have a question about the Over and is the answer not in the manual?
Questions and answers