Advertisement
Quick Links
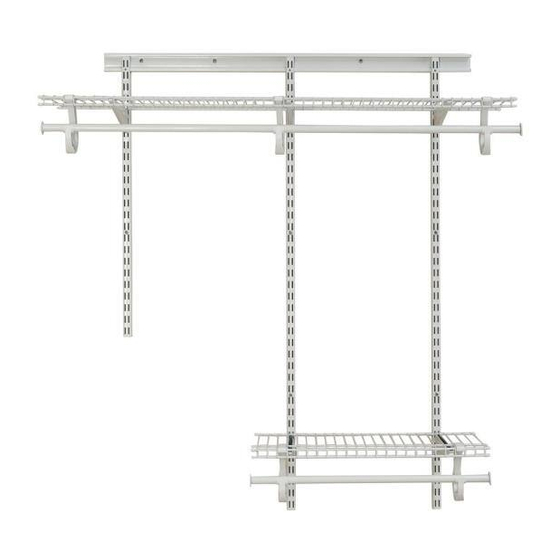
ShelfTrack
Installation Tips
®
1. Use the correct hardware
Select the hardware that is right for your wall type:
Drywall
Studs
Drill 1/2 in. holes and
Secure to the wall with #12
secure to the wall with
x 2 in. pan head screws at
toggle bolts.
stud locations.
2. Hang track location
Track can be installed at any height. However, for maximum
adjustability and strongest installation, install track flush to
ceiling and screw into wood header behind wallboard. Stud
installation is recommended whenever possible for the strongest
installation.
3. Determine length and spacing of standards
Standards are available in several lengths, depending on the number
of shelves you want and the spacing between the shelves. The closer the
standards are placed together, the stronger the installation. Standards
should be spaced no more than 24 in. apart, and no more than 4 in.
from the end of the shelf.
24 in. maximum
ClosetMaid.com
|
1-800-874-0008
Concrete
Drill 1/4 in. holes. insert
#12 wall anchors and
secure to the wall with #12
x 2 in. pan head screws.
|
10/13
A
24in.
61cm
C
G
F
with
Choose Your Hardware
Hang Track
A
Standard
B
Bracket
C
4. Securing standards
Each standard must be secured to the wall with one screw at the closest
hole to the center of the standards. When using toggle bolts, remove
toggle, put bolt through standard and re-attach toggle to bolt before
placing standard on track.
5. Attaching brackets
Attach brackets at desired shelf height.
Note: Always match bracket size to shelving depth except when using
Shelf & Rod shelving. Always use 12 in. brackets for this type of shelving. When
installing 16 in. SuperSlide
with Closet Rod & Support always use 12 in. brackets.
®
6. Cutting shelving, closet rods, and hang tracks
Wire shelving can be cut using a bolt cutter or hacksaw.
Closet rods can be cut using a pipe cutter (recommended) or a
hacksaw. Hang tracks can be cut with a hacksaw.
7. Corners
When two shelves come together in a corner, use a corner shelf support
to connect them. Use a corner closet rod to allow clothes to slide
uninterrupted around corners.
Note: SuperSlide
Closet rod supports should be placed where closet rods join
®
8. End caps
Add caps to every exposed wire on both ends of each
shelf and to the ends of closet rods. End caps protect
you, your clothing and the shelving materials.
B
E
D
Closet Rod
D
Closet Rod Support
E
Closet Rod End Cap
F
Shelf End Cap
G
.
Advertisement

Related Manuals for Emerson ClosetMaid ShelfTrack


Summary of Contents for Emerson ClosetMaid ShelfTrack
- Page 1 24in. 61cm with Choose Your Hardware Hang Track Closet Rod Closet Rod Support Standard Closet Rod End Cap Bracket Shelf End Cap ShelfTrack Installation Tips ® 1. Use the correct hardware 4. Securing standards Select the hardware that is right for your wall type: Each standard must be secured to the wall with one screw at the closest hole to the center of the standards.
- Page 2 12 in. 30,5 cm Choose Your Hardware Support Bracket Closet Rod Closet Rod Support Side Wall Bracket Closet Rod End Cap Wall Clip Shelf End Cap Fixed Mount Installation Tips 1. Shelf installation 4. Corners There are three ways to install a shelf: Wall-to-Wall, Wall-to-Open, Butt shelves (A).
Need help?
Do you have a question about the ClosetMaid ShelfTrack and is the answer not in the manual?
Questions and answers