
Related Manuals for IOGear met(AL) GUD310


Summary of Contents for IOGear met(AL) GUD310
- Page 1 Quick Start Guide met(AL)™ Vault Dock USB 3.0 Docking Station with Built-In HDD Enclosure GUD310 PART NO. Q1345 www.iogear.com...
-
Page 2: Package Contents
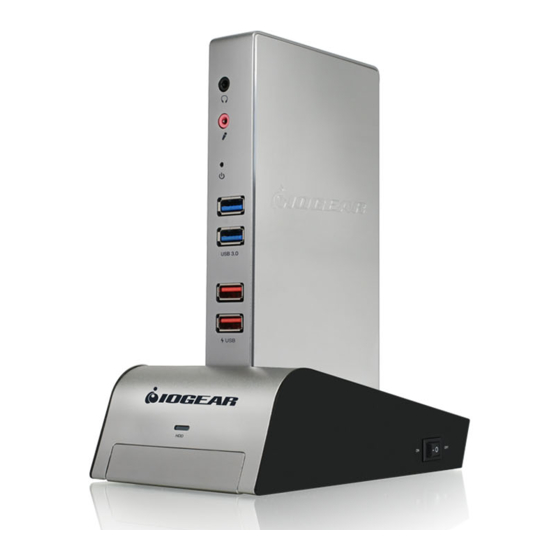
Package Contents 1 x GUD310 Docking Station 1 x USB 3.0 Type A to Type B Cable 1 x DVI to VGA Adapter 1 x DC 12V Power Adapter 1 x Software CD 4 x HDD Mounting Screws 1 x Screw Driver 1 x Quick Start Guide 1 x Warranty Card System Requirements... - Page 3 Overview Front/Side 1. Headphone 2. Microphone 3. Power Indicator 4. USB 3.0 Ports 5. USB Fast Charging Ports 6. HDD Indicator 7. 2.5” HDD Tray 8. Power Switch Back 1. Gigabit LAN Port 2. DVI Port 3. HDMI Port 4. USB 2.0 Ports 5.
-
Page 4: Software Installation
Software Installation Before connecting the Docking Station, install drivers using the provided CD. If your PC/Notebook/Mac does not have a CD drive, go to the link below to download the latest drivers: www.displaylink.com/support/downloads.php 1. Select Drivers for either Windows or Mac and then double-click the Setup.exe or DisplayLink.dmg 2. - Page 5 4. Insert the 2.5” SATA HDD into the drive tray. Ensure that the screw guides on the left and right side of the HDD are aligned on the drive tray. Fasten the HDD to the drive tray by inserting and tightening the screws. 5.
- Page 6 External Monitor Settings: Windows Option 1: Extend Mode 1. Click the DisplayLink icon in the bottom right corner to open the DisplayLink Manager Menu. 2. Roll the mouse cursor over IOGEAR USB 3.0 Dock to bring up the Manager Menu. 3. Select Extend.
- Page 7 Option 2: Mirror Mode 1. Click the DisplayLink icon in the bottom right corner to open the DisplayLink Manager Menu. 2. Roll the mouse cursor over IOGEAR USB 3.0 Dock to bring up the Manager Menu. 3. Select Mirror. 4. The resolution, color depth, and refresh rate of the primary screen are copied on to the monitor connected to the docking station.
- Page 8 External Monitor Settings: Mac OS X Option 1: Extend Mode 1. Open System Preferences and click Displays. 2. Click on Arrangement to change the position of the displays currently connected. Option 2: Mirror Mode 1. Open System Preferences and click Displays. 2.
-
Page 9: Compliance Information
European Union directives: Electromagnetic Capability (2004/108/EC), Low Voltage (2006/95/EC) and R&TTED (1999/5/EC). IC Statement Canada, Industry Canada (IC) Notices Complies with the Canadian ICES-003 Class B specifications. Declaration of Conformity and related documents can be downloaded directly from our website: http://www.iogear.com/product/GUD310/certifications... -
Page 10: Limited Warranty
WE’RE HERE TO HELP YOU! NEED ASSISTANCE SETTING UP THIS PRODUCT? Make sure you: 1. Visit www.iogear.com for more product information 2. Visit www.iogear.com/support for live help and product support iogear.custhelp.com support@iogear.com www.iogear.com 19641 Da Vinci, Foothill Ranch, CA 92610...
Need help?
Do you have a question about the met(AL) GUD310 and is the answer not in the manual?
Questions and answers