
Related Manuals for Wolf-Guard YL-007M2G


Summary of Contents for Wolf-Guard YL-007M2G
- Page 1 GSM RFID VOICE Alarm System User’s Manual For a better understanding of this product, please read this user manual thoroughly before using it. PDF 文件使用 "pdfFactory Pro" 试用版本创建 www.fineprint.cn...
-
Page 2: Table Of Contents
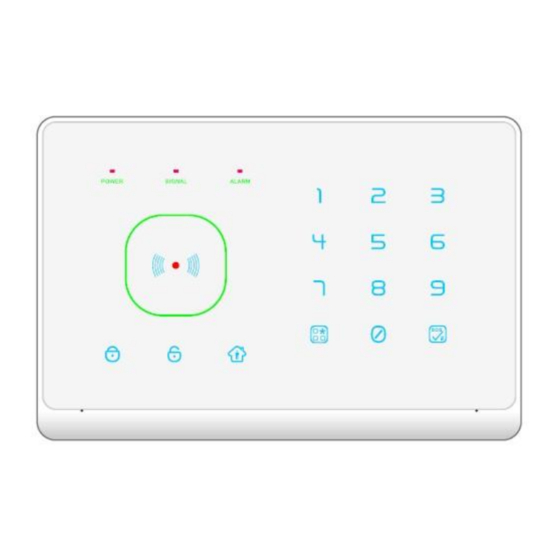
CONTENTS 10. Connect Outdoor Siren [Function Instruction] 11. Check System Status [Control Panel] 12. Command Chart Control Panel front schematic 13. System Setting by SMS diagram 14. System Setting by Remote Call Control Panel back schematic 15. Delete Settings diagram 16. -
Page 3: [Function Instruction]
[Function Instruction] ² Multi-languages voice (default: English and Chinese); system volume is adjustable (low, medium and high); ² 99 RFID cards to arm, disarm, and control the relay; ² SMS notification for disarm by RFID card; SMS content (of the first 10 cards) is editable;... - Page 4 LED indicator: LED Status System working status POWER Power supply is normal SIGNAL Flash per 0.5 second Checking SIM card Comfort LED flashing Checking GSM network Flash every 3 seconds GSM network is normal ALARM Alarming Flash per 0.5 second Alarming delay Flash every 3 seconds Remote call control...
-
Page 5: Control Panel Back Schematic
Control Panel back schematic diagram: Wired terminal block: ALARM SPK Positive of siren (red cable) 12VOUT Positive of 12V output Wired sensor 2 Wired sensor 1 Relay port PUSH Relay port PDF 文件使用 "pdfFactory Pro" 试用版本创建 www.fineprint.cn... -
Page 6: [Door Contact]
Note: Please pay attention to the siren connection. Positive side to “ALARM SPK” and negative to “GND”. Do not mix the two cables together when connecting. Otherwise, it will damage the transistor in the control panel. Wired sensor connection: connect one cable of the wired sensor to GND and the other to “Z1 or Z2”. -
Page 7: [System Alarm]
within a certain range. ² Fix the adjustment bracket on the wall with the provided screws and attach the detector to the bracket. It is recommended to mount it at a height of 2-2.2m above the floor. ² Effect of the PIR detection is best when the detection direction is in 90° angle with the walking direction of the intruder. -
Page 8: [System Settings]
wired sensors. Part trigger How to trigger alarm SOS button on the Press it in standby status, no matter under panel arm or disarm Tamper alarm The tamper alarm button on the back side of the panel is bounced up (not in setting status) SMS content: Panel tamper alarm! Emergency button on... -
Page 9: Pair Remote Controls
Pair Remote Controls Extra remote controls has to be paired to the control panel in order to perform normally. The one in the standard package has been paired. This alarm system supports maximum 10 remote controls. In setup state, press 2 to choose remote controls pairing and to confirm. -
Page 10: Leave Voice Message
system will exit and return to disarm status if there’s no operation over 30seconds. If the remote controls or wireless sensor or card has been paired before, you will hear “repeat pairing”. Leave Voice Message This system supports voice recording by the control panel or by remote call. The maximum time for recording is 12 seconds. -
Page 11: Relay Control
Relay Control Users can control the relay by 3 different ways. RFID card In standby status, swipe the RFID card over the card reading area. You will hear “away arm”. Then press 1 to open the relay (the wire ports “COM” and “PUSH”... -
Page 12: Check System Status
After setting the wireless siren, it’s recommended to encrypt it to avoid interference. The signal code sent from the panel transmitter of this model from our company are the same. If you and your neighbor both are using this model, the alarm signal from your neighbor may cause your siren to sound. In “system setting”... - Page 13 Function Setting Command Description Language setting 00*[0/1]# 0: English, 1: Chinese Voice volume 01*X# X: 1~3; 1: low, 2: medium, 3: high Panel power failure 02*[0/1]# 0: off, 1: on. System default: off. /recovery/battery low power alert reply 03*[0/1]# 0: off, 1: on. System default: on. setting SMS alert for RFID 04*[0/1]#...
- Page 14 Wireless zone 12*XX*Y# XX: defense zone number 01~99, alarm ring Y: 0: off, 1: on. e.g.: 12*01*1# the siren will ring when zone 01 is triggered. Wired defense zone 13*XX*Y# XX: defense zone number 01~02, type setting Y: zone type 1. Real time; 2. Urgent;...
- Page 15 Alarming time of 41*XX# XX: 00~30 minutes. 0 means no siren sound when alarming. System default: 03. Delay arm time 42*XX# 00~99seconds. System default: 0 (no delay) Delay alarm time 43*XX# 00~99seconds. System default: 40 Wireless 44*[0/1]# 0: off, 1: on. System default: off. transmission Wireless siren...
-
Page 16: System Setting By Sms
Chinese characters.) SMS content for 92*XX*content# XX: RFID card serial number RFID card disarm 01~10. (SMS content e.g.: 123123#91*02*Tom could not exceed disarm# English This means when the system is letters disarmed by the second RFID Chinese card, users will receive the SMS: characters.) Tom disarm. -
Page 17: Factory Reset
16. Factory Reset In standby status, press disarm button on the panel. After hearing “please enter password to disarm”, input “95175308246” and press to confirm. The panel will make voice “back to factory reset” indicating setting finished. After this operation, all the settings are returned to factory default and all the coding will be deleted. -
Page 18: Away Arm
Away Arm The Away Arm function will arm the alarm system all around your house, including the sensors, while everyone is going out. When the detector is triggered either by unauthorized entry, fires or smoke gas leak, etc., the alarm system will trigger the alarm. Operation by the control panel: Press button on keypad, system will enter arm status 40seconds later or delay time set by the user. -
Page 19: Emergency Help
The control panel will send a message back “->OK, system disarmed”. Emergency Help Press button on the control panel for about 3 seconds. No matter the system is in arm or disarm status, it will make alarm immediately. Answer Alarm Call When the control panel sounds the alarm, it will dial the preset numbers. -
Page 20: System Dialing Function
Press [1#]: arm, if finished successfully, you will hear a voice prompt “arm”. Press [2#]: disarm, if finished successfully, you will hear a voice prompt “disarm”. Press [3#]: monitor the scene. Press [4#]: two-way intercom. You can’t operate the system during this time. -
Page 21: [Components List]
Wireless modulation: ASK Anti-interference: 1V/m (frequency range: 20~1000 MHz) Wireless sensors: 99pcs Remote controls: 10pcs RFID card: 99pcs Working temperature: 0℃~+40℃ Humidity: ≤90% (no fog) [Components List] Control panel 1 pc, Remote controls 2 pcs, Wired mini siren 1 pc, PIR detector 1 pc, Door contact... - Page 22 moisture all will corrupt the electronic circuit. ² Do not use or place the alarm system in dirty locations, otherwise the electronic elements will be damaged. ² Do no place the system in excessively hot locations. High temperature will shorten the service life of electronic equipment, damage batteries, deform or even melt some plastic parts.
- Page 23 ² Since the alarm system is continuously in operation or standby mode, the supply adaptor of the control panel shall be connected to a safe and reliable socket. ² Do not place the system near your bedroom or office table, because the siren will make high-loudness sound in the case of alarm, which may adversely affect your rest or work.
- Page 24 Optional sensors/detectors are packed separately. You can choose according to your specific requirements. PDF 文件使用 "pdfFactory Pro" 试用版本创建 www.fineprint.cn...
Need help?
Do you have a question about the YL-007M2G and is the answer not in the manual?
Questions and answers