Table of Contents
Advertisement
Quick Links
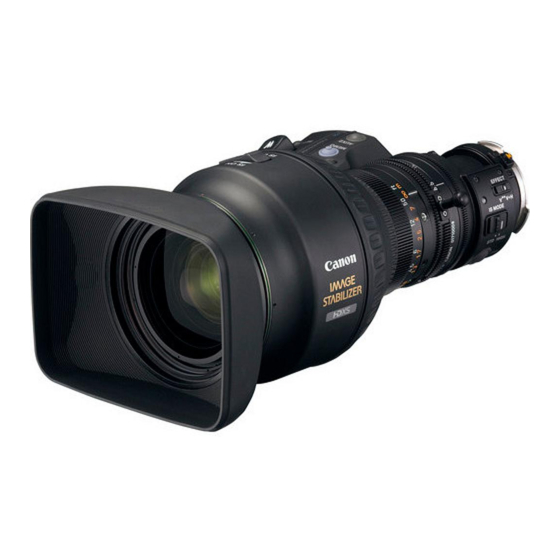
BCTV Zoom Lens
广播电视变焦镜头
HJ15ex8.5B
取扱説明書
OPERATION MANUAL
使用说明书
ご使用の前に必ずこの取扱説明書をお読みください。
なお、取扱説明書は必要に応じてご覧になれるよう大切に保管してください。
Read this operation manual before using the product.
Keep the manual in place for future reference.
在使用本产品之前 , 请务必先仔细阅读本使用说明书。请务必妥善保管好本书 ,
以便日后能随时查阅 ( 保留备用 )。请在充分理解内容的基础上 , 正确使用。
LENSES
(レンズ編)
(LENS)
(镜头汇编)
J/E/C
Advertisement
Table of Contents

Related Manuals for Canon HD XS HJ15ex8.5B


Summary of Contents for Canon HD XS HJ15ex8.5B
- Page 1 BCTV Zoom Lens 广播电视变焦镜头 LENSES HJ15ex8.5B 取扱説明書 (レンズ編) OPERATION MANUAL (LENS) 使用说明书 (镜头汇编) ご使用の前に必ずこの取扱説明書をお読みください。 なお、取扱説明書は必要に応じてご覧になれるよう大切に保管してください。 Read this operation manual before using the product. Keep the manual in place for future reference. 在使用本产品之前 , 请务必先仔细阅读本使用说明书。请务必妥善保管好本书 , 以便日后能随时查阅 ( 保留备用 )。请在充分理解内容的基础上 , 正确使用。 J/E/C...
- Page 3 日 本 語 版 ENGLISH VERSION ……………………… See Page E1 中文版 ......请参阅第 C1 页...
- Page 5 安全にお使いいただくために 製品および取扱説明書に記載されている安全に関する警告や注意事項は、 必ず守ってください。 これら危険防止の警告や注意事項にそった取扱いをしない場合、 けがや事故に至る可能性があります。 この取扱説明書 をよく読んで、 十分に理解した上で本機を正しくご使用ください。 また、 この取扱説明書は必要に応じてご覧になれるよう大切に保管してください。 この取扱説明書の中では、 お客様および他の人々の安全をお守りし、 事故を未然に防止するための警告文や注意文に以 下のシンボルマークと言葉を使用しています。 取扱いを誤った場合に、死亡または重傷を負う恐れがある警告事項が書かれています。 警告 安全に使用していただくために、必ずこの警告事項をお守りください。 取扱いを誤った場合に、負傷を負う恐れがある注意事項が書かれています。安全に使用 注意 していただくために、必ずこの注意事項をお守りください。 操作する上での注意事項、または推奨事項です。 『ご注意ください』 ここに記載されていることを守らないと、製品が正しく機能しない可能性があります。 また、操作上における有益な情報も記載されています。 取扱いについて 警告 1. 水が入ったり、 濡れたりしないようにしてください。 万一、 内部に水が入った場合は使用を中止してください。 そのま ま使用すると、 火災や感電の原因となります。 2. レンズで太陽や輝度の高い光源をのぞかないでください。 目に障害を起こす危険があります。 注意 1. レンズを持ち運ぶときは、 落下させないようご注意ください。 レンズを落下させますと、 けがの原因となることがあ ります。...
- Page 6 保守 ・ 点検について 警告 1. レンズの外装を清掃するときは、 必ずレンズケーブルを抜き、 レンズをカメラから取り外してから行ってください。 また、 ベンジン ・ シンナーなど引火しやすいものは、 使用しないでください。 火災や感電の原因となります。 『ご注意ください』 1. レンズの表面に付いたゴミやほこりは、 ブローアーで吹き飛ばすか、 柔らかい刷毛で軽く払ってください。 指紋やシミが付いた場合は、 市販のレンズクリーナーを少量浸した清浄な柔らかい綿布またはレンズクリーニング ペーパー (シルボン紙など) で軽くふき取ってください。 中心から渦を巻きながら周辺に向かってふき上げます。 ゴミなどが付着したままで強くこするとレンズ表面に傷がつくことがありますのでご注意ください。 2. 使用条件 ・ 頻度 ・ 環境などにより異なりますが、 毎年一回程度は保守点検を実施し、 必要な場合にはオーバーホールな どを行ってください。 保管について 注意 1. 保管するときは、 必ずレンズキャップ、 ダストキャップを付けてください。 キャップ無しの状態で保管した場合、 レン ズの集光作用により火災の原因となることがあります。...
- Page 7 - はじめに - このたびはキヤノンBCTVズームレンズをお買い求め頂きまして誠にありがとうございます。 このレンズはバリアングルプリズム (VAP) を搭載したENG/EFP用像ぶれ補正ズームレンズです。 この取扱説明書は以下の内容で構成されています。 ①取扱説明書 「レンズ編」 ②取扱説明書 「情報ディスプレイ編 CD-ROM」 また、 この取扱説明書は下記の製品モデルに適用されます。 HJ15ex8.5B KRSE-V S 「情報ディスプレイ編」取扱説明書では、情報ディスプレイの操作方法および操作手順が記載されています。 必要に応じてご覧ください。 取扱説明書中の記述については、下表をご覧ください。 表記 説明 例 ●●画面 情報ディスプレイの画面名は、 下線を付けて表記します。 「Top画面が表示されます。 」 など 設定項目名は [ ] で表記します。 [ ] 「 [Trk] を選択してください。 」 など 『 』 選択項目名や選択機能名は...
- Page 9 1 標準商品構成 2 各部の名称 3-1. カメラへ取り付ける 3-2. フードを取り付ける 3 取付け ・ 接続 3-3. 電源を投入する 3-4. レンズの初期化をする 4-1. フランジバック調整 4 調整 4-2. アイリスゲイン調整 5-1. ズーム操作 5-2. フォーカス操作 5-3. アイリス操作 5 操作 ・ 撮影 5-4. 像ぶれ補正機構 (IS : イメージスタビライザー) 操作 5-5. マクロ操作 5-6. スイッチ操作 6 製品仕様 巻末 資料集 付録 索引...
- Page 10 1 標準商品構成 1 標準商品構成 ご使用を始める前に以下のものが全て梱包されていることをご確認ください。 (万一、不足品がある場合はお手数でもお買い上げの販売店にご連絡をお願いいたします。 ) レンズ本体 レンズキャップ フードキャップ フード ダストキャップ 取扱説明書「レンズ編」 CD-ROM(取扱説明書「ディスプレイ編」 仕様により、上記付属品以外のアクセサリーが必要になる場合がございます。 詳細はお買い上げの販売店までお問い合わせください。 『ご注意ください』 保管にあたり下記のことに注意を払ってください。 1) 常温下に保管してください。 2) 寒いところに保管されていたレンズを急に暖かい部屋に持ち込まないようご注意ください。急に暖かい 部屋に持ち込むと、レンズ内部が曇ったり結露問題の生ずる危険があります。 3) 強い衝撃や振動をレンズに与えないようにしてください。...
- Page 11 2 各部の名称 2 各部の名称 ① フードロックノブ ② アイリスゲイン調整トリマー ※AUX ③ アイリス瞬時オートスイッチ ④ アイリス動作モード切替えスイッチ ⑤ ズームシーソースイッチ ⑥ RETスイッチ ⑦ MEMOスイッチ ⑧ F.B.ロックネジ/F.B.調整リング ⑨ 位置決めピン ⑩ マクロボタン/マクロリング ⑪ アイリスリング ※ AUX ⑫ ズームレバー/ズームリング ほかの機能を割り付けることができます。 ⑬ フォーカスリング 詳細はP26をご覧ください。 ⑭ IS ONレバー ⑮ IS OFFスイッチ ⑯ズームサーボ/マニュアル切替えノブ...
- Page 12 2 各部の名称 ディスプレイ各部の名称 DISPLAY デジタルファンクションセレクターの操作方法 PUSH...
- Page 13 3 取付け・接続 3 取付け ・ 接続 3-1. カメラへ取り付ける レンズを接続する前にカメラの電源を“OFF”にしてください。 カメラを水平またはやや上向きに固定します。 位置決めピン カメラ側のバヨネットマウントリングをレンズ側 より見て反時計方向に回転させ、保護キャップを 外します。 レンズのダストキャップを反時計方向に回転させ 外します。 電源/アイリス レンズのマウント面にある位置決めピンをカメラ コントロールケーブル マウント面にある溝にあわせてからレンズをカメ ラマウント面に密着させます。 カメラ側のバヨネットマウントリングをレンズ側 より見て時計方向に回してレンズを固定します。 レンズのドライブユニット後面部から出ている電 源/アイリスコントロールケーブルをカメラに接 続します。 カメラ 『ご注意ください』 バヨネッ トマウントリング レンズ本体やドライブユニット(バンド部 を 含 む ) を 持 っ て 、 カ メ ラ 全 体 の 重 量 を 支 え...
- Page 14 3 取付け・接続 3-2. フードを取り付ける 出荷時は、 レンズキャップが取り付けてあります。 最初にこのレンズキャップを取り外してください。 フードをレンズに取り付けます。 フードとレンズ鏡筒についている、それぞれの指 標点を合わせます。 フードロックノブを締めます。 取り外したキャップはなくさないよう大切に保管し てください。 3-3. 電源を投入する カメラの電源を"ON"状態にしてください。 レンズにも電源が供給されます。...
- Page 15 4 調整 4 調整 4-1. フランジバック調整 ズームレンズの結像面とTVカメラの結像面が合致していないと、 ズーム操作を行ったときフォーカ スが合わなくなりピンボケになります。 下記の手順でレンズのフランジバックを調整してください。 適当と思われる距離(2 ~ 5m 位)に被写体を定 めます。ジーメンス・スター・チャートがあれば 最適ですが、チャートがない場合は、コントラス トのはっきりしたものを被写体として利用すると 作業がやりやすくなります。 アイリス操作でレンズの絞りを開放(オープン) にします。 ジーメンス ・ スター ・ チャート レンズのズームを望遠端(テレ)いっぱいにしま す。 F.B.調整リング フォーカス操作で焦点(ピント)を合わせます。 レンズのズームを広角端(ワイド)いっぱいにし F.B.ロックネジ ます。 レンズの F.B. ロックネジを緩め、F.B. 調整リン グを回して焦点(ピント)を合わせます。 緩める 3 から 6 の操作を 2,3 回繰り返して、ズーム両端 での焦点(ピント)を合わせます。...
- Page 16 4 調整 4-2. アイリスゲイン調整 レンズ本体のドライブユニット前面部にアイリスゲイン調整トリマーがあります。 出荷時には適正に設定 されています。 任意に設定変更したい場合は、 小型ドライバーなどを使用して、 以下の手順で調整してくだ さい。 アイリスゲイン調整トリマーに付いているゴム キャップをめくります。 レンズ側のアイリス動作モード切替えスイッチを “A”(オート)側にします。 アイリスゲイン調整トリマーをドライバーなどで 回します。 時計方向-----------ゲインが上がります。 反時計方向--------ゲインが下がります。 レンズ本体のアイリスリングを見て、 ハンチングが 起こらない範囲で、 ゲインが最高になるように設定 してください。 ア イ リ ス ゲ イ ン 調 整 が 終 わ り ま し た ら、 ゴ ム キャップを元に戻します。...
- Page 17 5 操作・撮影 5 操作 ・ 撮影 5-1. ズーム操作 5-1-1. マニュアルズーム操作 ドライブユニット底面部のズームサーボ/マニュ ズームサーボ/マニュアル切替えノブ アル切替えノブを “MANU” 側にします。 ズームリング (またはズームレバー) を回してズー ZOOM ム操作を行います。 SERVO SERVO MANU. REMOTE1/ ZOOM VIRTUAL REMOTE2 カメラ側から見て 時計方向-----------広角 (ワイド) 側へ 反時計方向--------望遠 (テレ) 側へ 『ご注意ください』 マニュアルズーム操作を行うときは、 必ず、 ズ ー ム サ ー ボ / マ ニ ュ ア ル 切 替 え ノ ブ を “MANU”側にしてから行ってください。...
- Page 18 5 操作・撮影 レンズ本体のドライブユニット底面部にあるズー ズームサーボ/マニュアル切替えノブ ムサーボ/マニュアル切替えノブを “SERVO” 側にします。 ZOOM SERVO MANU. SERVO ドライブユニット上面部のズームシーソースイッ REMOTE1/ ZOOM VIRTUAL REMOTE2 チを押してズーム操作を行います。 スイッチの押し込み具合によりズームスピードが変 わります。 深く押すほど、 ズームスピードが速くなり ます。 ■最高ズームスピード調整ボリュームの機能 サーボズームスピードは、ズームシーソースイッチを押す深さにより変化 します。深く押すほど速くなります。 この最も深く押したときのスピードを 「最高ズームスピード」 と いいます。 「最高ズームスピード」は、調整ボリュームで調節することができます。 それにともない、押し込み量ゼロ~最大の間のスピードも変化します。 最高ズームスピード 調整ボリューム (下図参照) サーボズーム自動再生操作においての最高スピードは、最高ズームスピード調整ボリュームの調整位置に 関わらず、常に最高速度で移動します。 ※情報ディスプレイでの調整や設定も可能です。 「情報ディスプレイ編」 をご覧ください。...
- Page 19 5 操作・撮影 ■ F-Hold 機能 一般のズームレンズは望遠側にズームすると、F.No が低下します。F ドロップと呼ばれる現象です。 Fドロップの生じない焦点距離の範囲だけでズーム操作を可能にするために、F-Hold 機能が用意さ れています。 設定は情報ディスプレイで行いますが、ここでは簡単な設定方法を記載します。詳細については取 扱説明書「情報ディスプレイ編」をご覧ください。 OPEN F-Hold CLOSE WIDE TELE F-Hold の設定 (デフォルトは『OFF』に設定されています。 ) ディスプレイスイッチを押し、ディスプレイを表示させてください。 Zoom Tracking: F-Hold: Set キーを押し、右キーで、Zoom 画面を表示させてください。 Movement ( 左図参照 ) 下キーを 2 回押し、右キーまたは、左キーで『ON』または『OFF』を 選択します。 設定が完了します。 F-Hold が ON の場合 1) シャトル機能は影響を受けます。...
- Page 20 5 操作・撮影 5-1-3. ズームトラック機能 ズームコントロール域 (ズームトラック) を任意のズーム範囲で規制することができます。 この機能により望遠端 (テレ端) および広角端 (ワイド端) を仮想的に設定することができます。ズー ムトラック機能は、すべてのサーボズーム操作において有効です。 (マニュアルズーム操作には、影 響しません。 ) ズームトラック機能を使用する場合、あらかじめ機能を「ON」させておく必要があります。 「ON/ OFF」切替え方法は、以下の方法の 2 通りになります。設定方法は次ページをご覧ください。 ■ズームトラック機能「ON/OFF」切替え A:情報ディスプレイにて「ON/OFF」切替え ディスプレイスイッチを押し、ディスプレイを表示させます。 IG:50 MENU 操作キーで[Trk]を選択したあとに、Set キーを押します。 [Trk] [Trk]OFF Fr1P と前回設定が点滅表示になります。 (左図参照) Shtl Fr1P 右キーまたは、 左キーを押し 『ON』 または 『OFF』 に切り替えます。 [ ...
- Page 21 5 操作・撮影 ■ズームトラック位置の設定方法 ズームトラックの位置設定をする前に、あらかじめズームトラック機能を「ON」させておく必 要があります。 「ON/OFF」切替え方法は前ページをご覧ください。 アイリス瞬時 設定したいズームトラック位置にズーミングしま オートスイッチ MEMOスイッチ す。 そのズーム位置を保持したまま MEMO スイッチを 押しながら、アイリス瞬時オートスイッチを押し ます。本レンズの有するズーム域の中間位置に対 して、望遠側であれば望遠端、広角側であれば広 角端のズームトラック位置として記憶されます。 望遠側、広角側それぞれに 1. ~ 2. 項の操作にて設 定を行います。またはどちらか一方の設定も可能 です。 ズームトラック位置を再設定する場合は、 1.~3.項 の操作にて行います。 ( あとから設定された位置に 記憶が書き替えられます。 ) 1) ズームトラック位置を再設定する場合、サーボズーム操作では、ズーム位置を設定端点よりメカ端点 側に移動できません。このような場合、下記のいずれかを行ってください。 ・ズームトラック機能を一度 OFF にする。 (前ページ参照) ・ズームシーソースイッチ操作(14 ページ参照)にて設定のズーミングを行う。 ・手動で操作する。...
- Page 22 5 操作・撮影 5-1-4. シャトルショット シャトルショット機能を使用するには、 シャトル機能をVTR、 RET、 AUXスイッチに割付けが必要で す。 詳細は 「5-6.スイッチ操作」 をご覧ください。 1. シャトルメモリーポジションの設定 記憶させたい任意のポジションにズーミングし、 そのポ ズームシーソースイッチ ジションを保持したまま、 MEMOスイッチを押しながら 『Shtl』 スイッチを押しますとシャトルメモリーポジショ ンが記憶されます。 この記憶させたシャトルメモリーポジションは後 述の「フレーミングプリセット」で記憶させるポジ MEMOスイッチ ションとは別のものです。 また、このとき、記憶させたポジションは電源 『Shtl』 スイッチ OFF 後も記憶されています。 2. シャトルメモリーポジションへの移動 『Shtl』 スイッチを押し続けているとシャトルメモリーポジションへ最高スピードでズームして停止します。 この『Shtl』スイッチを押している間は、このポジションを維持しています。 『Shtl』スイッチによる操作を優先させているため、 『Shtl』スイッチを押している間はズームシーソー スイッチによる操作は行えません。 『Shtl』 スイッチを離すと元のズームポジションに戻ります。 すなわち2ケ所のポジションを高速で切 り替えることができます。...
- Page 23 5 操作・撮影 5-1-5. スピードプリセット VTR, RET, AUXスイッチのいずれかに『Sped』 機能を割り付けてください。 本取扱説明書では、 VTRス イッチに 『Sped』 機能を割り付けた場合で説明します。 1. ズームスピードおよびズーム方向の記憶方法 ズームシーソースイッチ 記憶させたいズームスピードとズーム方向(望遠側また は広角側) にズームシーソースイッチを操作し、 保持し たままMEMOスイッチを押します。 ズームスピードと方 向が記憶されます。 この記憶されたズームスピードは、 「フレーミング プリセット」に反映されます。 MEMOスイッチ Spedスイッチ 2. スピードプリセットの操作方法 『Sped』 スイッチを押すと、 1.項で記憶させたスピードと方向(望遠側または広角側) に向かって移動し 始め、 ズーム端へ到達すると停止します。 「シャトルショット」のようにスイッチを押し続けなくても、一度押しただけでズーム端まで移動し、復 帰ポジションも設定されません。 3. スピードプリセットでの移動中の解除 スピードプリセットでの移動中、 下記のいずれかの操作により移動が解除されます。 1) 『 Sped』 スイッチをもう一度押す。 →移動が停止する。 2)...
- Page 24 5 操作・撮影 5-1-6. フレーミングプリセット フレ-ミングプリセット[ズーム] あらかじめ決めた画角と移動スピード(ズームスピード)を容易に再現できます。 フレーミングプリセットは、Frame1 および Frame2 の 2 カ所までメモリーできます。次ページ以降の 説明では Frame1 のみ記載しています。また、Frame1 は『Fr1P』として表示しています。 フレーミングメモリーポジションへの移動スピード選択 フレーミングポジションへの移動スピードの選択は 『Fr1P』 、 『 Fr1F』 のスイッチ割付けで行います。 ・ 『Fr1P』 ------------設定スピード (Preset Speed) (工場出荷時はAUXスイッチに割り付けられています) ・ 『Fr1F』 ------------最高スピード (Fast Speed) スイッチの割付け方法は、 5-6.スイッチ操作をご参照ください。 設定組み合わせ 移動スピードの設定 フレームプリセッ ト 制御内容...
- Page 25 5 操作・撮影 1. フレーミングメモリーポジションの設定 記憶させたい任意のポジションにズーミング(およ ズームシーソースイッチ びフォーカス) し、 そのポジションを保持したまま 『MEMO』 スイッチを押しながら『Fr1P』 スイッチを押 します。 この記憶されたフレーミングメモリーポジション 『MEMO』 は「シャトルショット」で記憶させるポジション スイッチ とは別のものです。また、このときに記憶させた ポジションは電源 OFF 後も記憶されています。 『Fr1P』 スイッチ 2. フレーミングメモリーポジションへ移動する 『Fr1P』 スイッチを押すとフレーミングメモリーポジションへ選択したスピードで移動し始め、 フレーミング メモリーポジションへ到達すると停止します。 「シャトルショット」のようにスイッチを押し続けなくても、一度押しただけでメモリーポジションまで 移動し、復帰ポジションも設定されません。 3. フレーミングメモリーポジションへの移動を解除するまたは切り替える メモリーポジションへの移動中、 下記のいずれかの操作により移動が解除されます。 [ズームフレーミングプリセット] [ズームフレーミングプリセット] ● 『Fr1P』 スイッチをもう一度押す。 ● ズームシーソースイッチによる操作を行う。 ● 『Shtl』 スイッチによる操作を行う。 5-2.
- Page 26 5 操作・撮影 5-3. アイリス操作 アイリス操作はアイリス動作モード切替えスイッチによりオート/マニュアルどちらかの操作が選択で きます。 5-3-1.オートアイリス操作 アイリス動作モード切替えスイッチを “A”側にし アイリス動作モード 切替えスイッチ ます。 カメラからの指令信号によるオート (自動) アイリ ス操作になります。 ビデオ信号レベルが常に一定になるように自動 (ド ライブユニット内に組み込まれたモーターにより) でアイリスリングが回ります。 5-3-2.マニュアルアイリス操作 アイリス動作モード切替えスイッチを “M”側にし ます。 レンズ本体のアイリスリングによるマニュアル操 作になります。 レンズ本体のアイリスリングを手動で回してアイ リス操作を行います。 カメラ側から見て 時計方向-----------アイリスが絞り込まれます。 反時計方向--------アイリスが開きます。 『ご注意ください』 マニュアルアイリス操作を行うときは、 必ず、 アイリス動作モード切替えスイッチを “M”側にしてから行って ください。 “A”側のまま強引にマニュアルアイリス操作を行いますと、 故障の原因となります。 ※情報ディスプレイでの調整や設定も可能です。 「情報ディスプレイ編」...
- Page 27 5 操作・撮影 5-4. 像ぶれ補正機構 (IS : イメージスタビライザー) 操作 ISモードを切り替えることにより撮影環境に合わせた像ぶれ補正機構を選択できます。 5-4-1.像ぶれ補正機構の基本設定 ① EFFECTスイッチ スイッチパネル 像ぶれ補正機構補正方向の選択スイッチ EFFECTスイッチ V+H : 補正方向が水平 (H) +垂直 (V) の両方向に対して実行 V : 垂直 (V) のみ補正実行 ② IS MODEスイッチ IS モードの選択スイッチ TRIPOD : レンズを三脚に取り付けて使 用するときの推奨モード IS MODEスイッチ PORTABLE : レンズを担いで使用するとき の推奨モード...
- Page 28 5 操作・撮影 5-4-3.メカロックの解除および像ぶれ補正機構ON状態 IS ONレバーを「IS ON」 方向の矢印にしたがい IS ONレバー 作動させ、 完全に端の位置まで作動させると “カチッ”と音がします。 この状態で、 IS ONレ バーがロックされ、 像ぶれ補正機構が使用可能 IS OFFスイッチ となります。 このとき、 レンズ本体ISスイッチ パネル上のIS表示LEDが点灯します。 メカロック解除時 IS表示LED 像ぶれ補正機構ONの状態で、 パンニング時に、 PANスイッチを押しながら操作すると、 像ぶれ 補正機構を一時的に停止し、 止まり際の流れを 低減することができます。 ※ PA Nスイッチによる像ぶれ補正機構O N / OFF切替えをオルタネートにするか、 または モーメンタリーにするかは情報ディスプレ イ上で設定可能です。...
- Page 29 5 操作・撮影 5-5. マクロ操作 本レンズにはマクロ機能が付いています。 小さな被写体を、 至近撮影距離 (M.O.D.) よりさらに近接して撮影したい場合に使用します。 本レンズの場合は、 最短で1cm (ワイド端、 マクロ位置) まで近づいて接写できます。 マクロボタンを押してロックを解除し、押した ままの状態でレンズ本体後部にあるマクロリン マクロボタン グを、カメラ側から見て時計方向に回すとマク ロ撮影ができます。 マニュアルまたはサーボによりズームを広角(ワ イド)端一杯にしてください。 マクロボタンを押してマクロリングを回転させ、 マクロリング ピントを合わせてください。 広角端以外でもマクロ操作は可能ですが、 近接距離 が長くなります。 多点フォーカス撮影について マクロ撮影の状態で、 ズーミングして焦点距離を変えていくと、 ピントの合う位置も変化していきます。 この特性を利用して、ズーム操作だけで、同一カット内でピントの合う位置をずらしていく特殊技法 が多点フォーカス撮影です。撮影の手順は次のとおりです。 遠方の被写体にズームアップし、通常のフォーカス操作でピントを合わせます。 ズームを広角(ワイド)側に引いて、近距離の被写体にマクロ操作でピントを合わせます。 マクロボタンを 2 の状態にしたまま、再度、遠方の被写体にズームアップし、通常のフォーカス操作で ピントを合わせます。...
- Page 30 5 操作・撮影 5-6. スイッチ操作 ドライブユニットのVTR、 RET、 AUXスイッチ、 もしくはズームデマンドのAUX1、 AUX2の5つのスイッ チには、 情報ディスプレイから各機能を割り付けることができます。 工場出荷時には、 それぞれ『VTR』 、 『RET』 、 『 Fr1P』 、 『 Shtl』 、 『 Fr1P』 という機能が割り付けられています。 ここでは簡易モードでの各スイッチへの機能割付けの簡単な手順を記載します。詳細な手順につ いては取扱説明書「情報ディスプレイ編」をご覧ください。 ディスプレイスイッチを押し、ディスプレイを表示させます。 IG:50 MENU 操作キーで割付けを行いたいスイッチ名を選択し、Set キーを押しま [Trk]OFF Fr1P Shtl Fr1P す。スイッチ名とデフォルトまたは前回設定が点滅表示になります。 [ Z.M. ] [ ...
- Page 31 6 製品仕様 6 製品仕様 焦点距離 8.5-128mm 15× ズーム比 最大口径比 1:2.5 (at 8.5-68mm) 1:4.7 (at 128mm) 有効画面寸法 9.6×5.4mm ( 11mm) 包括角度 (広角端) 58.9° ×35.2° (at 8.5mm) (望遠端) 4.3° ×2.4° (at 128mm) 0.8m (マクロ時前玉より10mm) 至近距離 (広角端) 95.8×53.9cm (at 8.5mm) 至近での 撮像範囲 (望遠端)...
-
Page 33: English Version
ENGLISH VERSION The English version is the operation manual for countries other than Japan. -
Page 34: Fcc Regulations
Canadian Radio Interference Regulations CAN ICES-3(B)/NMB-3(B) We, Canon Inc., in Japan and CANON EUROPE LTD., in U.K., confirm that the BCTV zoom lens is conformity with the essential requirements of EC Directive(s) by applying the following standards: EN55103-1 and EN55103-2... -
Page 35: General Safety Information
5. If the lens is to be used in adverse environments, such as in a chemical laden atmosphere, consult with Canon’s... -
Page 36: Maintenance And Inspection
5. For further information on repairs, maintenance, or adjustments not mentioned in this operation manual, contact your Canon dealer or your Canon sales representative. 6. Note that Canon may be unable to undertake servicing or repair of a product if it is modified without consulting Canon or your Canon sales representative. - Page 37 LENSES - FOREWORD - Thank you for purchasing the Canon BCTV zoom lens. This is the broadcast ENG/EFP lens which is incorporated with Vari-Angle Prism [VAP] image stabilizer. This operation manual consists of the followings. ①Operation Manual "Lens" ②Operation Manual "Information Display CD-ROM"...
- Page 39 LENSES 1 STANDARD PRODUCT LIST 2 NOMENCLATURE 3-1. MOUNT THE LENS ON THE CAMERA 3 HOW TO MOUNT 3-2. MOUNT THE HOOD ON THE LENS 3-3. TURN IT ON 4-1. BACK FOCUS ADJUSTMENT OF THE LENS 4 ADJUSTMENT 4-2. IRIS GAIN ADJUSTMENT 5-1.
- Page 40 1 STANDARD PRODUCT LIST LENSES 1 STANDARD PRODUCT LIST Make sure all of the following items are included in the packing box. (If you find any item missing, please contact your dealer or Canon Inc.) Lens body Lens cap Hood cap...
- Page 41 2 NOMENCLATURE LENSES 2 NOMENCLATURE ① Hood Lock Knob ② Iris Gain Adjusting Trimmer ※AUX ③ Instant Auto-Iris Switch ④ Iris Operation Mode Change-over Switch ⑤ Zoom Rocker Seesaw ⑥ RET Switch ⑦ MEMO Button ⑧ Flange Back Lock Screw/Flange Back Adjusting Ring ⑨...
- Page 42 2 NOMENCLATURE LENSES Information Display Display Switch Push this to show the display. When it is pushed once, the display appears, when it is pushed again,the diplay is turned off. Display This appears when the DISPLAY switch is pushed. If two or more minutes are allowed to elapse without any operation being performed, the display turns off automatically.
-
Page 43: How To Mount
3 HOW TO MOUNT LENSES 3 HOW TO MOUNT 3-1. MOUNT THE LENS ON THE CAMERA Before mounting the lens on the camera,make sure that the camera's power is turned off. Position the camera horizontally. Locating Pin Turn the bayonet ring of the camera counterclockwise as viewed from the lens. - Page 44 3 HOW TO MOUNT LENSES 3-2. MOUNT THE HOOD ON THE LENS The lens cap is attached to the lens at the factory. Please remove the lens cap and attach the hood as instructed below. Hood Lock Knob Fit the hood on the front of the lens barrel. Align the index marks.
- Page 45 4 ADJUSTMENT LENSES 4 ADJUSTMENT 4-1. BACK FOCUS ADJUSTMENT OF THE LENS If the relationship between the image plane of the lens and the image plane of the television camera is incorrect, the object goes out of focus when the lens is zoomed. Follow the procedure below to adjust the back focus of the lens.
-
Page 46: Iris Gain Adjustment
4 ADJUSTMENT LENSES 4-2. IRIS GAIN ADJUSTMENT An iris gain adjusting trimmer is located on the front of the lens drive unit. The iris gain is set at middle of range at the factory. However, if you wish to change the iris gain, adjust the trimmer through the procedure described below. Turn over the rubber cap. -
Page 47: Zoom Operation
5 OPERATION LENSES 5 OPERATION 5-1. ZOOM OPERATION 5-1-1. Manual Zoom Operation Set the zoom operation change-over knob at the Zoom Operation bottom of the lens drive unit to “ MANU.” position. Change-over Knob Turn the zoom ring (itself or with the zoom lever). ZOOM SERVO SERVO... - Page 48 5 OPERATION LENSES Set the zoom operation change-over knob at the Zoom Operation bottom of the lens drive unit to “SERVO” position. Change-over Knob The zoom can be operated by pressing the zoom ZOOM MANU. SERVO SERVO rocker seesaw located on the top of the lens drive REMOTE1/ ZOOM VIRTUAL...
- Page 49 5 OPERATION LENSES ■ F-Hold Function As a regular zoom lens is turned toward the telephoto end, the f-number decreases. This phenomenon is referred to as “F drop.” The F-Hold function has been provided in order to enable zoom operations to be performed only within the range of the focal length where this F drop does not occur.
- Page 50 5 OPERATION LENSES 5-1-3. Zoom Track Function The zoom control range (zoom track) can be limited to selected zoom positions. This function allows virtual settings to be made for the Tele end and Wide end. The zoom track func- tion is enabled for all servo zoom operations. (This does not affect manual zoom operation.) The first step which must be taken if the zoom track function is to be used is to set the function to ON.
- Page 51 5 OPERATION LENSES ■ Setting the Zoom Track Positions The first step which must be taken if the zoom track position is to be set is to set the zoom track function to ON. To set this function to ON or OFF, refer to the previous page. Zoom to the zoom track position that you want to Instant Auto-Iris Switch...
- Page 52 5 OPERATION LENSES 5-1-4. Shuttle-Shot Function Before using shuttle-shot function, the "Shtl" function must be allocated to VTR, RET or AUX switch. For details, refer to "5-6 Switch Operations". 1. How to set the shuttle memory position Zoom in a position that you want to memorize and keep Zoom Rocker Seesaw that position.
- Page 53 5 OPERATION LENSES 5-1-5. Speed Preset Allocate the “Sped” function to VTR, RET or AUX switch. In this manual, operations are described on the assumption that “Sped” function was allocated to the VTR switch. 1. How to preset the zoom speed and direction Zoom Rocker Seesaw Operate the zoom rocker seesaw to determine the zoom speed and direction (toward telephoto angle or widest...
- Page 54 5 OPERATION LENSES 5-1-6. Framing Preset Framing Preset[Zoom] This enables a predetermined picture angle and movement speed (zoom speed) to be reproduced easily. Up to two framing presets, Frame1 and Frame2, can be stored in the memory. Only Frame1 is described in the description given on the following pages.
-
Page 55: Focus Operation
5 OPERATION LENSES 1. How to store the Framing memory position Zoom (and focus) to the position that you want to store, Zoom Rocker Seesaw while holding this zoom (and zoom focus) position, press the “Fr1P” button while holding down the MEMO button. This stores the framing memory position. -
Page 56: Iris Operation
5 OPERATION LENSES 5-3. IRIS OPERATION The iris can be operated automatically or manually by changing the iris operation mode change-over switch. 5-3-1. AUTOMATIC IRIS OPERATION Slide the iris operation mode change-over switch to the Iris Operation Mode “A” position. Change-over Switch The video level (or the iris) is automatically adjusted by the camera. - Page 57 5 OPERATION LENSES 5-4. IMAGE STABILIZER (IS) OPERATION By switching the IS mode, you can select the image stabilization feature which is suitable for your shooting environment. 5-4-1. BASIC SETTINGS OF IMAGE STABILIZER ① EFFECT switch Switch Panel Selection switch of the direction for compensation by EFFECT Switch the image stabilizer V+H...
- Page 58 5 OPERATION LENSES 5-4-3. UNLOCKING THE MECHANICAL LOCK AND SETTING THE IMAGE STABILIZER ON Slide the IS ON lever in the direction of “IS ON” IS ON Lever arrow until it clicks to stop. The IS ON lever is now locked and the image stabilizer is ready to use.
-
Page 59: Macro Operation
5 OPERATION LENSES 5-5. MACRO OPERATION When the macro function of the lens is used, macro shooting is enabled. In macro shooting, the object distance becomes shorter than the normal minimum object distance (M.O.D.). The minimum object distance by macro operation for this lens is 10mm at widest angle To operate the macro, press the macro button to unlock the macro ring. -
Page 60: Switch Operations
5 OPERATION LENSES 5-6. SWITCH OPERATIONS Functions can be assigned to the five switches: the VTR, RET, AUX switches of the drive unit, or AUX1 and AUX2 switches on the zoom demand on the information display. "VTR", "RET", "Fr1P", "Shtl", and "Fr1P"... -
Page 61: Product Specifications
6 PRODUCT SPECIFICATIONS LENSES 6 PRODUCT SPECIFICATIONS Focal Length 8.5-128mm Zoom Ratio 1:2.5 (at 8.5-68mm) Maximum Relative Aperture 1:4.7 (at 128mm) Image Format 9.6 5.4mm ( 11mm) 58.9° 35.2° (at 8.5mm) (Widest angle) Angular Field of View (Telephoto angle) 4.3° 2.4° (at 128mm) Minimum Object 0.8m (10mm from the front lens vertex in macro mode) Distance (M.O.D) - Page 62 LENSES MEMO...
- Page 63 中 文 版 中文版为中华人民共和国用使用说明书。...
- Page 64 有害物质 部件名称 六价铬 多溴联苯 多溴二苯醚 铅(Pb) 汞(Hg) 镉(Cd) (Cr(VI)) (PBB) (PBDE) 电气实装部分 × ○ ○ ○ ○ ○ 金属部件 × ○ ○ ○ ○ ○ 本表格依据 SJ/T 11364 的规定编制。 ○ : 表示该有害物质在该部件所有均质材料中的含量均在 GB/T 26572 规定的限量要求以下。 × : 表示该有害物质至少在该部件的某一均质材料中的含量超出 GB/T 26572 规定的限量要求。 FOR P.R.C.
- Page 65 镜头 安全使用须知 请务必严格遵守产品以及使用说明书中记载的有关安全使用警告和注意事项。 操作时不严格遵守这些防止危险的警告和注意事项, 则有可能导致发生受伤或事故。 请认真阅读和充分理解本使用说明书的内容, 正确使用本产品。 请妥善保管本使用说明书, 以备需要时能够随时予以查阅。 为能确保顾客和他人的安全, 有效地杜绝事故发生, 我们在本使用说明书的警告事项和注意事项中采用了以下 标记符号和表述。 记载了有关错误使用操作将有可能导致死亡或重伤之危险的警告事项。为了 警告 能够确保安全使用,请务必严格遵守这些警告事项。 记载了有关错误操作使用将有可能导致人体受伤之危险的注意事项。为能确 注意 保安全使用,请务必严格遵守这些注意事项。 描述了涉及操作方面的注意事项或建议采纳事项。 不严格遵守这些记载内容, 须知 则将可能使产品不能正常地发挥其功能作用。同时,还记载了有关操作方面 的有用信息。 关于操作使用 警告 1. 请勿使本产品浸入水中或淋水。 万一发生了内部进水的情况, 请停止使用。 继续使用有可能引起火灾或触电 事故。 2. 请勿通过镜头直视太阳或高亮度的光源, 否则有可能造成眼睛受损 。 注意 1. 携带镜头时, 请注意不要跌落。 镜头跌落有可能导致操作人员受伤。 2.
- Page 66 镜头 关于保养与检修 警告 1. 清洁镜头的外表装饰件时, 必须首先拔出镜头电缆, 从摄像机上拆下镜头之后, 再进行清洁。 而且, 请勿使用 苯炔类稀释剂等易燃物品。 否则将会引发火灾或触电。 须知 1. 镜头表面附着有污垢或灰尘时, 请使用吹风机将其清除, 或使用柔软毛刷轻轻拂拭。 发现指纹或污点附着于 镜头表面时, 请使用干净柔软的棉布含浸少量的市场上销售的镜头专用清洁剂, 或使用镜头专用清洁纸 (皱 纹纸等) 轻轻地擦拭。 擦拭时, 应从中心部位开始画圈地向四周轻轻擦拭。 请注意, 用力擦拭附着污垢的镜头, 有可能损伤镜头表面。 2. 定期检修 检修保养的时间会因使用条件, 次数, 环境等不同而异, 但至少应毎年进行一次检修保养, 必要时可进行彻 底的拆卸检修。 关于保管 注意 1. 保管时, 请务必盖好镜头盖(或遮光盖) , 防尘盖。 如果在未盖好盖子的状态下加以保管, 则有可能因镜头的 聚光作用而导致发生火灾。...
- Page 67 镜头 - 前言 - 非常感谢您购买佳能BCTV 变焦镜头产品。 此镜头装载了可变角度棱镜 (VAP) , 是一种用于ENG/EFP的像摆动补偿变焦镜头。 本使用说明书的内容如下 : ① 《镜头汇编》 ② 《信息显示屏汇编[CD-ROM]》 本册使用说明书可适用于下列产品机型。 镜头 HJ15ex8.5B KRSE-V S 使用说明书《信息显示屏汇编》中,描述了信息显示屏的操作方法及操作步骤,请根据需要进行查阅。 关于使用说明书的描述内容,请参阅下表。...
- Page 69 镜头...
- Page 70 1 标准产品组成 镜头 1 标准产品组成 开始使用之前,请核实确认下列全部包装物件。 (万一发现有物件缺失,烦请与购买本产品的销售店联系。 ) 镜头主体 镜头盖 遮光盖 遮光罩 防尘盖 CD-ROM(使用说明书《显示屏汇编》 ) 使用说明书《镜头汇编》 选购不同规格时,必须配备上述附属件以外的其他配套件。有关详细情况,请与购买产品的销售店或佳能 公司联系洽询。 须知 保管时必须严格遵守下列注意事项 : 1) 必须保管于常温下。 2) 必须注意,切勿将保管于阴冷场所内的镜头立即拿到温度较高的房间内。立即拿到温度较高的 房间内,则有可能导致镜头内部产生雾气或结霜的危险。 3) 切勿剧烈地碰撞或振动镜头。...
- Page 71 2 各部位名称 镜头 2 各部位名称 ① 遮光罩锁定螺钉 ② 光圈增益微调器 ※AUX ③ 光圈瞬态自动开关 ④ 光圈操作模式切换开关 ⑤ 变焦往复推移开关 ⑥ RET开关 ⑦ MEMO开关 ⑧ 后焦锁定螺钉/后焦调节环 ⑨ 定位销 ⑩ 趋近拍摄按钮/微距光环 ⑪ 光圈环 ※ AUX ⑫ 变焦杆/变焦环 可以配备其它功能。 有关详细内容, 请参阅C26。 ⑬ 聚焦环 ⑭ IS ON键钮 ⑮...
- Page 72 2 各部位名称 镜头 信息显示屏 DISPLAY 操作键的使用方法 PUSH...
- Page 73 3 安装与连接 镜头 3 安装与连接 3-1. 镜头与摄像机的配套安装 连接镜头之前, 必须将摄像机的电源设为 “OFF” 。 固定摄像机,使其保持水平或稍稍朝上。 沿逆时针方向转动摄像机侧的反锥卡座环, 从摄像机基座取下防尘盖。 从镜头取下防尘盖。 将设在镜头基座面上的定位销,与摄像机基 座面上的凹槽对齐,然后将镜头牢固地安装 于摄像机的基座面上。 从镜头凸面前端视看,沿顺时针方向转动摄 像机侧的反锥卡座环,固定镜头。 将从镜头驱动装置后面引出的电源和光圈控 制电缆,连接于摄像机上。 须知 切勿握持镜头主体或驱动装置 (包括束带部 分) 使其承受摄像机的全部重量。 向基座和 驱动装置等部位施加过度的力, 会导致损坏 镜头各部位的机构。 1) 请妥善保管取下的防尘盖, 以免丢失。 2)...
- Page 74 3 安装与连接 镜头 3-2. 镜头与遮光罩的配套安装 出厂时已配备了镜头盖。 请按指定处移动镜头和配备遮光罩。 将遮光罩安装于镜头的前端。 标注于遮光罩和镜筒上的各个指标点对齐。 紧固遮光罩锁定螺钉。 请妥善保管取下的遮光盖, 以免丢失。 3-3. 接通电源 将摄像机的电源设为 “ON” , 向镜头输送电源。...
- Page 75 4 调整 镜头 4 调整 4-1.镜头的后焦调整 如果变焦镜头的成像镜面与T V 摄像机的成像镜面不一致, 则会在变焦时导致产生聚焦错位, 焦点模糊。 按照以下操作步骤, 调整镜头的后焦。 将被拍摄物体定位于合适的距离(2 ~ 5m) 位置上。最好是使用西门子星形图, 如果没有, 可以将对比度清晰的物体作为被拍摄物体使 用,以便进行操作。 操作光圈,打开镜头光阑。 操作变焦,将镜头拉至长焦端尽头。 操作聚焦,对准焦点。 操作变焦,将镜头拉至广角端尽头。 拧松镜头上的后焦锁定螺钉,转动后焦调节 环,对准焦点。 重复步骤 3 ~ 6 的操作,确认变焦两端的焦 点是否已经吻合。 决定了后焦调节环的正确位置之后,紧固后焦...
- Page 76 4 调整 镜头 4-2. 光圈增益调整 镜头主体驱动装置前面, 设有光圈增益微调器。 出厂时, 光圈增益已设定在中间范围段。 需任意改变设定时, 可以按以下操作步骤调整微调器。 取下塑胶盖。 将光圈操作模式开关设至“A” 。 用小型螺丝刀等工具,按照以下方式转动光 圈增益微调器进行调整。 顺时针方向 ------ 增益上升 逆时针方向 ------ 增益下降 在不会引发图像摆动的范围内, 将增益调整至 最大。 完成调整后,重新盖好塑胶盖。 ※可以在信息显示屏上调整光圈增益。 请参阅使用说明书 《信息显示屏汇编》 。...
- Page 77 5 操作 镜头 5 操作 5-1. 变焦操作 5-1-1. 手动变焦操作 将位于驱动装置底面的变焦操作切换旋钮, 设至“MANU”侧。 转动变焦环(或握持变焦杆) 。 ZOOM SERVO SERVO MANU. REMOTE1/ ZOOM VIRTUAL REMOTE2 从摄像机侧视看 顺时针方向 ------ 广角侧 逆时针方向 ------ 长焦侧 须知 手动操作变焦时, 必须将变焦操作切换旋 钮设至 “MANU” 侧。 如果不改变 “SERVO” 侧的设定, 强制进行手 动变焦操作,...
- Page 78 5 操作 镜头 将 驱 动 装 置 底 面 的 变 焦 操 作 切 换 旋 钮 设 至 “SERVO”侧。 按下镜头驱动装置上的变焦往复推移开关, ZOOM MANU. SERVO SERVO 执行变焦操作。 REMOTE1/ ZOOM VIRTUAL REMOTE2 此时, 可以根据按动开关的用力程度, 改变变焦 速度。 按键越深, 速度越快。 ■最高变焦速度调整旋钮...
- Page 79 5 操作 镜头 ■ F-Hold 功能 普通的变焦镜头将变焦距拉至长焦侧时,会使 F.No(光量)降低。我们把这种现象称为“F 下降(光量下降) ” 。为了能在控制 F 下降(光量下降)产生的焦点距离范围内执行变焦操作, 配备了 F-Hold 功能。 可以在信息显示屏上进行设定,但本章节仅记载了简单的设定方法。有关详细内容,请参 阅使用说明书(信息显示屏汇编) 。 F-Hold 的设定(默认值已设为『OFF』 。 ) 按下显示屏开关,启动显示屏。 Zoom Tracking: F-Hold: 按下 Set 键,选按右移键,启动 Zoom 画面显示。 Movement (参见左图) 按动下移键 2 次,选按右移键或左移键,选择“ON”或“OFF” 。 ...
- Page 80 5 操作 镜头 5-1-3.变焦跟踪功能 可以在任意的变焦控制范围内,限制变焦控制领域(变焦跟踪) 。 利用此功能,可以虚拟设定长焦端和广角端。变焦跟踪功能可以有效地用于全部的伺服变焦 操作。 (不会影响手动变焦操作。 ) 使用变焦跟踪功能时,必须预先将该功能设为“ON” 。 “ON/OFF”的切换方法,具有以下 2 种 方式。有关设定方法,请参阅下一页。 ■变焦跟踪功能“ON/OFF”切换 A : 在信息显示屏上切换“ON/OFF” 按下显示屏开关,启动显示屏。 IG:50 MENU [Trk]OFF Fr1P 用操作键选择[Trk]之后,选按 Set 键。此时, [Trk]与前 Shtl Fr1P 次的设定将出现闪烁。 (参见左图) [ Z.M. ] [ I-Tq ] H 选按右移键或左移键,切换至“ON”或“OFF”...
- Page 81 5 操作 镜头 ■变焦跟踪位置的设定方法 设定变焦跟踪位置之前, 必须预先将该变焦跟踪功能设为“ON” 。有关“ON/OFF”切换方法, 请参阅上一页。 将变焦距拉至需设定的变焦跟踪位置。 保持此变焦位置不变的同时,一边按下 M E M O 开关,一边按下光圈瞬态自动开关。以本镜头 所具备的变焦领域的中间位置为准,如果选择 靠近长焦端或广角端,则将记忆所选择的长焦 端或广角端的变焦跟踪位置。 按照 1 ~ 2 项的操作,分别在长焦侧,广角侧 进行设定。或者也可以仅在其中的一侧进行设 定。 需重新设定变焦跟踪位置时, 按照1~3项进行 操作。 ( 此时, 记忆将被改写成后设定的位置。 ) 1) 重新设定变焦跟踪位置时,不能利用伺服变焦操作将变焦位置从设定端点移动至机械端点。此 时,请采用以下任意方式进行操作。 ·再次将变焦跟踪功能设为“OFF” 。 (参见上一页) ·利用变焦往复推移开关进行操作(参见 C14 页) ,设定变焦距。 ·手动进行操作。...
- Page 82 5 操作 镜头 5-1-4.快速梭动功能 使用快速梭动功能, 必须将“Shtl” 功能配备于VTR, RET或AUX开关。 有关详细内容, 请参阅“5-6 开关操作” 。 1. 梭动内存位置的设定 将焦距拉至需记忆的任选位置, 保持此位置不变。 一边按下MEMO开关, 一边按下“Shtl” 开关, 则将记忆 梭动内存位置。 已记忆的梭动内存位置,与后述的“取景预设” 中记忆的位置不同。 而且, 此时所记忆的位置, 切断(OFF)电源之后, 仍可保留记忆。 2. 向梭动内存位置移动 持续地按下“Shtl”开关,能以最高速度将变焦距拉至梭动内存位置 ( 预设变焦位置 ) 后予以停止。 按下“Shtl”开关的时间内,可以使变焦保持于梭动内存位置不变。 此时将会优先执行“Shtl”开关启动的操作,因此,按下“Shtl”开关的时间内,不能执行变焦 翘板开关启动的操作。 松开“Shtl”开关,可以返回到原来的变焦位置。也就是说可以高速切换 2 个位置(梭动内存位置 和初始位置)...
- Page 83 5 操作 镜头 5-1-5. 速度预设 请将“S p e d” 功能配备于V T R, R E T或A U X 中的任意一个开关。 本使用说明书阐述说明了已将 “Sped” 功能配备于VTR 开关这种情况。 1. 变焦速度及变焦方向的记忆方法 按照需记忆的变焦速度和变焦方向(长焦侧或广角 侧) , 操作变焦往复推移开关, 保持不变的同时, 按下 MEMO 开关, 则将记忆变焦速度和方向。 已记忆的变焦速度, 会如实反映给“取景预设” 。 2. 速度预设的操作方法 按下 “Sped” 开关, 开始向1项中所记忆的速度和方向 (长焦侧或广角侧) 移动, 到达变焦端后停止。 如“快速梭动”所示,不必持续按下开关,只需按下一次,就会移动到变焦端,而且不必设定...
- Page 84 5 操作 镜头 5-1-6. 取景预设 取景预设[变焦] 可以便于再现预先决定的视角和移动速度(变焦速度) 。 取景预设最多可记忆 2 处, “ Frame1” 及 “Frame2” 。以下章节的说明, 仅阐述有关 “Frame1” 的内容, 并将“Frame1”列为“Fr1P”予以描述。 向取景内存位置移动的速度选择 要选择向取景位置的移动速度,根据“Fr1P” 、 “Fr1F”的开关分配进行。 •“Fr1P”------- 设定预设速度(预设速度) (出厂时,已分配给 AUX 开关) •“Fr1F”------- 设定最高速度(最快速度) 有关开关的分配方法,请阅览 5-6. 开关操作。 取景预设 [变焦] 的设定 此为插图举例。请注意,已将功能配备给其他开关时,刊载插图会与实际开关状态有所不同。 1) “Fr1P”功能 -------- 出厂时,已分配给 AUX 开关。...
- Page 85 5 操作 镜头 1. 取景内存位置的设定 将变焦距及聚焦拉至需记忆的任意位置, 保持此位 置不变的同时, 一边按下M E M O开关, 一边“F r1P” 开 关, 则将记忆取景内存位置。 已记忆的取景内存位置,与“快速梭动功能” 中记忆的位置不同。 并且,此时记忆的位置,切断(OFF)电源后, 仍可保留记忆。 2. 向取景内存位置移动 按下 “Fr1P” 开关, 开始以选择速度向取景内存位置移动, 到达取景内存位置后停止。 如“快速梭动功能”所示,不必持续按下开关,只需按下一次,就会移动到内存位置,而且 不必设定复位位置。 3.向取景内存位置移动的解除或切换 向取景内存位置移动中, 执行以下任意操作, 则将解除移动。 [变焦取景预设] ● 再次按下 “Fr1P” 开关。 ● 利用变焦往复推移开关进行操作 ●...
- Page 86 5 操作 镜头 5-3. 光圈操作 光圈操作可使用光圈操作模式切换开关至自动或手动。 5-3-1. 自动光圈操作 将光圈操作模式切换开关设至 “A” 侧。 摄像机自动调整录像拍摄电平 (或光圈) 。 光圈环根据摄像机发出的指令信号自动进行 (由内置于驱动装置内的电机进行驱动) 旋转。 5-3-2. 手动光圈操作 手动操作光圈时, 将光圈操作模式切换开关设 至 “M” 侧。 手动旋转镜头光圈环, 调整录像拍摄电平。 手动旋转镜头光圈环, 从摄像机侧视看时 : 顺时针方向, 光圈光阑缩小。 逆时针方向, 光圈光阑开放。 须知 手动操作光圈时, 必须将光圈操作模式切 换开关设至 “M” 侧。 如果不改变 “A” 侧的设 定,...
- Page 87 5 操作 镜头 5-4. 图像摆动补偿机构 (IS: 图像稳定器) 的操作 可以通过切换IS模式, 选择符合摄影环境要求的图像摆动补偿机构。 5-4-1.图像摆动机构的基本设定 ① EFFECT开关 用于选择图像摆动补偿机构补偿方向的选择 开关。 V + H : 补偿方向可以按照水平 (H) + 垂直 (V) 的两个方向执行补偿。 : 仅按照垂直 (V) 方向执行补偿。 ② IS MODE开关 用于选择IS模式的选择开关。 TRIPOD : 将镜头安装于三角架上予以使用 时的推荐使用模式。 PORTABLE : 肩扛镜头予以使用时的推荐使用 模式。...
- Page 88 5 操作 镜头 5-4-3.机械锁定的解除及图像摆动补偿机构ON状态 按照“I S O N” 方向的箭头所示, 操作移动 IS ON键钮, 将其完全移动至尽头位置时, 将 会发出“咔嚓” 的响声。 此状态下, 可以锁定 IS ON键钮, 并可以使用图像摆动补偿机构。 此时, 镜头主体I S开关操作面板上的I S显示 LED, 将会发出亮光。 图像摆动补偿机构O N状态下, 摆动拍摄时, 只需一边按动P A N开关, 一边进行操作, 即可 暂时停止使用图像摆动补偿机构, 可以减少 停止时产生的波动。 ※ 可以在信息显示屏上, 把利用P A N开关来执行 图像摆动补偿机构的ON / OFF切换操作,...
- Page 89 5 操作 镜头 5-5. 趋近拍摄操作 本镜头设有趋近拍摄功能。 可以从至近距离(M.O.D)靠近微小的被拍摄物体进行趋近拍摄。 本镜头可以最短靠至10mm ( 广角端, 趋近位置) 的近距离进行拍摄。 按下趋近拍摄按钮,解除锁定,保持按下的 状态不变,从摄像机侧视看,沿顺时针方向 转动镜头主体后面的趋近拍摄按钮,则可进 行趋近拍摄。 利用手动或伺服操作,将变焦距拉至广角侧 尽头。 按下趋近拍摄按钮, 转动微距光环, 对准焦点。 除广角端外, 也可以进行趋近拍摄, 但接近距离 较长。 关于多点聚焦拍摄 趋近拍摄状态下,通过变焦改变焦点距离后,焦点的吻合位置也将发生变化。 利用这一特性,仅执行变焦操作,在同一拍摄镜头内偏移焦点吻合位置的特技拍摄法,被称为 多点聚焦拍摄。 拍摄步骤如下 : 变焦放大远处的被拍摄物体,利用常规聚焦操作,对准焦点。 将变焦拉至广角侧,利用趋近拍摄操作,将焦点对准近距离的被拍摄物体。 将趋近拍摄按钮固定于 2 的状态下,再次变焦放大远处的被拍摄物体,利用常规聚焦操作,对准 焦点。...
- Page 90 5 操作 镜头 5-6. 开关操作 可从信息显示屏为驱动装置的 VTR、RET、AUX 开关或变焦电动控制器的 AUX1、AUX2 这 5 个开 关分配各种功能。出厂时, 已分别配备了“VTR” 、 “RET” 、 “Fr1P” 、 “Shtl” 、 “Fr1P”这些功能。 这里将介绍在简易模式下为各开关分配功能的简单步骤。有关详细操作步骤,请阅览使用说明书《信 息显示屏汇编》 。 按下显示屏开关,启动显示屏。 IG:50 MENU [Trk]OFF Fr1P 利用操作键, 选择需配备的开关名称之后, 按下 Set 键。此时, Shtl Fr1P 开关名称和默认功能,或前次的设定内容将出现闪烁。 [ ...
- Page 91 6 产品规格 镜头 6 产品规格 后焦 48mm(空气换算) 滤光镜 φ 82mm P0.75 (镜头镜筒) 光圈 由摄像机控制 基座 必备输入电压 标准 DC12V(10 ~ 17V) 消耗电流 最大 500mA ( “R”型镜头) 体积大小 170.2×119.1×239.1mm (W×H×L) 重量 约 1.99kg 使用环境条件 温度 : - 20℃至+ 45℃的范围内 相对湿度 : 5%RH 至 95% 的范围内(不允许产生结霜)...
- Page 92 镜头 MEMO...
- Page 93 Инструкция по эксплуатации, отвечающая маркировке EAC EAC белгісіне сай пайдаланушы нұсқаулығы На русском языке……………………См. страницу R1 Қазақ тілінде…………………………K1 бетін қараңыз...
-
Page 95: Дата Изготовления
(1) Прочитайте «Информацию по общей технике безопасности» (на тыльной стороне) перед началом использования продукта. (2) Прочитайте эту инструкцию перед началом использования продукта. Храните ее в легкодоступном месте для использования. Предисловие Благодарим за приобретение зум-объектива Canon BCTV. Данное руководство пользователя распространяется на следующие модели: LENSES HJ15ex8.5B KRSE-V S ДАТА... - Page 96 изделие может упасть и привести к травме. 5. В случае необходимости ремонта изделия, выполнения операций или регулировок, не описанных в настоящем руководстве пользователя, обратитесь к представителю Canon или дилеру, у которого вы приобрели данное изделие. 6. При использовании данного изделия под прямыми солнечными лучами внутренние узлы изделия могут...
- Page 97 ПРЕДУПРЕЖДЕНИЕ 1. В случае возникновения любого из следующих отклонений от нормальной работы немедленно отсоедините кабель от фотоаппарата и обратитесь к представителю Canon или дилеру, у которого вы приобрели изделие: ・ дым, аномальный запах или аномальный шум; ・ попадание посторонних предметов (включая металлы и жидкости) внутрь изделия.
- Page 98 приведенной в настоящем руководстве, обратитесь к дилеру Canon или вашему торговому представителю Canon. 6. Следует иметь в виду, что компания Canon, возможно, не сможет провести обслуживание или ремонт изделия, если оно было изменено без согласования с компанией Canon или вашим торговым представителем Canon.
-
Page 99: Как Устанавливать
КАК УСТАНАВЛИВАТЬ LENSES КАК УСТАНАВЛИВАТЬ УСТАНОВИТЕ ОБЪЕКТИВ НА КАМЕРУ Перед установкой объектива на камеру убедитесь, что она отключена от электропитания. У а Расположите камеру горизонтально. Поверните байонетное кольцо камеры против часовой стрелки, если смотреть со стороны объектива. Снимите пылезащитную крышку с узла крепления... - Page 100 КАК УСТАНАВЛИВАТЬ LENSES УСТАНОВКА БЛЕНДЫ НА ОБЪЕКТИВ Для защиты объектива производитель надел на него крышку. Снимите крышку с объектива и установите на ее место бленду, как показано ниже. Р а а а Наденьте бленду на переднюю часть корпуса объектива. Совместите метки бленды и объектива. Затяните...
-
Page 101: Управление Трансфокацией
УПРАВЛЕНИЕ LENSES УПРАВЛЕНИЕ УПРАВЛЕНИЕ ТРАНСФОКАЦИЕЙ Ручное управление трансфокацией Установите переключатель системы управления П а а а а трансфокацией в нижней части привода объектива в положение “MANU.” Поверните кольцо трансфокатора (или рычаг ZOOM SERVO SERVO MANU. REMOTE1/ ZOOM трансфокатора) для выполнения трансфокации. VIRTUAL REMOTE2 ПРИМЕЧАНИЕ... -
Page 102: Технические Характеристики
ТЕХНИЧЕСКИЕ ХАРАКТЕРИСТИКИ LENSES ТЕХНИЧЕСКИЕ ХАРАКТЕРИСТИКИ Ф а 8,5-128 К а а 1:2,5 ( а 8,5-68 Ма а а а 1:4,7 ( а 128 Ф а а 9,6 5,4 ( 11 а ) 58,9° 35,2° ( а 8,5 У а 4,3° 2,4° ( а 128 М... -
Page 103: Жасап Шығарылған Күні
оқыңыз. Қауіпсіздік шараларын сақтау керек. (2) Өнімді пайдаланбай тұрып пайдаланушы нұсқаулығын (осы парақ) оқыңыз. Нұсқаулықты болашақта анықтама алуға дайын сақтаңыз. АЛҒЫ СӨЗ Canon BCTV үлкейткіш объективін сатып алғаныңыз үшін рақмет. Бұл пайдаланушы нұсқаулығы келесі үлгілерге қатысты: LENSES HJ15ex8.5B KRSE-V S ЖАСАП... -
Page 104: Жалпы Қауіпсіздік Ақпараты
тексеріп, босап қалған бөліктерін бекітіңіз. Болмаса, өнім құлап, жарақат алуға әкеліп соғуы мүмкін. 5. Егер осы өнімді жөндеу немесе осы пайдаланушы нұсқаулығында көрсетілмеген жұмыстар мен баптауларды орындау қажет болса, Canon өкілі немесе бастапқыда өнімді жеткізген дилермен хабарласыңыз. 6. Бұл өнім тікелей күн көзінде пайдаланылған кезде құралдың ішкі бөліктері жоғары температураға дейін қызуы... - Page 105 бөлмеге алып келместен бұрын, оны тиімді ылғалжұтқыш бар винил қалтаға салыңыз да, бөлмеге алып келіңіз. Өнім температурасы бөлме температурасымен бірдей деңгейге жеткенде, оны винил қалтадан шығарыңыз.) 5. Егер өнім химиялық құрам толтырулары бар орта сияқты қолайсыз орталарда пайдаланылатын болса, Canon өкілімен алдын ала кеңесіңіз.
- Page 106 ТҰТЫНУШЫ НАЗАРЫНА 1. Canon компаниясы тұтынушының осы өнімді дұрыс пайдаланбауы салдарынан тиген зиян үшін жауап бермейді. 2. Canon компаниясы өнім сапасы, функциялары немесе пайдаланушы нұсқаулығына байланысты және тұтынушы мақсатында өнімнің өтімділігі мен жарамдылығы үшін ешқандай кепілдік бермейді. Онымен қоса, Canon компаниясы тұтынушы мақсатында пайдаланудан туындаған кез келген тікелей не...
- Page 107 ОРНАТУ ЖОЛЫ LENSES ОРНАТУ ЖОЛЫ ОБЪЕКТИВТІ КАМЕРАҒА ОРНАТУ Объективті камераға орнатпай тұрып, камераның қуаты өшірулі екенін тексеріңіз. Камераны көлденеңінен қойыңыз. О Камераның байонет сақинасын объективтен қарағанда сағат тіліне қарсы бұраңыз. Камераның бекіткішінен шаңнан қорғайтын қақпақты шешіңіз. Объективтен шаңнан қорғайтын қақпақты шешіңіз. Объектив...
- Page 108 ОРНАТУ ЖОЛЫ LENSES ОБЪЕКТИВКЕ БЛЕНДАНЫ ОРНАТУ Объектив қабы объективке зауытта бекітіледі. Төменде нұсқауға қарап, объектив қақпағын алыңыз және бленданы бекітіңіз. Б а а Бленданы объектив цилиндрінің алдында а орнатыңыз. Блендадағы және объектив цилиндріндегі көрсеткіш белгілерді туралаңыз. Бленданы құлыптау тұтқасын бекемдеңіз. О...
-
Page 109: Үлкейту Операциясы
БАСҚАРУ LENSES БАСҚАРУ ҮЛКЕЙТУ ОПЕРАЦИЯСЫ Үлкейтуді қолмен басқару а Объективтің іске қосу бірлігінің төменгі жағындағы үлкейту а операциясын өзгерту тұтқасын МАNU. күйіне орнатыңыз. Үлкейту операциясын орындау үшін үлкейту сақинасын (немесе үлкейту тұтқасын) бұрыңыз. ZOOM SERVO SERVO MANU. REMOTE1/ ZOOM VIRTUAL REMOTE2 ЕСКЕРТПЕ... -
Page 110: Техникалық Сипаттамалар
ТЕХНИКАЛЫҚ СИПАТТАМАЛАР LENSES ТЕХНИКАЛЫҚ СИПАТТАМАЛАР Ф 8,5-128 Ма а а 1:2,5 (8,5-68 Ма а а а а а 1:4,7 (128 С 9,6 5,4 ( 11 (Е 58,9° 35,2° (8,5 Б (Т 4,3° 2,4° (128 Н а а а а (НМ ) ( а... -
Page 111: Technical Information
資料集 TECHNICAL INFORMATION 资料汇编... - Page 113 外観図 EXTERNAL VIEW 外观图 HJ15ex8.5B KRSE-V S...
- Page 115 索 引 RET ........................26 VTR ........................26 アイリス ......................22 オートアイリス ....................22 ジーメンススターチャート ..................11 ズーム ........................13 像ぶれ補正機構(IS:イメージスタビライザー) ..........23 フード ......................... 10 フォーカス ......................21 フランジバック ....................11 マクロ ......................... 25 INDEX AUTO IRIS ....................E22 BACK FOCUS .....................E11 FOCUS ......................E21 HOOD ......................E10 IMAGE STABILIZER (IS) ................E23 IRIS ......................E22...
- Page 117 Canon Canada, Inc. Broadcast and Communications Div. 6390 Dixie Road, Mississauga, Ontario, L5T 1P7, Canada Tel:+1(905)795-2012 Fax:+1(905)795-2087 Mexico Canon Mexicana, S. de R.L. de C.V. Call Center Div. Blvd. Manuel Avila Camacho No,138, Col. Lomas de Chapultepec, Mexico, D.F.
- Page 118 〒 146-8501 東京都大田区下丸子 3-30-2 仕様・外観・商品構成などはお断りなく変更することがあります。 CANON INC. 30-2, Shimomaruko 3-chome, Ohta-ku, Tokyo, 146-8501, Japan Subject to change without notice. 进口商 : 佳能(中国)有限公司 地址 : 100005 北京市东城区金宝街 89 号 金宝大厦 15 层 规格・外观・商品构成等进行变更,恕不事先一一通知。 初版 :2015.2.1 原产地 : 日本 Pub No. B-IM-20241-0 2015.02 CANON INC. ©...
Need help?
Do you have a question about the HD XS HJ15ex8.5B and is the answer not in the manual?
Questions and answers