Table of Contents
Advertisement
Quick Links
Advertisement
Table of Contents

Related Manuals for Cookworks KWS1009J-H10R


Summary of Contents for Cookworks KWS1009J-H10R
- Page 1 TO215X01302G KWS1009J-H10R 129/8770 同 单 TO214X03774G...
- Page 2 Instruction Manual Please keep for future reference KWS1009J-H10R...
- Page 3 IMPOR TANT SAFETY INSTRUCTIONS Read all the instructions carefully before using and retain this for further reference. The temperature of accessible surfaces may get hot when the appliance is operating especially the metal top area and the warming rack if any. This appliance is not intended for use by young children and persons with reduced physical, sensory or mental capabilities, or lack of experience and knowledge.
- Page 4 IMPORTANT SAFETY INSTRUCTIONS Read all instructions before use and keep for future reference. WARNING • Misuse or modification of this appliance may result in breakdown or injury. • To reduce the risk of fire or electric shock, do not expose this appliance to rain or moisture. •...
- Page 5 IMPORTANT SAFETY INSTRUCTIONS Read all instructions before use and keep for future reference. CHILDREN • Children do not always understand the dangers associated with operating electrical appliances. Never allow children to use this appliance. • Children should be supervised to ensure that they do not play with the appliance. POWER SUPPLY •...
- Page 6 IMPORTANT SAFETY INSTRUCTIONS Read all instructions before use and keep for future reference. • Do not use outdoors If the electric circuit is overloaded with other appliances, this appliance may not • operate properly. The Toaster Oven should be operated on a separate electrical circuit from other operating appliances.
-
Page 7: Table Of Contents
CONTENTS Know Your Machine ..................5 Operation ......................6 Before Using Your Oven................6 About Control Settings..................8 How To Use The Oven................... 10 How To Use ....................11 Care and Cleaning................... 16 Specifications ....................18 WARNING: This appliance includes a heating function. Surfaces, other than the functional surfaces may develop high temperatures. -
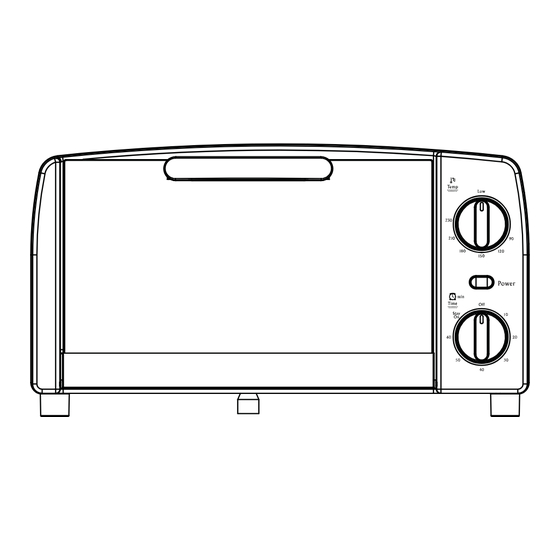
Page 8: Know Your Machine
CONTENTS Know Your Machine--------------------------------------------------------------------------------------------------5 Operation--------------------------------------------------------------------------------------------------------------6 Before Using Your Oven--------------------------------------------------------------------------------------------6 About Control Setting------------------------------------------------------------------------------------------------8 How to Use The Oven-----------------------------------------------------------------------------------------------10 How to Use------------------------------------------------------------------------------------------------------------11 Care and Cleaning---------------------------------------------------------------------------------------------------16 Specifications--------------------------------------------------------------------------------------------------------18 KNOW YOUR MACHINE Enclosure Thermostat Knob Indicator Cover Timer Knob Heating Element Glass Door Door Handle Food Tray Grill Rack OPERATION... -
Page 9: Before Using Your Oven
BEFORE USING YOUR OVEN ——before using your oven: 1、Make sure oven is unplugged and Timer knob is in the OFF position. See fig.1. 2、Remove all racks and trays. Wash in hot soapy water or in dishwasher. 3、Thoroughly dry all accessories and re-assemble in oven. -
Page 10: About Control Settings
ABOUT CONTROL SETTINGS Time Setting ——Time range 0-60minutes: The Timer can be set up to 60 minutes. The oven will not Thermostat Knob turn “Stay on” without the timer being set. When the Timer Knob is in the “off” position, the oven will not operate. -
Page 11: How To Use The Oven
ABOUT CONTROL SETTINGS Temperature Setting ——Turn the Temperature Knob to the desired temperature setting. The temperature can be set from 70℃ to 220℃。See fig.3. Indicator Light Grill Rack ——The Indicator Light will light up when the oven is operating. When the Timer Knob is in the “OFF”... -
Page 12: How To Use
HOW TO USE Toasting 1、Turn the Temperature Knob clockwise to Thermostat Knob 220℃. See fig.7. 2、Open the Oven Door and place sliced bread on the Grill Rack Place one slice of bread Power in the center of Grill Rack or 4 slices side by side.See fig.8. - Page 13 BROILING 1、Slide in the Food Tray under the Grill Rack. Always use the Food Tray when broiling food like chicken wings or drumsticks which contain fat.See fig.10. Food Tray 2、Place food on the Grill Rack. Grill Rack NOTE:We always suggest preheating oven about 3-5minutes before cooking the food.
- Page 14 Baking Slide 1、 the Food Tray into the bottom rack level. See fig.12. Food Tray 2、Turn the Temperature Knob clockwise to 220℃。 See fig.13. 3、Depending on the food you are cooking,set an appropriate time with the Timer Knob. If you need to cook food longer than 60 minutes, set the Timer to the Stay On setting.
-
Page 15: Care And Cleaning
CARE AND CLEANING NOTE:Always unplug and allow to cool before cleaning. 1、Before cleaning unplug the toaster oven and allow it to cool completely. 2、Wash all the attachments with mild,soapy water including the rack and the baking tray. 3、Do not use abrasive cleaners, scrubbing brushes and chemical cleaner as this will cause damage to the coating of baking tray. -
Page 16: Specifications
SPECIFICATIONS Technical Data Model: KWS1009J-H10R Power Supply: 220-240V~50Hz Power Consume: 1050W Connecting to Power Check that the voltage marked on the product corresponds with your supply voltage. This product isfitted with a 13A plug complying with BS1363. If this plug is unsuitable or needs to be replaced, please note the following: Plug Replacement If you need to replace the fitted plug. - Page 17 PRODUCT GUARANTEE This product is guaranteed against manufacturing defects for a period of Year This product is guaranteed for twelve months from the date of original purchase. Any defect that arises due to faulty materials or workmanship will either be replaced, refunded or repaired free of charge where possible during this period by the dealer from whom you purchased the unit.
Need help?
Do you have a question about the KWS1009J-H10R and is the answer not in the manual?
Questions and answers