Wen SnowBlaster 5662 Manual
18" electric snow thrower
Hide thumbs
Also See for SnowBlaster 5662:
- Manual (20 pages) ,
- Safety instructions (14 pages) ,
- Instruction manual (16 pages)
Table of Contents
Advertisement
Quick Links
Advertisement
Table of Contents

Related Manuals for Wen SnowBlaster 5662


Summary of Contents for Wen SnowBlaster 5662
- Page 2 SNOW THROWER IDENTIFICATION For information and questions, please contact Customer Service by calling 1-800-232-1195. Certain information will be requested by a Customer Service Representative. Please fill out the information below and have it accessible prior to calling. Refer to name plate on your Snow Thrower for the Serial Number. Record your Snow Thrower's information below.
-
Page 3: Table Of Contents
TABLE OF CONTENTS Specifications ………………………………………………………. Important Safety Instructions ………………………………………. Know Your Snow Thrower’s Components ………………………… Assembly Instructions ……………………………………………… Unpacking ………………………………………………….. Middle Frame Assembly …………………………………… Upper Frame Assembly …………………………………….. Discharge Chute Assembly …………………………………. Lower and Upper Chute Crank Assembly ………………….. Operation ……………………………………………………………. -
Page 4: Important Safety Instructions
IMPORTANT SAFETY INSTRUCTIONS Warning: Do not plug in the Snow Thrower until the following steps have been read and understood. READ ALL INSTRUCTIONS BEFORE USING YOUR SNOW THROWER Electrical Instructions Your Snow Thrower has a polarized male plug, with one prong in the switch-housing socket slightlylonger and wider than the other. - Page 5 Personal Safety Stay alert, watch what you are doing and use common sense when operating your Snow Thrower. Do not use your Snow Thrower while you are tired or under the influence of drugs, alcohol, ormedication. A moment of inattention while operating the Snow Thrower may result in seriousbodily injury.
- Page 6 Abnormal operation - If you notice the snow thrower running in an unstable state or hear abnormalsounds from the motor, stop the machine, disconnect the power immediately, and contact our customer service department. Noise control - When using the snow thrower, you must respect local laws and regulationsregarding noise control and environmental protection.
-
Page 7: Know Your Snow Thrower's Components
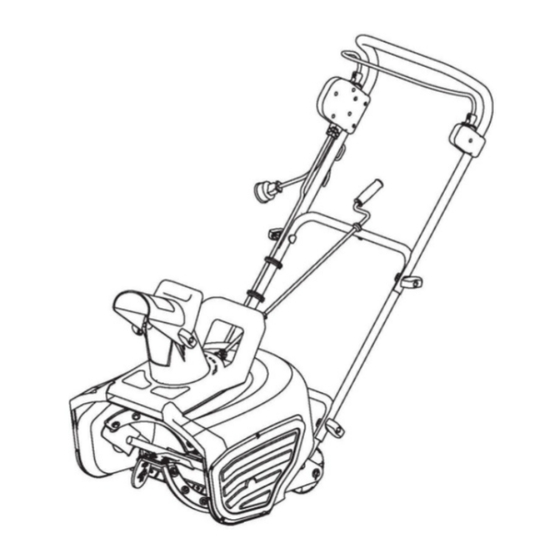
KNOW YOUR SNOW THROWER’S COMPONTENTS 5 6 7 4 8 3 9 2 10 1 11 LOWER FRAME UPPER CHUTE CRANK MIDDLE FRAME POLARIZED PLUG CARRYING HANDLE CABLE CLIP UPPER FRAME CHUTE DEFLECTOR HANDLE BAR... -
Page 8: Assembly Instructions
ASSEMBLY INSTRUCTIONS Unpacking 1. Carefully remove your Snow Thrower and all other items from box. 2. Your Snow Thrower comes with the following accessories. • T-bolt: 4 pieces • Saddle Washer: 4 pieces • Knob: 4 pieces • Cable Clip: 3 pieces •... -
Page 9: Upper Frame Assembly
Upper Frame Assembly For easier assembly, the handle frames are marked with yellow tape from the factory. This tape indicates the LEFT side of each handles part, as viewed from the operator’s position of the Snow Thrower. Hold the upper frame with the yellow tape on the LEFT side so that the screw holes align with the holes on the middle frame. -
Page 10: Discharge Chute Assembly
Discharge Chute Assembly (Fig. 6) Lift the chute deflector so that it snaps and locks securely onto the discharge chute. Raise or lower the chute deflector to the desired height of the snow stream and tighten the chute deflector knobs. Note: Do not over tighten the chute deflector knobs. -
Page 11: Operation
OPERATION KEEP CHILDREN AND BYSTANDERS AT A SAFE DISTANCE while operating your Snow Thrower. Note: Before using the Snow Thrower, please make sure the power source you will use is in accordancewith the specifications shown in this manual. Securing the Extension Cord For safe and efficient use of your Snow Thrower, use only a UL-rated or CSA extension cord recommendedfor outdoor use (see page 4). -
Page 12: Powering On And Off
Powering On and Off To power on, first press and hold the switch button found alongside the switch housing. Pull the handle bar toward you and grasp hold ofit firmly with both hands to start the machine. Themachine can only be started by pressing the switchbutton before squeezing the handle bar. -
Page 13: Plowing The Snow
PLOWING THE SNOW WARNING: Keep the area of operation free of foreign objects that can become thrown bythe rotor blades. Perform a thorough inspection of the area since some objects may behidden from view by surrounding snow. If the Snow Thrower hits an obstruction or picks upa foreign object during use, stop the Snow Thrower, disconnect the extension cord, removethe obstruction, and inspect the unit for damage. -
Page 14: Changing Snow Discharge Chute's Direction
CHANGING SNOW DISCHARGE CHUTE’S DIRECTION 1. Never direct the snow discharge chute at the operator, bystanders, vehicles or nearby windows.The discharged snow and foreign objects accidentally picked up by the Snow Thrower can causeserious damage and bodily injury. Always point the discharge chute in the opposite direction of anything you don’t want to hit with snow and foreign objects. -
Page 15: Maintenance
MAINTENANCE WARNING: Make sure to turn off the switch and disconnect the extension cord beforeperforming any maintenance task on your Snow Thrower. Snow Thrower Use and Care 1. KNOW YOUR LIMITATIONS. Do not overload your Snow Thrower’s capacity by attempting to clearsnow at too fast of a rate. -
Page 16: Exploded View
EXPLODED VIEW #5662 S NOW T HROWER O PERATOR’S M ANUAL 16 ... - Page 17 #5662 S NOW T HROWER O PERATOR’S M ANUAL 17 ...
-
Page 18: Parts List
PARTS LIST Part# Stock# Description Part# Stock# Description 56663-001 Locknut M6 56663-046 Small Gear 56663-002 Washer 6 56663-047 Flat Key 3x12 56663-003 Right Fixing Plate 56663-048 Bearing 608-2Z 56663-004 TPU/Rubber Plate 56663-049 Gear Box 56663-005 Washer 6 56663-050 Bearing 6001-2Z 56663-006 Screw M6x16 56663-051... - Page 19 56663-044 Oil Seal 56663-089 Locknut M4 56663-045 Nut M8 56663-090 Screw M4x20 Part# Stock# Description 56663-091 Eye Bolt 56663-092 Rubber Ring 56663-093 Upper Chute Crank 56663-094 Snap Ring 8 56663-095 Handle Grip 56663-096 Upper Frame 56663-097 Saddle Washer 56663-098 Middle Frame 56663-099 T-bolt...
-
Page 20: Warranty
ONE (1) YEAR LIMITED WARRANTY SNOW BLASTER™ is committed to building tools that are dependable for years. Our warranties are consistentwith our commitment and dedication to quality. ONE (1) YEAR LIMITED WARRANTY OF SNOW BLASTER™ PRODUCTS FOR HOME USE. GREAT LAKES TECHNOLOGIES, LLC (“Seller") warrants to the original purchaser only, that allSNOW BLASTER™...
Need help?
Do you have a question about the SnowBlaster 5662 and is the answer not in the manual?
Questions and answers