Table of Contents
Advertisement
Quick Links
Specifications
Cold Water Supply
Working Pressures
Min: 0.2 bar
Max: 5.0 bar
3.0
3.0
2.0
2.0
1.0
4.0
1.0
4.0
Min: 5°C Max: 25°C
0.2
5.0
0.2
5.0
Pressure
Pressure
Factory
BAR
BAR
pre-set 38°C
Maximum Static Pressure: 10.0 bar
Tools You'll Need
Pencil
Flat head Screwdriver
Drill
Cross head Screwdriver
Prior to Installation
All products manufactured and supplied by Bristan are safe to use provided that
they are installed, operated and receive regular maintenance in
accordance with these instructions.
This product needs to be installed in accordance with, and meet the
requirements of the Water Supply (Water Fittings) Regulations 1999 and
current by-laws. For full Installation Requirements & Notes (IRN) please
visit wras.co.uk/directory.
Isolation valves must be fitted to the inlet water supplies to ensure ease of future
maintenance.
Before installing this product the water supply must be thoroughly flushed in
order to remove any swarf, solder etc.
This product must not be modified in any way as this will invalidate the
guarantee.
Full access must be made available for future maintenance/servicing purposes.
Before drilling into walls, check that there are no hidden electrical wires,
cables or water supply pipes. This can be checked with the aid of an
electronic detector.
If power tools are used do not forget to:
- Wear eye protection
- Unplug equipment after use
If in doubt, contact a registered plumber or your Local Water Authority or
the Secretary of the Institute of Plumbing, address as follows:-
The Institute of Plumbing,
64 Station Lane,
Hornchurch,
Essex,
RM12 6NB, Tel: 01708 472791
Installation Instructions
& User Guide
Please leave these instructions
with the end user
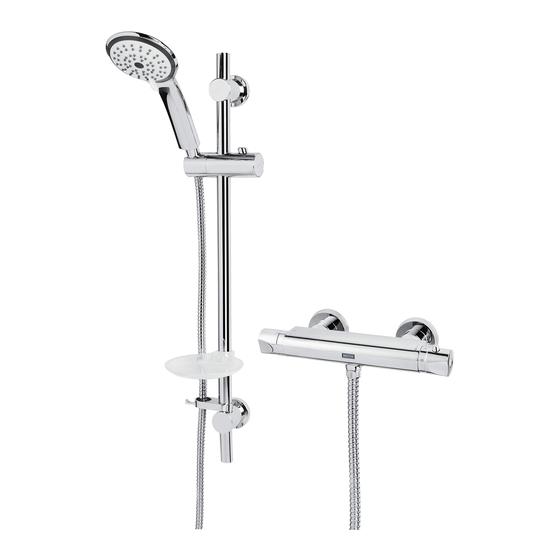
Product Codes:
AR2 SHXMTFF C (D3)
AR2 SHXVOFF C (D3)
Inlet Water Temperature
Inlet Dimensions
Hot Water Supply
65°C
25°C
60°C
5°C
60-65°C Recommended
IMPORTANT
TMV2 Designation
The inlet hot water must
be at least 10°C above the
required blend temperature.
Spanner
Pipe Cutter
Hexagonal Keys
Pack Contents
x4
x4
x1
x1
x1
x2
x2
x2
x2
x8
x2
x8
Installation
1
Identify the
required position of
the valve and prepare
the water supply pipes.
Supply pipes should be
150mm apart.
Using the backplate
150mm
supplied with the
Centres
wallmount, mark and
drill holes.
Inlet Connections
3
15mm
Compression
HP-S & LP-SE
Secure the isolator
Secure the isolator
onto the backplate
onto the backplate
ensuring the olive is
ensuring the olive is
positioned over the
positioned over the
pipework correctly.
pipework correctly.
Isolation
Supplied
1
with
AR2 SHXMTFF C
only
x1
Remove the concealing
Remove the concealing
cap from the shroud.
cap from the shroud.
Operation
x1
x1
x2
x1
x2
2
Secure the rubber backplate
Secure the rubber backplate
and backplate into place.
and backplate into place.
4
5
Push shrouds to the
Push shrouds to the
back of the wall outlet,
back of the wall outlet,
securing them against
securing them against
the rubber fixing plate
the rubber fixing plate
2
On
On
Off
Off
Insert filter washer and
Insert filter washer and
secure the shower to
secure the shower to
the wall mount.
the wall mount.
Rotate the shroud until
Rotate the shroud until
the opening aligns with
the opening aligns with
the isolation screw.
the isolation screw.
Turn the screw to isolate
Turn the screw to isolate
the water. Reverse the
the water. Reverse the
process when turning
process when turning
the water back on.
the water back on.
Cold
Cold
Hot
Hot
Advertisement
Table of Contents

Related Manuals for Bristan AR2 SHXMTFF C


Summary of Contents for Bristan AR2 SHXMTFF C
- Page 1 Supplied Prior to Installation with AR2 SHXMTFF C All products manufactured and supplied by Bristan are safe to use provided that only they are installed, operated and receive regular maintenance in accordance with these instructions. This product needs to be installed in accordance with, and meet the...
- Page 2 Turn cartridge spindle clockwise to decrease the temperature. Turn cartridge spindle anti-clockwise to increase the temperature. Slide soap dish, hose retainer & handset holder onto the riser rail. Insert wall plugs & slide bottom bracket onto rail so the holes align. Fix rail with screws and push cap onto bracket.
Need help?
Do you have a question about the AR2 SHXMTFF C and is the answer not in the manual?
Questions and answers