
Related Manuals for Belkin 8820cw00232


Summary of Contents for Belkin 8820cw00232
- Page 1 Window Mount User Manual English 8820cw00232 F8Z453cw Français Deutsch Nederlands Español Italiano Português Русский cw_8820cw00232.indb 1 16/10/2009 14:0...
- Page 2 TaBle OF CONTeNTs seCTions Table of Contents 1 Introduction . . . . . . . . . . . . . . . . . . . . . . . . . . . . . . . . . . . . . . . . . . . . . . . . . .1 Features .
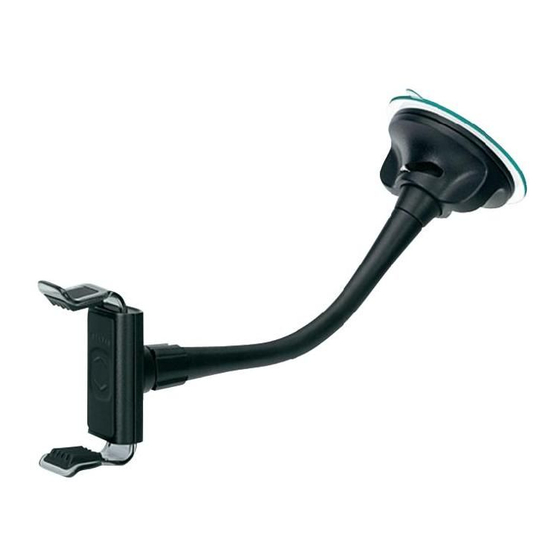
- Page 3 INTRODUCTION seCTions Table of Contents Features • Suction-cup mount attaches to any window or smooth surface • Adjustable cradle securely holds many iPhone/iPod models and other mobile devices. • Adjustable gooseneck gives you freedom to position your device • Cradle allows access to your device’s dock connector Fig 1 What’s in the Box What’s in the Box Cable Management Clip Suction Cup Cradle Flexible Arm Fig 2 EN-1 Window Mount Assembling your window mount cw_8820cw00232.indb 1 16/10/2009 14:0...
- Page 4 Fig 1 What’s in the Box Cable Management Clip Suction Cup seTTINg Up YOUR WINDOW MOUNT Cradle Flexible Arm seCTions Table of Contents assembling Your Window Mount Fig 2 plac Cable Management Clip Suction Cup 1 . Tightly screw on the suction cup and cradle to opposite ends of the gooseneck. Assembling your window mount 1 . P Cradle Flexible Arm...
- Page 5 Fig 3A Fig 3B Attaching your window mount to the window Fig 3A Fig 3B seTTINg Up YOUR WINDOW MOUNT seCTions seCTions Table of Contents Table of Contents placing Your Device in the Cradle 1 . Position the cradle to your liking. 2 . Press the release button to extend the cradle arms to their maximum height. Placing the iPhone in the cradle.
- Page 6 seTTINg Up YOUR WINDOW MOUNT Fig 4B seCTions seCTions Table of Contents Table of Contents 4 . Firmly press the top and bottom of the cradle arms together as shown below (indicated by stickers on the cradle arms), until your device is securely in place. 1 . P Fig 4C 2 . W Removing the iPhone Fig 5A EN-4 Fig 5B Window Mount Wind cw_8820cw00232.indb 4 16/10/2009 14:0...
- Page 7 Fig 4C Fig 4C seTTINg Up YOUR WINDOW MOUNT seCTions seCTions Table of Contents Table of Contents Removing Your Device from the Cradle 1 . Push back on the tab of the upper cradle arm and slide the top of your device toward you. Removing the iPhone Fig 5A Removing the iPhone Fig 5A 2 . When your device is free, remove it. Fig 5B Fig 5B Removing your windown mount Fig 6A...
- Page 8 aDjUsTINg YOUR WINDOW MOUNT Fig 6C seCTions Table of Contents adjusting the position of the Cradle 1 . Remove your device from the cradle and bend the extension arm until the cradle is in the 1 . R desired position. The extension arm will hold its new position. 2 . H Adjusting the position of the cradle 3 . W Fig 7 4 . I EN-6 Window Mount Wind...
- Page 9 Fig 5B aDjUsTINg YOUR WINDOW MOUNT Fig 5B seCTions Table of Contents Detaching Your Mount from the Window 1 . Remove your device from the cradle. 2 . Hold the cradle portion with one hand. Removing your windown mount 3 . With the other hand, reach down to the suction-cup base and twist it (clockwise) until the Removing your windown mount suction pressure releases. Fig 6A Fig 6B Fig 6A Fig 6B 4 . If necessary, peel back the small plastic tab located on the edge of the suction cup to...
- Page 10 TROUBleshOOTINg seCTions Table of Contents You can quickly solve most problems with your Window Mount by following the advice in this section. Your device doesn’t fit in the adjustable cradle . Solution • Press the release button to extend the cradle arms, and then try placing your device in the cradle in different orientations. to c Your Window Mount doesn’t stick to the window . Solution • Use a damp cloth to clean the inside of the Window Mount’s suction cup and the area of the Belk window the suction cup will be attached to. • Dampening the inside of the suction cup may help it create a better seal with the window. EN-8 Window Mount Wind cw_8820cw00232.indb 8 16/10/2009 14:0...
- Page 11 WaRNINgs seCTions Table of Contents WaRNINg: see The BelKIN WINDOW MOUNT WaRNINg aND saFeTY gUIDe FOR pRODUCT WaRNINgs aND OTheR IMpORTaNT saFeTY INFORMaTION . Check the country, state, province, regional, and local laws where you drive before mounting the Window Mount. Do not place the Window Mount in a location that in any way obstructs the driver’s view, interferes with driving controls, interferes with airbag deployment, violates applicable law or is otherwise unsafe. See the Belkin Window Mount Warning and Safety Guide, incorporated herein by reference, for more details. Your Window Mount requires full concentration and both hands to install. Do not attempt to connect your Window Mount while driving. Do not attempt to adjust or retrieve an unsecured Window Mount or mobile device while driving . Adjust the position of your Window Mount so that it and your mobile device do not interfere with any of the operating controls of the vehicle or your view of the road.
- Page 12 INFORMaTION seCTions Table of Contents Belkin International, Inc ., limited 3-Year product Warranty To g 1 . C What this warranty covers . Belkin International, Inc. (“Belkin”) warrants to the original purchaser of this Belkin product that the product shall be free of defects in design, assembly, material, or workmanship. What the period of coverage is . Belkin warrants the Belkin product for three years. What will we do to correct problems? Product Warranty.
- Page 13 INFORMaTION seCTions seCTions Table of Contents Table of Contents To get service for your Belkin product you must take the following steps: 1 . Contact Belkin Ltd Express Business park, Shipton Way, Rushden, NN106GL, United Kingdom, Attn: Customer Service, call + 44 (0) 1933 35 2000 or call Free Tech Support (see hat last page), within 15 days of the Occurence. a . The part number of the Belkin product. b . Where you purchased the product. c . When you purchased the product. d . Copy of original receipt. 2 . Your Belkin Customer Service Representative will then instruct you on how to forward your receipt and Belkin product and how to proceed with your claim. Belkin reserves the right to review the damaged Belkin product. All costs of shipping the Belkin product to Belkin for inspection shall be borne solely by the purchaser. If Belkin determines, in its sole discretion, that it is impractical to ship the damaged equipment to Belkin, Belkin may designate, in its sole discretion, an equipment repair facility to inspect and estimate the cost to repair such equipment. The cost, if any, of shipping the equipment to and from such repair facility and of such estimate shall be borne solely by the purchaser. Damaged equipment must remain available for inspection until the claim is finalized. Whenever claims are settled, Belkin reserves the right to be subrogated under any existing insurance policies the purchaser may have. ce, EN-11 Window Mount cw_8820cw00232.indb 11...
- Page 14 INFORMaTION seCTions seCTions Table of Contents Table of Contents how state law relates to the warranty . THIS WARRANTY CONTAINS THE SOLE WARRANTY OF BELKIN. THERE ARE NO OTHER WARRANTIES, EXPRESSED OR, EXCEPT AS REQUIRED BY LAW, IMPLIED, INCLUDING THE tech IMPLIED WARRANTY OR CONDITION OF QUALITY, MERCHANTABILITY OR FITNESS FOR A PARTICULAR PURPOSE, AND SUCH IMPLIED WARRANTIES, IF ANY, ARE LIMITED IN DURATION TO THE TERM OF THIS WARRANTY. Some states do not allow limitations on how long an implied warranty lasts, so the above limitations may not apply to you. IN NO EVENT SHALL BELKIN BE LIABLE FOR INCIDENTAL, SPECIAL, DIRECT, INDIRECT, FINL CONSEQUENTIAL OR MULTIPLE DAMAGES SUCH AS, BUT NOT LIMITED TO, LOST BUSINESS OR PROFITS ARISING OUT OF THE SALE OR USE OF ANY BELKIN PRODUCT, EVEN IF ADVISED OF THE POSSIBILITY OF SUCH DAMAGES. This warranty gives you specific legal rights, and you may also have other rights, which may ICEL vary from state to state. Some states do not allow the exclusion or limitation of incidental, IREL ITAL consequential, or other damages, so the above limitations may not apply to you. EN-12 Window Mount Wind cw_8820cw00232.indb 12...
- Page 15 ICELAND 800 8534 www.belkin.com/uk/ IRELAND 0818 55 50 06 www.belkin.com/uk/ ITALY 02 - 69 43 02 51 www.belkin.com/it/ LUXEMBOURG 34 20 80 85 60 www.belkin.com/uk/ NETHERLANDS 0900 - 040 07 90 €0.10 per minute www.belkin.com/nl/ NORWAY 81 50 0287 www.belkin.com/uk/ POLAND 00800 - 441 17 37 www.belkin.com/uk/ PORTUGAL 707 200 676 www.belkin.com/uk/ RUSSIA 495 580 9541 www.belkin.com/ SOUTH AFRICA 0800 - 99 15 21 www.belkin.com/uk/...
- Page 16 Shipton Way, Rushden 92100 Boulogne-Billancourt, 80637 Munich NN10 6GL, United Kingdom France Germany Belkin Iberia Belkin Italy & Greece Belkin B.V. C/ Anabel Segura, 10 planta baja, Of. 2 Via Carducci, 7 Boeing Avenue 333 28108, Alcobendas, Madrid Milano 20123...
- Page 17 Manuel de l'utilisateur English 8820cw00232 F8Z453cw Français Deutsch Nederlands Español Italiano Português Русский cw_8820cw00232.indb 1 16/10/2009 14:0...
- Page 18 TaBle Des MaTIèRes seCTions Table des matières Tabl 1 Introduction . . . . . . . . . . . . . . . . . . . . . . . . . . . . . . . . . . . . . . . . . . . . . . . . . . . . . . 1 Caractéristiques .
- Page 19 INTRODUCTION seCTions Table des matières . 1 Caractéristiques • Ventouse permettant de fixer le dispositif au pare-brise à toute surface lisse • Berceau ajustable qui convient à bon nombre de modèles d'iPhone/iPod et autres . 2 appareils mobiles. • Le col ajustable permet de positionner le dispositif au besoin Fig 1 • Accès facile au connecteur dock de votre appareil What’s in the Box . 6 Contenu du coffret . 8 . 9 Attache-câble Ventouse Cable Management Clip Suction Cup Tige flexible Berceau Cradle...
- Page 20 Fig 1 What’s in the Box Cable Management Clip Suction Cup INsTallaTION DU sUppORT paRe-BRIse Cradle Flexible Arm seCTions Table des matières Tabl Tabl assembler le support pare-brise Fig 2 plac Cable Management Clip Suction Cup 1 . Vissez la ventouse et le berceau solidement aux extrémités du col. Assembling your window mount 1 . P Cradle Flexible Arm...
- Page 21 Fig 3A Fig 3B Attaching your window mount to the window Fig 3A Fig 3B INsTallaTION DU sUppORT paRe-BRIse seCTions seCTions Table des matières Table des matières placer l'appareil dans le berceau 1 . Positionnez le berceau tel que désiré. 2 . Appuyez sur le bouton pour ouvrir le berceau à sa hauteur maximale. Placing the iPhone in the cradle. Fig 4A Placing the iPhone in the cradle.
- Page 22 Fig 4B INsTallaTION DU sUppORT paRe-BRIse seCTions seCTions Table des matières Table des matières Tabl Tabl 4 . Appuyez fermement sur les parties inférieure et supérieure du berceau tel que montré Reti ci-dessous (indiqué par des autocollants sur le berceau), jusqu'à ce que votre appareil soit 1 . A bien en place. Fig 4C 2 . L Removing the iPhone Fig 5A Fig 5B FR-4 support pare-brise supp Removing your windown mount cw_8820cw00232.indb 4...
- Page 23 Fig 4C Fig 4C INsTallaTION DU sUppORT paRe-BRIse seCTions seCTions Table des matières Table des matières Retirer l'appareil du berceau soit 1 . Appuyez sur la languette du bras supérieur du berceau et tirez le haut de votre appareil vers vous. Removing the iPhone Fig 5A Removing the iPhone Fig 5A 2 . Lorsque votre appareil est libre, retirez-le du berceau. Fig 5B Fig 5B Removing your windown mount Fig 6A...
- Page 24 ajUsTeR le sUppORT paRe-BRIse Fig 6C seCTions Table des matières Tabl ajuster la position du berceau enle 1 . Retirez l'appareil du berceau et pliez la tige flexible jusqu'à ce que le berceau soit dans la 1 . R position désirée. La tige flexible maintiendra cette position. 2 . T Adjusting the position of the cradle 3 . A Fig 7 4 . A FR-6 support pare-brise supp...
- Page 25 Fig 5B ajUsTeR le sUppORT paRe-BRIse Fig 5B seCTions Table des matières enlever le support du pare-brise la 1 . Retirez l'appareil du berceau. 2 . Tenez le berceau dans une main. Removing your windown mount 3 . Avec l'autre main, faites tourner la base avec ventouse jusqu'à ce que la ventouse se Removing your windown mount détache. Fig 6A Fig 6B Fig 6A Fig 6B 4 . Au besoin, tirez sur la petite languette de plastique située au pourtour de la ventouse pour...
- Page 26 DépaNNage seCTions Table des matières Tabl Vous pouvez rapidement résoudre la plupart des problèmes du Support pare-brise en suivant les conseils proposés dans cette section. votre appareil ne convient pas au support . Vérif Solution avan • Appuyez sur le bouton pour ouvrir le berceau et essayez de placer votre appareil suivant dép diverses orientations dans le berceau. part plus L'ins le support pare-brise ne colle pas à la fenêtre . pas Solution n'es • À l'aide d'un chiffon humide, nettoyez l'intérieur de la ventouse et la section du pare-brise où sera placé le Support pare-brise.
- Page 27 L'installation du Support pare-brise requiert de la concentration et vos deux mains. N'essayez pas de brancher le Support pare-brise en conduisant. s'il n'est pas correctement fixé, n'essayez pas d'ajuster ou de replacer votre support pare-brise ou votre baladeur Mp3 pendant que vous conduisez . Ajustez le Support pare-brise de façon à ce que ce dernier et l'iPod n'empêchent pas l'accès aux commandes du véhicule ou n'obstruent la vue du conducteur sur la route. Belkin n'accepte aucune responsabilité en cas de blessure corporelle ou de dommage matériel à la suite d'une conduite dangereuse résultant de l'interaction avec le Support pare- brise, l'iPhone, l'iPod ou l'appareil mobile. FR-9 support pare-brise cw_8820cw00232.indb 9 16/10/2009 14:0...
- Page 28 INFORMaTIONs seCTions Table des matières Tabl Tabl garantie produit limitée de 3 an de Belkin International, Inc . l'obs (bais Couverture offerte par la garantie Belkin International, Inc. (« Belkin ») garantit à l'acheteur initial de ce produit Belkin que le produit est exempt de défauts de conception, de montage, de matériau et de fabrication. Proc période de garantie 1 . C Belkin Corporation garantit ce produit Belkin pour une période de trois ans. en cas de problème Garantie du produit Belkin s'engage à réparer ou à remplacer gratuitement, à sa convenance, tout produit...
- Page 29 INFORMaTIONs seCTions seCTions Table des matières Table des matières l'obsolescence, l'abus, les dommages provoqués par des perturbations de basse tension (baisses ou affaissements de tension, par exemple), un programme non autorisé ou une modification de l'équipement du système. pour une demande d'intervention Procédez comme suit pour obtenir une réparation de votre produit Belkin : 1 . Contactez Belkin Ltd Express Business Park, Shipton Way, Rushden, NN106GL, Royaume- Uni, à l'attention de : Customer Service (service client) ou téléphonez au + 44 (0) 1933 35 2000 ou au service d'assistance technique gratuit (voir en dernière page) dans les 15 jours suivant l'événement. a . Référence du produit Belkin. b . Lieu d'achat du produit. c . Date de l'achat du produit. ou d . Copie de la preuve d'achat originale. elui 2 . Le représentant du service client Belkin vous donnera alors toutes les instructions sur la façon d'expédier votre facture et le produit Belkin et la façon de présenter votre réclamation. Belkin se réserve le droit d'examiner le produit Belkin endommagé. Tous les frais d'expédition du produit Belkin à l'adresse de Belkin en vue de son inspection seront entièrement à la charge de l'acheteur. Si Belkin détermine, à son entière discrétion, qu'il serait impossible...
- Page 30 INFORMaTIONs seCTions seCTions Table des matières Table des matières Tabl Tabl endommagé doit être disponible pour inspection jusqu’au règlement de la demande de réclamation. Lorsqu’un règlement intervient, Belkin se réserve le droit d'un recours en subrogation sous toute autre police d'assurance détenue par l'acheteur. télép la législation nationale face à la garantie CETTE GARANTIE COMPREND LA SEULE GARANTIE DE BELKIN. BELKIN REJETTE PAR LE PRÉSENT DOCUMENT TOUTES LES AUTRES GARANTIES, EXPLICITES OU IMPLICITES, SAUF EXCEPTIONS PRÉVUES PAR LA LOI, Y COMPRIS MAIS SANS S'Y LIMITER, LES GARANTIES IMPLICITES AFFÉRENTES À LA QUALITÉ LOYALE ET MARCHANDE ET RÉP À L'ADÉQUATION À UNE FINALITÉ DONNÉE. CES GARANTIES IMPLICITES, LE CAS ÉCHÉANT, SONT D'UNE DURÉE LIMITÉE AUX CONDITIONS DE LA PRÉSENTE GARANTIE. FINL Certains pays ne permettent pas d’imposer de limite à la durée de validité des garanties implicites. Il se peut donc que les limites ci-dessus ne s'appliquent pas dans votre cas. GRÈ BELKIN NE PEUT EN AUCUN CAS ÊTRE TENU RESPONSABLE DE DOMMAGES ISLA ACCESSOIRES, DIRECTS, INDIRECTS OU MULTIPLES, Y COMPRIS, MAIS SANS S'Y IRLA LIMITER, LES PERTES COMMERCIALES OU DE REVENUS DÉCOULANT DE LA VENTE ITAL OU DE L'UTILISATION DE TOUT PRODUIT BELKIN, MÊME LORSQU'IL A ÉTÉ AVISÉ DE LA PROBABILITÉ DES DITS DOMMAGES.
- Page 31 ISLANDE 800 8534 www.belkin.com/uk/ IRLANDE 0818 55 50 06 www.belkin.com/uk/ ITALIE 02 - 69 43 02 51 www.belkin.com/it/ LUXEMBOURG 34 20 80 85 60 www.belkin.com/uk/ PAYS-BAS 0900 - 040 07 90 0,10 € par minute www.belkin.com/nl/ NORVÈGE 81 50 0287 www.belkin.com/uk/ POLOGNE 00800 - 441 17 37 www.belkin.com/uk/ PORTUGAL 707 200 676 www.belkin.com/uk/ RUSSIE 495 580 9541 www.belkin.com/ AFRIQUE DU SUD 0800 - 99 15 21 www.belkin.com/uk/...
- Page 32 Shipton Way, Rushden 92100 Boulogne-Billancourt 80637 Munich NN10 6GL, Royaume-Uni France Allemagne Belkin Iberia Belkin Italie & Grèce Belkin B.V. C/ Anabel Segura, 10 planta baja ou 2 Via Carducci, 7 Boeing Avenue 333 28108, Alcobendas, Madrid Milan 20123 1119 PH Schiphol-Rijk...
- Page 33 Window Mount Benutzerhandbuch English 8820cw00232 F8Z453cw Français Deutsch Nederlands Español Italiano Português Русский cw_8820cw00232.indb 1 16/10/2009 14:0...
- Page 34 INhalTsveRZeIChNIs KapiTel inhaltsverzeichnis inha 1 einleitung . . . . . . . . . . . . . . . . . . . . . . . . . . . . . . . . . . . . . . . . . . . . . . . . . . . . . . . . 1 Merkmale .
- Page 35 eINleITUNg KapiTel inhaltsverzeichnis . 1 Merkmale • Saugnapfhalterung lässt sich an Fenstern oder anderen glatten Oberflächen befestigen • Verstellbare Halterungsschale zur Befestigung vieler iPhone/iPod-Modelle und anderer . 2 Mobilgeräte • Verstellbarer Schwanenhals zur optimalen Ausrichtung des Geräts Fig 1 • Halterungsschale ermöglicht Zugriff auf Dock Connector des Geräts What’s in the Box . 6 verpackungsinhalt . 8 . 9 Saugnapf Kabel-Clip Cable Management Clip Suction Cup Halterungsschale Schwanenhals Cradle Flexible Arm Fig 2 DE-1...
- Page 36 Fig 1 What’s in the Box Cable Management Clip Suction Cup WINDOW MOUNT BeFesTIgeN Cradle Flexible Arm KapiTel inhaltsverzeichnis inha inha Window Mount zusammensetzen Fig 2 Cable Management Clip Suction Cup 1 . Schrauben Sie den Saugnapf und die Halterungsschale an den entgegengesetzten Enden Assembling your window mount des Schwanenhalses an. 1 . R Cradle Flexible Arm 2 . D...
- Page 37 Fig 3A Fig 3B Attaching your window mount to the window Fig 3A Fig 3B WINDOW MOUNT BeFesTIgeN KapiTel KapiTel inhaltsverzeichnis inhaltsverzeichnis gerät in der halterungsschale befestigen den 1 . Richten Sie die Halterungsschale so aus, wie es für Sie am bequemsten ist. 2 . Drücken Sie auf die Freigabetaste, um die Arme der Halterungsschale so weit wie möglich Placing the iPhone in the cradle. zu verlängern.
- Page 38 WINDOW MOUNT BeFesTIgeN Fig 4B KapiTel KapiTel inhaltsverzeichnis inhaltsverzeichnis inha inha 4 . Drücken Sie die Arme der Halterungsschale fest zusammen, bis Ihr Gerät sicher befestigt ist (s. Aufkleber auf den Halterungsarmen). 1 . D Fig 4C 2 . E Removing the iPhone Fig 5A Fig 5B DE-4 Window Mount Wind Removing your windown mount cw_8820cw00232.indb 4 16/10/2009 14:0...
- Page 39 Fig 4C Fig 4C WINDOW MOUNT BeFesTIgeN KapiTel KapiTel inhaltsverzeichnis inhaltsverzeichnis gerät aus der halterungsschale nehmen igt 1 . Drücken Sie den oberen Arm der Halterungsschale nach hinten und ziehen Sie die Oberseite Ihres Geräts in Ihre Richtung. Removing the iPhone Fig 5A Removing the iPhone Fig 5A 2 . Entfernen Sie das Gerät, wenn es sich von der Halterungsschale gelöst hat. Fig 5B Fig 5B Removing your windown mount Fig 6A Fig 6B Removing your windown mount...
- Page 40 WINDOW MOUNT eINsTelleN Fig 6C KapiTel inhaltsverzeichnis inha Die ausrichtung der halterungsschale verstellen halt 1 . Nehmen Sie Ihr Gerät aus der Halterungsschale und biegen Sie den Verlängerungsarm, 1 . N bis sich die Halterungsschale in der gewünschten Position befindet. Der Verlängerungsarm 2 . H Adjusting the position of the cradle bleibt nun in der neuen Position. 3 . D Fig 7 4 . F DE-6 Window Mount Wind cw_8820cw00232.indb 6...
- Page 41 Fig 5B WINDOW MOUNT eINsTelleN Fig 5B KapiTel inhaltsverzeichnis halterung vom Fenster entfernen 1 . Nehmen Sie Ihr Gerät aus der Halterungsschale. arm 2 . Halten Sie die Halterungsschale mit einer Hand fest. Removing your windown mount 3 . Drehen Sie mit der anderen Hand den Fuß des Saugnapfes im Uhrzeigersinn bis der Removing your windown mount Saugnapfdruck entweicht. Fig 6A Fig 6B Fig 6A Fig 6B 4 . Falls nötig, ziehen Sie an der kleinen Plastiklasche am Rand des Saugnapfes, damit der verbleibende Druck entweichen kann.
- Page 42 FehleRBeheBUNg KapiTel inhaltsverzeichnis inha Die meisten Probleme mit Window Mount können Sie lösen, wenn Sie nach folgenden Schritten vorgehen. INFO Ihr gerät passt nicht in die verstellbare halterungsschale . Erku Lösung Sie W dass • Drücken Sie auf die Freigabetaste, um die Arme der Halterungsschale zu verlängern werd und versuchen Sie dann Ihr Gerät in der Halterungsschale auf unterschiedliche Weise Sich auszurichten. Wind Die benö Window Mount haftet nicht am Fenster . Sie f Lösung • Reinigen Sie die Innenseite des Window Mount Saugnapfes und den Teil Fensters, an Wind welchem Sie die Halterung anbringen wollen, mit einem feuchten Tuch.
- Page 43 INFORMaTIONeN ZUR sICheRheIT KapiTel inhaltsverzeichnis aChTUNg: leseN sIe sICh DIe sICheRheITshINWeIse ZUM WINDOW MOUNT vON BelKIN DURCh . DORT FINDeN sIe WaRNUNgeN UND aNDeRe WIChTIge INFORMaTIONeN ZUR sICheRheIT . Erkundigen Sie sich nach den betreffenden Gesetzen des Landes oder Bundeslandes, bevor Sie Window Mount anbringen. Berücksichtigen Sie beim Anbringen des Window Mount, dass die Sicht des Fahrers sowie Steuerungselemente oder Airbags nicht beeinträchtigt werden dürfen, und dass Sie nicht gegen die jeweiligen Gesetze verstoßen und keine Sicherheitsrisiken eingehen sollten. Weitere Informationen finden Sie in den enthaltenen Window Mount Sicherheitshinweisen. Die Installation und Einstellung von Window Mount erfordert Ihre volle Aufmerksamkeit. Sie benötigen dafür beide Hände. Versuchen Sie nicht, Window Mount zu installieren, während Sie fahren. versuchen sie niemals, den sitz von Window Mount oder dem mobilen gerät zu korrigieren oder die geräte aufzuheben, während sie fahren .
- Page 44 INFORMaTIONeN KapiTel inhaltsverzeichnis inha inha Drei jahre eingeschränkte herstellergarantie von Belkin International, Inc . 1 . S garantieleistung . Belkin International, Inc. („Belkin”) garantiert dem ursprünglichen Käufer dieses Belkin- Produkts, dass dieses Produkt frei von Material-, Verarbeitungs-, und Konstruktionsfehlern ist. garantiedauer . Belkin gewährt für dieses Belkin-Produkt drei Jahre Garantie. problembehebung . Herstellergarantie. Belkin wird das Produkt nach eigenem Ermessen entweder kostenlos (abgesehen von den Versandkosten) reparieren oder austauschen. Belkin behält sich vor, seine Produkte ohne 2 . D Vorankündigung auslaufen zu lassen und übernimmt keine eingeschränkte Garantie für die Reparatur oder den Ersatz solcher ausgelaufenen Produkte. garantieausschluss . Belk Alle oben genannten Garantien verlieren ihre Gültigkeit, wenn das Belkin-Produkt Belkin beim auf Anfrage nicht auf Kosten des Käufers zur Überprüfung zur Verfügung gestellt wird oder volls wenn Belkin feststellt, dass das Belkin-Produkt nicht ordnungsgemäß installiert worden ist,...
- Page 45 INFORMaTIONeN KapiTel KapiTel inhaltsverzeichnis inhaltsverzeichnis nc . 1 . Schreiben Sie an Belkin Ltd. Express Business Park, Shipton Way, Rushden, NN106GL, Großbritannien, Attn: Customer Service oder wenden Sie sich innerhalb von 15 Tagen nach dem Vorfall telefonisch unter folgender Nummer an Belkin: + 44 (0) 1933 35 2000. Der technische Support steht Ihnen unter der Telefonnummer auf der letzten Seite ebenfalls zur Verfügung. n ist. a . Die Artikelnummer des Belkin-Produkts. b . Wo Sie das Produkt erworben haben. c . Das Kaufdatum. d . Eine Kopie der Originalquittung. 2 . Die entsprechenden Mitarbeiter/innen informieren Sie darüber, wie Sie Ihre Rechnung und das Belkin-Produkt versenden müssen und wie Sie fortfahren müssen, um Ihre Ansprüche geltend zu machen. Belkin behält sich vor, das beschädigte Belkin-Produkt zu überprüfen. Alle Kosten, die beim Versand des Belkin-Produkts an Belkin zum Zweck der Überprüfung entstehen, sind vollständig durch den Käufer zu tragen. Wenn Belkin nach eigenem Ermessen entscheidet, dass es nicht angebracht ist, das beschädigte Gerät an die Belkin zu schicken, kann Belkin nach eigenem Ermessen eine Reparaturstelle damit beauftragen, das Gerät zu überprüfen und einen Kostenvoranschlag für die Reparaturkosten des Gerätes zu machen. Die Kosten für den Versand zu einer solchen Reparaturstelle und die eventuellen Kosten für einen Kostenvoranschlag gehen vollständig zu Lasten des Käufers. Beschädigte Geräte müssen zur Überprüfung zur Verfügung stehen, bis das Reklamationsverfahren abgeschlossen ist. Wenn Ansprüche beglichen werden, behält sich Belkin das Recht vor, Ersatzansprüche an eine bestehende Versicherung des Käufers zu übertragen. DE-11 Window Mount cw_8820cw00232.indb 11...
- Page 46 INFORMaTIONeN KapiTel KapiTel inhaltsverzeichnis inhaltsverzeichnis inha inha garantiegesetze . DIESE GARANTIE BILDET DIE ALLEINIGE GARANTIE VON BELKIN. ES GIBT KEINE ANDERE Tech GARANTIE, EXPLIZIT ERWÄHNT ODER IMPLIZIT, AUSSER WENN DIES VOM GESETZ tech VORGESCHRIEBEN IST, EINSCHLIESSLICH DER IMPLIZITEN GARANTIE ODER DES wäh QUALITÄTSZUSTANDS, DER ALLGEMEINEN GEBRAUCHSTAUGLICHKEIT ODER EIGNUNG FÜR EINEN BESTIMMTEN ZWECK, UND SOLCHE IMPLIZITEN GARANTIEN, WENN ES ÖST SOLCHE GIBT, BEZIEHEN SICH AUSSCHLIESSLICH AUF DIE DAUER, DIE IN DIESER GARANTIE ZUGRUNDE GELEGT WIRD. TSCH In manchen Ländern sind Einschränkungen bezüglich der Dauer der Garantie nicht zulässig. DÄN FINN Die oben erwähnten Einschränkungen treffen für Sie dementsprechend nicht zu. UNTER KEINEN UMSTÄNDEN HAFTET BELKIN FÜR ZUFÄLLIGEN, BESONDEREN, DIREKTEN, INDIREKTEN, MEHRFACHEN SCHADEN ODER FOLGESCHÄDEN WIE, ABER NICHT AUSSCHLIESSLICH, ENTGANGENES GESCHÄFT ODER PROFITE, DIE ISLA IHNEN DURCH DEN VERKAUF ODER DIE BENUTZUNG VON EINEM BELKIN-PRODUKT IRLA ENTGANGEN SIND, AUCH WENN SIE AUF DIE MÖGLICHKEIT SOLCHER SCHÄDEN ITAL AUFMERKSAM GEMACHT WORDEN SIND. NIED Diese Garantie räumt Ihnen spezifische Rechte ein, die von Land zu Land unterschiedlich ausgestaltet sein können. Da in manchen Ländern der Ausschluss oder die Beschränkung der Haftung für durch Zufall eingetretene oder Folgeschäden nicht zulässig ist, haben die vorstehenden Beschränkungen und Ausschlussregelungen für Sie möglicherweise keine Gültigkeit.
- Page 47 INFORMaTIONeN KapiTel KapiTel inhaltsverzeichnis inhaltsverzeichnis Kostenloser technischer support ERE Technische Informationen und Unterstützung erhalten Sie unter www.belkin.com im Bereich technischer Support.- Wenn Sie den technischen Support telefonisch erreichen wollen, wählen Sie die entsprechende Nummer in dieser Liste *. Zum entsprechenden Telefontarif laND NUMMeR INTeRNeT-aDResse ÖSTERREICH 0820 200766 www.belkin.com/de/ BELGIEN 07 07 00 073 www.belkin.com/nl/www.belkin.com/fr/ 239 000 406 www.belkin.com/uk/ TSCHECHISCHE REPUBLIK DÄNEMARK 701 22 403 www.belkin.com/uk/ FINNLAND 0972519123 www.belkin.com/uk/ FRANKREICH 08 - 25 54 00 26 www.belkin.com/fr/...
- Page 48 Shipton Way, Rushden 92100 Boulogne-Billancourt, 80637 München NN10 6GL, Großbritannien Frankreich Deutschland Belkin Iberia Belkin Italy & Greece Belkin B.V. C/ Anabel Segura, 10 planta baja, Of. 2 Via Carducci, 7 Boeing Avenue 333 28108, Alcobendas, Madrid Mailand 20123 1119 PH Schiphol-Rijk,...
- Page 49 Window Mount handleiding English 8820cw00232 F8Z453cw Français Deutsch Nederlands Español Italiano Português Русский cw_8820cw00232.indb 1 16/10/2009 14:0...
-
Page 50: Table Of Contents
INhOUD hoofdsTuK inhoud inho 1 Inleiding . . . . . . . . . . . . . . . . . . . . . . . . . . . . . . . . . . . . . . . . . . . . . . . . . . . . . . . . . . 1 prod Productkenmerken . -
Page 51: Inleiding
INleIDINg inhoud . 1 productkenmerken • Zuignap voor bevestiging op een raam of een ander glad oppervlak • Verstelbare houder voor een veilige bevestiging van uw iPhone/iPod of een andere . 2 mobiel apparaat • Verstelbare verlengarm die u in staat stelt uw apparaat in de meest optimale stand te zetten Fig 1 • Te allen tijde toegang tot de dock-connector van uw apparaat What’s in the Box . 6 Inhoud van de verpakking . 8 . 9 Kabelclip Zuignap Cable Management Clip Suction Cup Flexibele verlengarm Houder Cradle... -
Page 52: Installatie Van De Window Mount
Fig 1 What’s in the Box Cable Management Clip Suction Cup INsTallaTIe vaN De WINDOW MOUNT Cradle Flexible Arm hoofdsTuK inhoud inho inho De Window Mount in elkaar zetten Fig 2 Cable Management Clip Suction Cup 1 . Schroef de zuignap vast op het ene uiteinde van de verlengarm en de houder op het Assembling your window mount andere uiteinde. -
Page 53: Uw Apparaat In De Houder Bevestigen
Fig 3A Fig 3B Attaching your window mount to the window Fig 3A Fig 3B INsTallaTIe vaN De WINDOW MOUNT hoofdsTuK hoofdsTuK inhoud inhoud Uw apparaat in de houder bevestigen 1 . Zet de houder in de gewenste stand. 2 . Druk op de ontgrendelingsknop van de houder om de klemarmen volledig uit te schuiven. Placing the iPhone in the cradle. Fig 4A Placing the iPhone in the cradle. - Page 54 INsTallaTIe vaN De WINDOW MOUNT Fig 4B hoofdsTuK hoofdsTuK inhoud inhoud inho inho 4 . Druk de armen van de houder stevig naar elkaar toe totdat uw apparaat goed vast zit. (Zie onderstaande afbeelding en de stickers op de armen van de houder.) 1 . D Fig 4C 2 . Z Removing the iPhone Fig 5A Fig 5B NL-4 Window Mount Wind Removing your windown mount cw_8820cw00232.indb 4 16/10/2009 14:0...
-
Page 55: Uw Apparaat Uit De Houder Halen
Fig 4C Fig 4C INsTallaTIe vaN De WINDOW MOUNT hoofdsTuK hoofdsTuK inhoud inhoud Uw apparaat uit de houder halen Zie 1 . Duw de bovenste klemarm naar achteren en beweeg de bovenkant van uw apparaat naar u toe. Removing the iPhone Fig 5A Removing the iPhone Fig 5A 2 . Zodra het apparaat los is gekomen, haalt u het uit de houder. Fig 5B Fig 5B Removing your windown mount Fig 6A Fig 6B... -
Page 56: De Window Mount Verstellen
De WINDOW MOUNT veRsTelleN Fig 6C hoofdsTuK inhoud inho De stand van de houder aanpassen De W 1 . Haal uw apparaat uit de houder en buig de flexibele verlengarm totdat de houder in de 1 . H gewenste stand staat. De verlengarm zal in deze nieuwe stand blijven staan. 2 . H Adjusting the position of the cradle 3 . D Fig 7 4 . I NL-6 Window Mount Wind... -
Page 57: De Window Mount Van De Ruit Halen
Fig 5B De WINDOW MOUNT veRsTelleN Fig 5B hoofdsTuK inhoud De Window Mount van de ruit halen 1 . Haal uw apparaat uit de houder. 2 . Hou de houder met één hand vast. Removing your windown mount 3 . Draai met uw andere hand de voet waaraan de zuignap is bevestigd tegen de klok in, zodat Removing your windown mount de zuigkracht afneemt. Fig 6A Fig 6B Fig 6A Fig 6B 4 . Indien nodig trekt u aan het kleine plastic lipje aan de rand van de zuignap om deze los te trekken van de ruit. -
Page 58: Problemen Oplossen
pROBleMeN OplOsseN hoofdsTuK inhoud inho Eventuele problemen met de Window Mount kunt u op eenvoudige wijze oplossen door gebruik te maken van de tips die hieronder worden gegeven. Zorg Uw apparaat past niet in de verstelbare houder . voor Oplossing dat d zijn, • Druk op de ontgrendelingsknop van de houder om de klemarmen volledig uit te schuiven ook en probeer uw apparaat in verschillende richtingen in de houder te plaatsen. Bij d Prob rijde Uw Window Mount blijft niet vastzitten op de ruit . vast Oplossing Wind • Maak de ruit en de binnenkant van de zuignap schoon met een vochtige doek. -
Page 59: Veiligheidsinformatie
Bij de installatie van de Window Mount heeft u uw volledige aandacht en beide handen nodig. Probeer nooit de Window Mount tijdens het rijden te bevestigen. probeer nooit tijdens het rijden een losgeraakte Window Mount of het mobiele apparaat dat u wilt gebruiken, vast te zetten of te zoeken . Zorg er bij het plaatsen van de Window Mount voor dat zowel de Window Mount als uw mobiele apparaat geen belemmering vormen voor de bereikbaarheid van de bedieningsknoppen van de auto. zich Belkin is niet verantwoordelijk voor persoonlijk letsel of beschadiging van eigendommen als gevolg van gevaarlijk rijgedrag door gebruik van de Window Mount, iPhone, iPod of uw mobiele apparaat tijdens het rijden. NL-9 Window Mount cw_8820cw00232.indb 9 16/10/2009 14:0... - Page 60 INFORMaTIe hoofdsTuK inhoud inho inho Drie jaar beperkte productgarantie van Belkin International, Inc . misb De dekking van deze garantie Belkin International, Inc. ("Belkin") garandeert de oorspronkelijke koper van dit Belkin-product Ga a dat het product vrij is van ontwerp-, assemblage-, materiaal- en fabricagefouten. 1 . N De geldigheidsduur van de dekking Belkin garandeert het Belkin-product gedurende drie jaar. hoe worden problemen opgelost? Productgarantie. Belkin zal het product dat een defect vertoont naar eigen keus kosteloos (met uitzondering van verzendkosten) repareren of vervangen. Belkin behoudt zich het recht voor zonder voorafgaande kennisgeving de verkoop van een bepaald product te staken, waarbij de beperkte garantie tot reparatie of vervanging van het betreffende product zal komen te vervallen. Als Belkin niet in staat is het product te repareren of te vervangen (bijvoorbeeld...
-
Page 61: Informatie
Ga als volgt te werk als u service voor uw Belkin-product wilt aanvragen: 1 . Neem binnen 15 dagen na het voorval schriftelijk contact op met de klantenservice van Belkin: Belkin Ltd., Customer Service, Express Business Park, Shipton Way, Rushden, NN10 6GL, Verenigd Koninkrijk, bel + 44 (0) 1933 35 2000 of neem contact op met de afdeling Technische Ondersteuning (zie laatste pagina voor telefoonnummers). a . Het artikelnummer van het Belkin-product. b . Waar u het product hebt gekocht. c . Wanneer u het product hebt gekocht. d . Een kopie van de aankoopbon. 2 . De medewerker van de Belkin-klantenservice zal u vervolgens uitleggen hoe u het aankoopbewijs en het product moet verzenden en hoe de claim verder wordt afgewikkeld. en Belkin International, Inc. behoudt zich het recht voor het defecte Belkin-product te onderzoeken. De kosten voor verzending van het Belkin product naar Belkin International, Inc. komen volledig voor rekening van de koper. Als Belkin naar eigen inzicht tot de conclusie komt dat het onpraktisch is de beschadigde apparatuur naar Belkin te verzenden, kan Belkin nal, naar eigen goeddunken een deskundige reparatie-inrichting aanwijzen en deze opdragen de betreffende apparatuur te inspecteren en de reparatiekosten ervan te begroten. De eventuele ntie verzendkosten van het product naar de reparatie-inrichting en van de terugzending naar de koper en van de kostenbegroting komen geheel voor rekening van de koper. Het beschadigde product moet voor onderzoek beschikbaar blijven totdat de claim is afgehandeld. Belkin NL-11 Window Mount cw_8820cw00232.indb 11... - Page 62 INFORMaTIe hoofdsTuK hoofdsTuK inhoud inhoud inho inho International, Inc. behoudt zich bij de vereffening van claims het recht voor tot in-de- plaatstreding bij alle geldige verzekeringspolissen waarover de koper van het product beschikt. De garantie en de wet DEZE GARANTIE OMVAT DE ENIGE GARANTIE VAN BELKIN INTERNATIONAL, INC. ER ZIJN GEEN ANDERE GARANTIES, NADRUKKELIJK OF TENZIJ WETTELIJK BEPAALD IMPLICIET, MET INBEGRIP VAN IMPLICIETE GARANTIES OF VOORZIENINGEN VAN KWALITEIT, VERHANDELBAARHEID OF GESCHIKTHEID VOOR EEN BEPAALD DOEL, EN ZULKE IMPLICIETE GARANTIES, MITS VAN TOEPASSING, ZIJN WAT HUN GELDIGHEID BETREFT FINL TOT DE DUUR VAN DEZE GARANTIE BEPERKT. In sommige staten of landen is het niet toegestaan de duur van impliciete garanties te beperken in welk geval de bovenstaande garantiebeperkingen wellicht niet voor u gelden. ONDER TOEPASSELIJK RECHT IS BELKIN INTERNATIONAL, INC. NIET AANSPRAKELIJK IJSL VOOR INCIDENTELE, BIJZONDERE, DIRECTE, INDIRECTE, BIJKOMENDE OF IERL ITAL MEERVOUDIGE SCHADE ZOALS ONDERMEER SCHADE TEN GEVOLGE VAN GEDERFDE WINST EN/OF GEMISTE OPBRENGSTEN VOORTKOMEND UIT DE VERKOOP OF HET GEBRUIK VAN BELKIN PRODUCTEN, ZELFS ALS DE BETROKKENE VAN DE MOGELIJKHEID VAN ZULKE SCHADE TEVOREN OP DE HOOGTE WAS GESTELD. Deze garantie verleent u specifieke wettelijke rechten en wellicht hebt u andere rechten die van staat tot staat kunnen verschillen. In sommige staten en landen is het niet toegestaan ZUID incidentele schade, gevolgschade en andere schade uit te sluiten en daarom gelden de bovenstaande garantiebeperkingen wellicht niet voor u. VERE NL-12...
- Page 63 INFORMaTIe hoofdsTuK hoofdsTuK inhoud inhoud Wordt geleverd met gratis technische ondersteuning Aanvullende informatie over technische ondersteuning is beschikbaar op www.belkin.com onder "Ondersteuning".- Als u telefonisch contact wilt opnemen met onze afdeling Technische ondersteuning, bel dan het telefoonnummer van uw land in deze lijst.* Tegen telefoontarief ZIJN laND TeleFOONNUMMeR INTeRNeTaDRes ET, OOSTENRIJK 0820 200766 www.belkin.com/de/ BELGIË 07 07 00 073 www.belkin.com/nl/www.belkin.com/fr/ TSJECHIË 239 000 406 www.belkin.com/uk/ DENEMARKEN 701 22 403 www.belkin.com/uk/ FINLAND 0972519123 www.belkin.com/uk/...
- Page 64 Shipton Way, Rushden 92100 Boulogne-Billancourt, 80637 München NN10 6GL, Verenigd Koninkrijk Frankrijk Duitsland Belkin Iberia Belkin Italy & Greece Belkin B.V. C/ Anabel Segura, 10 planta baja, Of. 2 Via Carducci, 7 Boeing Avenue 333 28108, Alcobendas, Madrid 20123 Milaan...
- Page 65 Manual del usuario English 8820cw00232 F8Z453cw Français Deutsch Nederlands Español Italiano Português Русский cw_8820cw00232.indb 1 16/10/2009 14:0...
- Page 66 ÍNDICe De CONTeNIDOs seCCiones seCCiones Índice de contenidos Índi 1 Introducción . . . . . . . . . . . . . . . . . . . . . . . . . . . . . . . . . . . . . . . . . . . . . . . . . . . . . . 1 Características .
- Page 67 INTRODUCCIÓN Índice de contenidos . 1 especificaciones • Su potente ventosa adhiere el dispositivo a cualquier ventana o superficie pulida • Base universal que se ajusta a prácticamente cualquier iPhone, iPod o dispositivo . 2 portátil. • El brazo articulado le permite colocar su dispositivo como más le convenga Fig 1 . 3 • La base da acceso a los conectores del dispositivo What’s in the Box . 6 Contenido de la caja . 8 . 9 Ventosa Clip para gestionar el cable Cable Management Clip Suction Cup Base Brazo articulado...
- Page 68 Fig 1 What’s in the Box Cable Management Clip Suction Cup CÓMO INsTalaR el sOpORTe paRa el paRaBRIsas CÓ Cradle Flexible Arm seCCiones Índice de contenidos Índi Índi ajustar el soporte para el parabrisas Fig 2 Colo Cable Management Clip Suction Cup 1 . Atornille firmemente la ventosa y la base en los extremos del brazo articulado.
- Page 69 Fig 3A Fig 3B Attaching your window mount to the window Fig 3A Fig 3B CÓMO INsTalaR el sOpORTe paRa el paRaBRIsas seCCiones seCCiones Índice de contenidos Índice de contenidos Colocar el dispositivo en la base 1 . Coloque la base a su gusto. 2 . Pulse el botón que permite desplegar los brazos de sujeción de la base y extiéndalos por Placing the iPhone in the cradle.
- Page 70 CÓMO INsTalaR el sOpORTe paRa el paRaBRIsas CÓ Fig 4B seCCiones seCCiones Índice de contenidos Índice de contenidos Índi Índi 4 . Apriete los brazos de sujeción de la base tal y como se muestra a continuación (verá Reti pegatinas identificativas en los brazos de sujeción) para que sujeten firmemente el 1 . P dispositivo.. Fig 4C 2 . C Removing the iPhone Fig 5A Fig 5B ES-4 soporte para el parabrisas sopo...
- Page 71 Fig 4C Fig 4C CÓMO INsTalaR el sOpORTe paRa el paRaBRIsas seCCiones seCCiones Índice de contenidos Índice de contenidos Retirar el dispositivo de la base 1 . Pulse la pestaña del brazo de sujeción superior y retire la parte superior del dispositivo. Removing the iPhone Fig 5A Removing the iPhone Fig 5A 2 . Cuando el dispositivo esté suelto, puede retirarlo. Fig 5B Fig 5B Removing your windown mount...
- Page 72 ajUsTaR el sOpORTe paRa el paRaBRIsas Fig 6C seCCiones Índice de contenidos Índi ajustar la posición de la base 1 . Retire el dispositivo y mueva el brazo articulado hasta que la base esté en la posición 1 . R deseada. El brazo conservará esa posición. 2 . S Adjusting the position of the cradle 3 . C Fig 7 4 . S ES-6 soporte para el parabrisas...
- Page 73 Fig 5B ajUsTaR el sOpORTe paRa el paRaBRIsas Fig 5B seCCiones Índice de contenidos Despegar el soporte del parabrisas 1 . Retire el dispositivo de la base. 2 . Sujete la base con una mano. Removing your windown mount 3 . Con la otra mano, sujete la base de la ventosa y gírela en contra del sentido de las agujas Removing your windown mount del reloj hasta que se desprenda. Fig 6A Fig 6B Fig 6A Fig 6B 4 . Si fuera necesario, tire con suavidad de la pestaña de goma que hay en la ventosa para...
- Page 74 ResOlUCIÓN De pROBleMas seCCiones Índice de contenidos Índi En esta sección encontrará una serie de consejos para resolver los posibles problemas que para pueda tener con este producto. el dispositivo no cabe en la base . el so Solución cond sopo • Pulse el botón que permite desplegar los brazos de sujeción de la base e intente colocar el dispositivo en distintas posiciones. Para No puede adherir el soporte al parabrisas . Solución el so • Limpie con un paño húmedo la ventosa y la superficie donde quiere fijar el soporte. coch • Humedecer el interior de la ventosa puede mejorar el agarre a la ventana Belk a un...
- Page 75 De segURIDaD seCCiones Índice de contenidos aDveRTeNCIa: Consulte la advertencia y guía de seguridad del soporte para el parabrisas de Belkin, en ella encontrará consejos de seguridad muy importantes . Consulte la legislación pertinente antes de instalar este adaptador en su parabrisas. Instale el soporte en un punto en el que no obstaculice en modo alguno el campo de visión del conductor,los controles del vehículo, los airbags o sus áreas de apertura. No instale el soporte de un forma que contravenga la legislación vigente o que no sea segura. Consulte la Advertencia y guía de seguridad del soporte para el parabrisas de Belkin, que se incluye aquí como referencia, si desea información más detallada. Para instalar este soporte es imprescindible que preste toda su atención y que use ambas manos. No intente instalar el soporte mientras conduce. No intente ajustar ni retirar el soporte o un dispositivo portátil que no esté...
- Page 76 INFORMaCIÓN seCCiones Índice de contenidos Índi Índi garantía del producto de 3 años de Belkin International, Inc . auto para la cobertura de la presente garantía . Para Belkin International, Inc. (“Belkin”) otorga una garantía al comprador original según la cual el 1 . P producto Belkin no tendrá defectos en cuanto a diseño, montaje, materiales o mano de obra. Cuál es el período de cobertura .
- Page 77 INFORMaCIÓN seCCiones seCCiones Índice de contenidos Índice de contenidos autorizadas de programas o sistemas. para obtener asistencia . Para obtener asistencia sobre algún producto de Belkin, debe seguir los siguientes pasos: 1 . Póngase en contacto con Belkin Ltd Express Business Park, Shipton Way, Rushden, NN10 bra. 6GL, Reino Unido, a la atención del: Servicio de atención al cliente, o llame al + 44 (0) 1933 35 2000 o al servicio técnico gratuito (véase la última página), en un plazo de 15 días desde el momento de la incidencia. a . El número de artículo del producto Belkin. b . El lugar de compra del producto. der c . El lugar de compra del producto. d . Copia de la factura original. 2 . El servicio de atención al cliente de Belkin le informará sobre cómo enviar la factura y el producto Belkin y sobre cómo proceder con su reclamación. Belkin se reserva el derecho de revisar el producto Belkin dañado. Todos los gastos de envío del producto Belkin a Belkin para su inspección correrán a cargo del comprador exclusivamente. Si Belkin determina, según su propio criterio, que resulta poco práctico el envío de los equipos averiados a Belkin, Belkin podrá designar, según su propio criterio, una empresa de reparación de equipos para que inspeccione y estime el coste de la reparación de dichos equipos. Los gastos, si existen, de envío del equipo a dicha empresa...
- Page 78 INFORMaCIÓN seCCiones seCCiones Índice de contenidos Índice de contenidos Índi Índi Relación de la garantía con la legislación estatal . ESTA GARANTÍA CONTIENE LA GARANTÍA EXCLUSIVA DE BELKIN. NO EXISTEN OTRAS Para GARANTÍAS EXPLÍCITAS O IMPLÍCITAS, EXCEPTO LAS ESTABLECIDAS POR LEY, serv INCLUYENDO LA GARANTÍA IMPLÍCITA O LAS CONDICIONES DE CALIDAD, APTITUD técn PARA LA VENTA O PARA CUALQUIER PROPÓSITO EN CONCRETO Y, TALES GARANTÍAS IMPLÍCITAS, SI ES QUE EXISTE ALGUNA, ESTÁN LIMITADAS A LA DURACIÓN DE ESTA paÍ GARANTÍA. BÉL Ciertas jurisdicciones no permiten la limitación de duración de las garantías implícitas, por lo que puede que las anteriores limitaciones no le afecten. FINL EN NINGÚN CASO BELKIN SERÁ RESPONSABLE DE LOS DAÑOS IMPREVISTOS, ESPECIALES, DIRECTOS, INDIRECTOS, CONSECUENTES O MÚLTIPLES, INCLUYENDO ENTRE OTROS LA PÉRDIDA DE NEGOCIO O BENEFICIOS QUE PUEDA SURGIR DE LA VENTA O EL EMPLEO DE CUALQUIER PRODUCTO BELKIN, INCLUSO SI BELKIN HA SIDO INFORMADA DE LA POSIBILIDAD DE DICHOS DAÑOS. ISLA IRLA Esta garantía le proporciona derechos legales específicos y también podría beneficiarse de...
- Page 79 INFORMaCIÓN seCCiones seCCiones Índice de contenidos Índice de contenidos servicio de asistencia técnica gratuito Para más información, consulte en nuestra página web www.belkin.com la sección del servicio de -asistencia técnica. Si desea ponerse en contacto con el servicio de asistencia técnica por teléfono, le rogamos que llame al número correspondiente de esta lista*. *Puede que se apliquen tarifas de llamada nacional paÍs NúMeRO DIReCCIÓN De INTeRNeT AUSTRIA 0820 200766 www.belkin.com/de/ BÉLGICA 07 07 00 073 www.belkin.com/nl/www.belkin.com/fr/ r lo REPÚBLICA CHECA...
- Page 80 Shipton Way, Rushden 92100 Boulogne-Billancourt 80637 Múnich NN10 6GL (Reino Unido) Francia Alemania Belkin Iberia Belkin Italy & Greece Belkin B.V. C/ Anabel Segura, 10 planta baja, Of. 2 Via Carducci, 7 Boeing Avenue 333 28108, Alcobendas, Madrid Milán 20123 1119 PH Schiphol-Rijk España...
- Page 81 Manuale utente English 8820cw00232 F8Z453cw Français Deutsch Nederlands Español Italiano Português Русский cw_8820cw00232.indb 1 16/10/2009 14:0...
- Page 82 INDICe sezioni indice indi 1Introduzione . . . . . . . . . . . . . . . . . . . . . . . . . . . . . . . . . . . . . . . . . . . . . . . . . . . . . . 1 Caratteristiche .
-
Page 83: 1Introduzione
INTRODUZIONe sezioni indice . 1 Caratteristiche • La ventosa aderisce a qualsiasi finestrino o superficie liscia • L' alloggiamento regolabile mantiene in posizione in maniera sicura diversi tipi di iPhone/ . 2 iPod ed altri dispositivi mobili. • Il collo in acciaio regolabile permette di scegliere liberamente dove posizionare il dispositivo Fig 1 • L'alloggiamento permette l'accesso al connettore dock del dispositivo What’s in the Box . 6 Contenuto della confezione . 8 . 9 Clip fermacavo Ventosa Cable Management Clip Suction Cup Braccio flessibile Cradle Flexible Arm... -
Page 84: Installazione Del Supporto Da Auto Con Ventosa
Fig 1 What’s in the Box Cable Management Clip Suction Cup INsTallaZIONe Del sUppORTO Da aUTO CON veNTOsa Cradle Flexible Arm sezioni indice indi indi Montaggio del supporto da auto con ventosa Fig 2 Cable Management Clip Suction Cup 1 . Avvitare bene la ventosa e l'alloggiamento alle estremità opposte del collo d'acciaio. Assembling your window mount 1 . P Cradle... -
Page 85: Posizionamento Del Dispositivo Nell'alloggiamento
Fig 3A Fig 3B Attaching your window mount to the window Fig 3A Fig 3B INsTallaZIONe Del sUppORTO Da aUTO CON veNTOsa sezioni sezioni indice indice posizionamento del dispositivo nell'alloggiamento 1 . Posizionare l'alloggiamento nella posizione desiderata. 2 . Premere il pulsante di rilascio in modo tale che i bracci dell'alloggiamento raggiungano la Placing the iPhone in the cradle. massima estensione. - Page 86 INsTallaZIONe Del sUppORTO Da aUTO CON veNTOsa Fig 4B sezioni sezioni indice indice indi indi 4 . Premere saldamente la parte superiore e inferiore dei bracci dell'alloggiamento, (come estr illustrato di seguito, facendo riferimento ai rispettivi adesivi posti sui bracci), sino a quando 1 . S il dispositivo sarà posizionato in maniera sicura. Fig 4C 2 . Q Removing the iPhone Fig 5A IT-4 supporto da auto con ventosa Fig 5B supp cw_8820cw00232.indb 4...
-
Page 87: Estrazione Del Dispositivo Dall'alloggiamento
Fig 4C Fig 4C INsTallaZIONe Del sUppORTO Da aUTO CON veNTOsa sezioni sezioni indice indice estrazione del dispositivo dall'alloggiamento ndo 1 . Spingere all'indietro la linguetta situata sul braccio superiore dell'alloggiamento e far scorrere la parte superiore del dispositivo verso di voi. Removing the iPhone Fig 5A Removing the iPhone Fig 5A 2 . Quando il dispositivo non è più bloccato, può essere tolto. Fig 5B Fig 5B Removing your windown mount Fig 6A Fig 6B... -
Page 88: 3Regolazione Del Supporto Da Auto Con Ventosa
RegOlaZIONe Del sUppORTO Da aUTO CON veNTOsa Fig 6C sezioni indice indi Regolazione della posizione dell'alloggiamento 1 . Togliere il dispositivo dall'alloggiamento e piegare il braccio allungabile fino a quando 1 . E l'alloggiamento raggiunge la posizione desiderata. Il braccio allungabile rimarrà nella nuova 2 . T Adjusting the position of the cradle posizione. 3 . C Fig 7 4 . S IT-6 supporto da auto con ventosa supp... -
Page 89: Rimozione Del Supporto Da Auto Con Ventosa Dal Vetro
Fig 5B RegOlaZIONe Del sUppORTO Da aUTO CON veNTOsa Fig 5B sezioni indice Rimozione del supporto da auto con ventosa dal vetro 1 . Estrarre il dispositivo dall'alloggiamento. uova 2 . Tenere l'alloggiamento con una mano. Removing your windown mount 3 . Con l'altra mano, prendere la coppa a ventosa e girarla (in senso orario) fino a quando la Removing your windown mount ventosa non aderisce più. -
Page 90: Risoluzione Dei Problemi
RIsOlUZIONe DeI pROBleMI sezioni indice indi Qualora si verificassero dei problemi con il supporto da auto con ventosa, essi possono Da a essere risolti seguendo i consigli riportati in questa sezione. Il dispositivo non entra nell'alloggiamento regolabile . Prim Soluzione prov supp • Premere il pulsante di rilascio per allungare i bracci dell'alloggiamento. Quindi, provare a del c posizionare il dispositivo nell'alloggiamento in diverse posizioni. dell' sicu per Il supporto da auto con ventosa non si attacca al vetro . Il su Soluzione • Usare un panno umido per pulire l'interno della ventosa del supporto da auto e la parte del... - Page 91 Il supporto da auto con ventosa deve essere installato con cura e usando entrambe le mani. Non collegare il supporto da auto con ventosa mentre si sta guidando. Non regolare del o staccare il supporto da auto con ventosa o il dispositivo mobile mentre si sta guidando . Regolare la posizione del supporto da auto con ventosa in modo tale che non ostacoli, insieme al dispositivo mobile, l'accesso ai comandi dell'automobile o la visuale del conducente. Belkin non si assume alcuna responsabilità per lesioni personali o danni materiali causati da una guida spericolata dovuta all'interazione con il supporto da auto con ventosa, l'iPhone, l'iPod o il dispositivo mobile. IT-9 supporto da auto con ventosa cw_8820cw00232.indb 9 16/10/2009 14:0...
- Page 92 INFORMaZIONI sezioni indice indi indi garanzia limitata di 3 anni sul prodotto Belkin International, Inc . parz Oggetto della garanzia . Belkin International, Inc. (“Belkin”) garantisce all'acquirente di questo prodotto Belkin che tale Per prodotto è esente da difetti di progettazione, montaggio, materiale e lavorazione. 1 . C periodo di copertura della garanzia . Belkin garantisce il prodotto Belkin per tre anni. Risoluzione di eventuali problemi . Garanzia sul prodotto.
- Page 93 INFORMaZIONI sezioni sezioni indice indice parziali oscuramenti o abbassamenti di tensione), programmazione non autorizzata oppure modifiche o alterazioni all'apparecchiatura dell'impianto. Come ottenere l'assistenza . tale Per usufruire dell'assistenza per il proprio prodotto Belkin, è necessario: 1 . Contattare Belkin Ltd., Express Business Park, Shipton Way, Rushden, NN10 6GL, Regno Unito, all'attenzione del: Servizio Clienti (chiamare il numero + 44 (0) 1933 35 2000), o l'Assistenza tecnica gratuita (vedere l'ultima pagina), entro 15 giorni dall'evento. a . Il codice del prodotto Belkin. b . Il luogo di acquisto del prodotto. c . La data di acquisto del prodotto. d . Copia originale della ricevuta. 2 . Il rappresentante del Servizio Clienti Belkin vi spiegherà come inviare la ricevuta e il pari prodotto Belkin e come procedere con il reclamo; Belkin si riserva il diritto di riesaminare il prodotto Belkin danneggiato. Tutte le spese di spedizione per il prodotto Belkin restituito alla Belkin sono a carico dell'acquirente. Se Belkin dovesse ritenere, a propria discrezione, che inviare l'apparecchio danneggiato non sia conveniente, Belkin potrà decidere, a propria discrezione, di farlo ispezionare e determinare il costo della riparazione presso una struttura diversa dalla propria. L'acquirente si farà carico di eventuali spese di spedizione, causate dal rinvio e dalla ricezione dell'apparecchio dopo l'ispezione. Eventuali apparecchi danneggiati dovranno essere mantenuti disponibili per eventuali verifiche fino alla risoluzione della richiesta di indennizzo. Al raggiungimento one, dell'accordo, Belkin si riserva il diritto di essere surrogata da eventuali polizze assicurative cui dell'acquirente.
- Page 94 INFORMaZIONI sezioni sezioni indice indice indi indi Cosa stabilisce la legge riguardo alla garanzia . LA PRESENTE GARANZIA COSTITUISCE L'UNICA GARANZIA DI BELKIN. LA PRESENTE Per GARANZIA COSTITUISCE L'UNICA GARANZIA, ESPLICITA O IMPLICITA, DELLA BELKIN. nell' SI ESCLUDE QUALSIASI GARANZIA IMPLICITA, DI COMMERCIABILITÀ E DI IDONEITÀ A pert SCOPI PARTICOLARI CHE VADA OLTRE LA PRESENTE GARANZIA ESPLICITA SCRITTA. Alcune giurisdizioni non consentono l'esclusione o la limitazione delle garanzie implicite o della responsabilità per i danni accidentali, pertanto i limiti di esclusione di cui sopra potrebbero non essere applicabili. IN NESSUN CASO BELKIN POTRÀ ESSERE CONSIDERATA RESPONSABILE DI ALCUN FINL DANNO DIRETTO, INDIRETTO, ACCIDENTALE, SPECIFICO O DANNI MULTIPLI TRA I QUALI, MA NON LIMITATI A, EVENTUALI DANNI DI MANCATI AFFARI O MANCATO GUADAGNO DERIVATI DALLA VENDITA O UTILIZZO DI QUALSIASI PRODOTTO BELKIN, ANCHE NEL CASO IN CUI SI FOSSE STATI INFORMATI DELLA POSSIBILITÀ DI TALI DANNI. ISLA Questa garanzia consente di godere di diritti legali specifici e di eventuali altri diritti che IRLA ITAL possono variare di stato in stato. Alcune giurisdizioni non consentono l'esclusione o la limitazione delle garanzie implicite o della responsabilità per i danni accidentali o altri danni, pertanto i limiti di esclusione di cui sopra potrebbero non essere applicabili. SVIZ IT-12...
- Page 95 INFORMaZIONI sezioni sezioni indice indice assistenza tecnica gratuita Per maggiori informazioni sull'assistenza tecnica, visitare il nostro sito web www.belkin.it nell'area Centro- assistenza. Per contattare l'assistenza telefonicamente, chiamare il numero pertinente riportato in questo elenco*. Si applicano solo le tariffe delle chiamate locali paese NUMeRO INDIRIZZO INTeRNeT AUSTRIA 0820 200766 www.belkin.com/de/ BELGIO 07 07 00 073 www.belkin.com/nl/www.belkin.com/fr/ REPUBBLICA CECA 239 000 406 www.belkin.com/uk/ DANIMARCA 701 22 403 www.belkin.com/uk/...
- Page 96 Shipton Way, Rushden 92100 Boulogne-Billancourt 80637 Monaco di Baviera NN10 6GL, Regno Unito Francia Germania Belkin Iberia Belkin Italy & Greece Belkin B.V. C/ Anabel Segura, 10 planta baja, Of. 2 Via Carducci, 7 Boeing Avenue 333 28108, Alcobendas, Madrid 20123 Milano...
- Page 97 Suporte para pára-brisas Manual do utilizador English 8820cw00232 F8Z453cw Français Deutsch Nederlands Español Italiano Português Русский cw_8820cw00232.indb 1 16/10/2009 14:0...
- Page 98 ÍNDICe INTR seCções Índi Índice 1 Introdução ................1 Cara Características .
-
Page 99: Introdução
INTRODUÇÃO seCções Índice Características • O suporte de ventosa fixa-se a qualquer vidro ou superfície lisa • O suporte ajustável fixa em segurança vários modelos de iPhone/iPod e outros dispositivos móveis. • O braço ajustável dá-lhe liberdade para posicionar o seu dispositivo Fig 1 • O suporte permite o acesso ao conector para base de ligação do seu dispositivo What’s in the Box Conteúdo da caixa Ventosa Clip de organização de cabos Cable Management Clip Suction Cup Braço flexível Cradle Flexible Arm Suporte Fig 2 PT-1 suporte para pára-brisas Assembling your window mount cw_8820cw00232.indb 1 16/10/2009 14:0... - Page 100 Fig 1 What’s in the Box Cable Management Clip Suction Cup InstAlAR O suPORte PARA PáRA-bRIsAs Cradle Flexible Arm seCções Índice Índi Índi Montar o suporte para pára-brisas Fig 2 Colo Cable Management Clip Suction Cup 1. enrosque com firmeza a ventosa e o suporte nas respectivas extremidades do braço. Assembling your window mount 1. P Cradle Flexible Arm 2. P Fig 2 Assembling your window mount Fixar o suporte ao vidro...
-
Page 101: Instalar O Suporte Para Pára-Brisas
Fig 3A Fig 3B Attaching your window mount to the window Fig 3A Fig 3B INsTalaR O sUpORTe paRa páRa-BRIsas seCções seCções Índice Índice Colocar o dispositivo no suporte 1. Posicione o suporte na posição pretendida. 2. Prima o botão de desbloqueio para estender os braços do suporte até à extensão máxima. Placing the iPhone in the cradle. Fig 4A Placing the iPhone in the cradle. Fig 4A r da 3. Coloque o dispositivo no suporte de modo a que fique apoiado no suporte inferior. (Para carregar,... - Page 102 INsTalaR O sUpORTe paRa páRa-BRIsas Fig 4B seCções seCções Índice Índice Índi Índi 4. Prima com firmeza e em simultâneo a parte superior e inferior dos braços do suporte tal como Retir ilustrado abaixo (indicado por autocolantes nos braços do suporte), até que o dispositivo fique 1. e bem fixo. Fig 4C 2. Q Removing the iPhone Fig 5A Fig 5B PT-4 suporte para pára-brisas supo Removing your windown mount cw_8820cw00232.indb 4 16/10/2009 14:0...
-
Page 103: Retirar O Dispositivo Do Suporte
Fig 4C Fig 4C INsTalaR O sUpORTe paRa páRa-BRIsas seCções seCções Índice Índice Retirar o dispositivo do suporte 1. empurre para trás a aba do braço superior do suporte e faça deslizar a parte superior do dispositivo na sua direcção. Removing the iPhone Fig 5A Removing the iPhone Fig 5A 2. Quando o dispositivo estiver solto, retire-o. Fig 5B Fig 5B Removing your windown mount Fig 6A Fig 6B Removing your windown mount Fig 6A Fig 6B... - Page 104 AjustAR O suPORte PARA PáRA-bRIsAs Fig 6C seCções Índice Índi Ajustar a posição do suporte Desp 1. Retire o dispositivo do suporte e dobre o braço de extensão até que o suporte alcance a posição 1. R pretendida. O braço de extensão assumirá a nova posição. 2. s Adjusting the position of the cradle 3. C Fig 7 4. s PT-6 suporte para pára-brisas supo cw_8820cw00232.indb 6 16/10/2009 14:0...
-
Page 105: Ajustar O Suporte Para Pára-Brisas
Fig 5B ajUsTaR O sUpORTe paRa páRa-BRIsas Fig 5B seCções Índice Desprender o suporte do vidro ão 1. Retire o dispositivo do suporte. 2. segure a parte do suporte com uma mão. Removing your windown mount 3. Com a outra mão, alcance a base da ventosa e rode-a (para a direita) até libertar a pressão de Removing your windown mount sucção. Fig 6A Fig 6B Fig 6A Fig 6B 4. se necessário, puxe a pequena aba plástica localizada no bordo da ventosa para libertar qualquer pressão residual. Fig 6C Fig 6C Adjusting the position of the cradle Adjusting the position of the cradle... -
Page 106: Resolução De Problemas
ResOluçãO De PRObleMAs AvIS seCções Índice Índi Pode resolver rapidamente a maioria dos problemas com o suporte para pára-brisas seguindo as AVIs recomendações desta secção. PARA Cons O dispositivo não cabe no suporte ajustável. solução algu viole • Prima o botão de desbloqueio para estender os braços do suporte e depois tente colocar o aviso dispositivo no suporte em orientações diferentes. A ins mão um s O suporte para pára-brisas não fixa ao vidro. supo solução dos c • utilize um pano húmido para limpar o interior da ventosa do suporte para pára-brisas e a zona do A be vidro na qual a ventosa será fixada. cond • O humedecimento do interior da ventosa também pode ajudar a criar uma melhor fixação ao dispo vidro. PT-8 suporte para pára-brisas supo cw_8820cw00232.indb 8 16/10/2009 14:0... -
Page 107: Avisos De Segurança
AvISOS De SegURANÇA seCções Índice AVIsO: COnsulte O MAnuAl De AVIsO e seGuRAnçA DO suPORte PARA PáRA-bRIsAs DA belKIn PARA AVIsOs sObRe O PRODutO e OutRAs InFORMAçÕes De seGuRAnçA IMPORtAntes. Consulte as leis nacionais, estatais, municipais, regionais ou locais onde conduz o seu veículo, antes de montar o suporte para pára-brisas. não coloque o suporte para pára-brisas num local que, de modo algum, obstrua a visão do condutor, interfira com os comandos de direcção e com a acção do airbag, viole a lei em vigor ou que é, de outro modo, inseguro. Para mais informações, consulte o manual de aviso e segurança do suporte para pára-brisas da belkin, incluído neste documento para referência. A instalação do suporte para pára-brisas precisa de ser feita com toda a concentração e com as duas mãos. não tente ligar o suporte para pára-brisas enquanto conduz. não tente ajustar, nem apanhar um suporte para pára-brisas ou um dispositivo móvel solto enquanto conduz. Ajuste a posição do suporte para pára-brisas de forma a que este e o seu dispositivo móvel não interfiram com nenhum dos comandos de operação do veículo ou com a sua visualização da estrada. do A belkin não assume qualquer responsabilidade por ferimentos ou danos materiais decorrentes da condução perigosa em resultado de interacção com o suporte para pára-brisas, iPhone, iPod ou dispositivo móvel. PT-9 suporte para pára-brisas cw_8820cw00232.indb 9 16/10/2009 14:0... - Page 108 InFORMAçÕes seCções Índice Índi Índi Garantia de produtos durante 3 anos da belkin International, Inc. Para O que se encontra coberto por esta garantia. 1. e A belkin International, Inc. (“belkin”) garante ao comprador original deste produto que o mesmo se encontra livre de defeitos de concepção, montagem, material ou execução. Qual o período de cobertura da garantia. A belkin concede uma garantia de três anos para o produto belkin. Quais os procedimentos a realizar para corrigir os problemas? Garantia do produto. A belkin procederá à reparação ou substituição gratuita (excepto no que diz respeito aos custos de envio), de acordo com o seu critério, de qualquer produto com avaria. A belkin reserva-se o direito de cancelar a produção de qualquer dos seus produtos, sem aviso prévio, e rejeita qualquer garantia 2. O limitada que obriga a reparar ou substituir qualquer destes produtos descontinuados. no caso de não ser possível à belkin reparar ou substituir o produto (por exemplo, porque foi descontinuado), a A be belkin oferece um reembolso ou um crédito referente à compra de outro produto da belkin.com num do p montante igual ao valor de compra do produto, comprovado pelo recibo original, com um desconto dete proporcional ao tempo de utilização. belki O que não se encontra coberto pela garantia? um o todas as garantias mencionadas anteriormente são consideradas nulas e inválidas se o produto para belkin não for enviado à belkin para inspecção, a seu pedido e às custas do comprador, ou se a belkin exclu determinar que o produto não foi instalado correctamente ou que foi alterado de alguma forma. A verif garantia belkin não cobre intempéries, como inundações, queda de raios, tremores de terra, actos decid de guerra, vandalismo, roubo, desgaste por utilização normal, erosão, gasto, falhas de actualização,...
-
Page 109: Informações
INFORMações seCções seCções Índice Índice Como obter assistência. Para obter assistência para o produto belkin deve proceder da seguinte forma: 1. entre em contacto com a belkin ltd express business park, shipton Way, Rushden, nn106Gl, Reino unido, Attn: Customer service; ligue para + 44 (0) 1933 35 2000 ou ligue para o Apoio técnico gratuito (consulte a última página), no prazo de 15 dias após a ocorrência. a. O número de peça do produto belkin. b. Onde adquiriu o produto. c. Quando adquiriu o produto. d. Cópia do recibo original. tia 2. O representante do serviço de assistência ao cliente da belkin fornecerá mais informações sobre como despachar o produto belkin, o respectivo recibo e de como prosseguir com a reclamação. A belkin reserva-se o direito de inspeccionar o produto belkin danificado. todos os custos de envio do produto à belkin para inspecção são da responsabilidade exclusiva do comprador. se a belkin determinar, de forma discricionária, que é impossível despachar o equipamento danificado para a belkin, esta pode designar, de forma discricionária, um centro de reparação que verifique e elabore um orçamento para a reparação do referido equipamento. O custo, a existir, de envio do equipamento para e de esse centro de reparação, bem como da elaboração dessa estimativa será suportado kin exclusivamente pelo comprador. O equipamento danificado deve permanecer disponível para verificação até que o destino da reclamação seja decidido. sempre que o destino das reclamações é decidido, a belkin reserva-se o direito de ser declarada sub-rogada ao abrigo de quaisquer apólices de seguro que o comprador bras possa ter em seu nome. PT-11 suporte para pára-brisas cw_8820cw00232.indb 11 16/10/2009 14:0... - Page 110 INFORMações seCções seCções Índice Índice Índi Índi Como é que as leis em vigor se aplicam à garantia. estA GARAntIA InCluI APenAs A GARAntIA DA belKIn. nãO Há OutRAs GARAntIAs, eXPRessAs Ou, eXCePtO nOs CAsOs PReVIstOs nA leI, IMPlÍCItAs, InCluInDO A GARAntIA IMPlÍCItA Ou pret COnDIçãO De QuAlIDADe, COMeRCIAlIZAçãO Ou ADeQuAçãO PARA uM FIM esPeCÍFICO, e essAs corre GARAntIAs IMPlÍCItAs, QuAnDO eXIstentes, sãO lIMItADAs eM teRMOs De DuRAçãO AtÉ AO paÍ teRMO DestA GARAntIA. áus Alguns estados não permitem limitações à duração de uma garantia implícita, pelo que as limitações bÉlG especificadas podem não ser aplicáveis. RePÚ DINA eM eVentO AlGuM PODe A belKIn seR ResPOnsAbIlIZADA POR DAnOs ACIDentAIs, esPeCIAIs, FINL DIReCtOs, InDIReCtOs, COnseQuentes Ou MÚltIPlOs, tAIs COMO, MAs nãO se lIMItAnDO A, PeRDA De neGÓCIO Ou luCROs, ResultAntes DA VenDA Ou utIlIZAçãO De QuAlQueR PRODutO AleM GRÉ belKIn, MesMO Que O COMPRADOR tenHA sIDO ADVeRtIDO DA POssIbIlIDADe De OCORRÊnCIA Desse tIPO De DAnOs. ISLÂ A presente garantia concede-lhe direitos legais próprios, sendo ainda possíveis outros direitos, cuja IRLA Itál validade varia de estado para estado. Alguns estados não permitem a exclusão ou a limitação de danos supervenientes, subsequentes ou outros danos, pelo que as limitações especificadas poderão PAÍs não se aplicar ao seu caso. RÚs áFRI esPA suÉC...
- Page 111 INFORMações seCções seCções Índice Índice Apoio técnico gratuito Pode obter mais informações no nosso site em www.belkin.com na área de apoio técnico.- se pretender entrar em contacto telefónico com o serviço de apoio técnico, ligue para o número correspondente nesta lista*. P odem aplicar-se chamadas às taxas locais paÍs NúMeRO eNDeReçO Na INTeRNeT áustRIA 0820 200766 www.belkin.com/de/ ões bÉlGICA 07 07 00 073 www.belkin.com/nl/www.belkin.com/fr/ RePÚblICA CHeCA 239 000 406 www.belkin.com/uk/ DINAMARCA 701 22 403 www.belkin.com/uk/ FINLÂNDIA 0972519123 www.belkin.com/uk/ FRANÇA...
- Page 112 Shipton Way, Rushden 92100 Boulogne-Billancourt, 80637 Munique NN10 6GL, Reino Unido França Alemanha Belkin Iberia Belkin Itália e Grécia Belkin B.V. C/ Anabel Segura, 10 planta baja, Of. 2 Via Carducci, 7 Boeing Avenue 333 28108, Alcobendas, Madrid Milão 20123...
- Page 113 Крепление на стекло Руководство пользователя English 8820cw00232 F8Z453cw Français Deutsch Nederlands Español Italiano Português Русский cw_8820cw00232.indb 1 16/10/2009 14:0...
- Page 114 СоДЕРжаНИЕ ВВЕ разделы Содержание Сод 1 Введение ................1 Хара...
- Page 115 ВВЕДЕНИЕ разделы Содержание Характеристики • Присоску можно прикрепить к любому стеклу или гладкой поверхности • Регулируемая подставка надежно удерживает многие модели iPhone/iPod и других мобильных устройств. • Регулируемая трубка позволяет свободно разместить устройство Fig 1 • Подствака не закрывает доступ к разъему устройства What’s in the Box Содержимое комплекта Присоска Зажим для фиксации кабелей Cable Management Clip Suction Cup Подставка Гибкий держатель Cradle Flexible Arm Fig 2 RU-1 Крепление на стекло Assembling your window mount cw_8820cw00232.indb 1 16/10/2009 14:0...
- Page 116 Fig 1 What’s in the Box Cable Management Clip Suction Cup Установка крепления на стекло Уст Cradle Flexible Arm разделы Содержание Сод Сборка крепления на стекло Fig 2 Уста Cable Management Clip Suction Cup 1. Прочно вкрутите присоску и подставку в противоположные концы трубки. Assembling your window mount 1. У Cradle Flexible Arm 2. Н...
- Page 117 Fig 3A Fig 3B Attaching your window mount to the window Fig 3A Fig 3B Установка крепления на стекло разделы Содержание Установка устройства в подставку 1. Удобно расположите подставку. 2. Нажмите кнопку фиксатора, чтобы удлинить зажимы подставки до максимума. Placing the iPhone in the cradle. Fig 4A Placing the iPhone in the cradle. Fig 4A рите...
- Page 118 Установка крепления на стекло Уст Fig 4B разделы Содержание Сод 4. Плотно прижмите верхнюю и нижнюю части подставки, как показано ниже (см. наклейки на Снят подставке), чтобы надежно закрепить устройство. 1. О Fig 4C 2. К Removing the iPhone Fig 5A Fig 5B RU-4 Крепление на стекло Креп Removing your windown mount cw_8820cw00232.indb 4 16/10/2009 14:0...
- Page 119 Fig 4C Fig 4C Установка крепления на стекло разделы Содержание на Снятие устройства с подставки 1. Отогните лепесток верхнего зажима и двигайте верхнюю часть устройства на себя. Removing the iPhone Fig 5A Removing the iPhone Fig 5A 2. Когда устройство высвобождено, его можно снять с подставки. Fig 5B Fig 5B Removing your windown mount Fig 6A Fig 6B Removing your windown mount Fig 6A Fig 6B RU-5...
- Page 120 регУлировка крепления на стекло рег Fig 6C разделы Содержание Сод Регулировка положения подставки Снят 1. Снимите устройство с подставки и сгибайте трубку, чтобы добиться необходимого 1. С положения подставки. Трубка останется в новом положении. 2. О Adjusting the position of the cradle 3. Д Fig 7 в 4. П с RU-6 Крепление на стекло Креп cw_8820cw00232.indb 6 16/10/2009 14:0...
- Page 121 Fig 5B регУлировка крепления на стекло Fig 5B разделы Содержание Снятие крепления со стекла 1. Снимите устройство с подставки. 2. Одной рукой удерживайте подставку. Removing your windown mount 3. Другой рукой вращайте основание присоски (против часовой стрелки), пока давление Removing your windown mount всасывания не будет сброшено. Fig 6A Fig 6B Fig 6A Fig 6B 4. При необходимости потяните за небольшой пластиковый язычок на краю присоски, чтобы сбросить остаточное давление. Fig 6C Fig 6C Adjusting the position of the cradle...
- Page 122 Устранение неполадок тех разделы Содержание Сод Следуя указаниям, приведенным в этом разделе, можно быстро решить большинство проблем, ВНИ которые могут возникнуть при использовании крепления на стекло. БЕЗО Озна Устройство невозможно установить на подставку. преж Решение оно безо • Нажмите кнопку фиксатора, чтобы удлинить зажимы подставки, затем попробуйте угро установить устройство на подставку под разными углами поворота. пред Для уста Крепление не прилипает к стеклу. пыта Решение креп • Протрите присоску крепления и зону стекла, на которую необходимо установить крепление, не м влажной тканью. Комп • Смочив внутреннюю поверхность присоски, можно улучшить уплотнение со стеклом. прич или RU-8 Крепление на стекло Креп...
- Page 123 техника безопасности разделы Содержание ем, ВНИМАНИЕ: ВАЖНУЮ ИНФОРМАЦИЮ ПО БЕЗОПАСНОСТИ МОЖНО НАЙТИ В РУКОВОДСТВЕ ПО БЕЗОПАСНОСТИ И ПРЕДУПРЕЖДЕНИЯХ belKIn. Ознакомьтесь с законами страны, штата, провинции или региона, где Вы будете проезжать, прежде, чем устанавливать крепление на стекло. Не размещайте крепление так, чтобы оно создавало помехи обзору водителя, управлению автомобилем, раскрытию подушки безопасности, не соответствовало применимым законам или другим способом представляло угрозу безопасности. Подробную информацию см. в руководстве по безопасности и предупреждениях belkin, ссылка на которое содержится здесь. Для установки крепления на стекло нужны полное внимание и свободные руки. Не пытайтесь устанавливать крепление на стекло, управляя автомобилем. Управляя автомобилем, не пытайтесь отрегулировать положение крепления или устройства либо поднять упавшее крепление. Устанавливайте крепление в такое положение, чтобы оно и мобильное устройство ние, не мешали управлять транспортным средством. Компания belkin не несет никакой ответственности за травмы или ущерб собственности по причине неосторожного вождения вследствие использования крепления на стекло, iPod, iPhone или другого мобильного устройства. RU-9 Крепление на стекло cw_8820cw00232.indb 9 16/10/2009 14:0...
- Page 124 информация инф разделы Содержание Сод Сод belkin International, Inc., ограниченная гарантия на три года молн изно пере Что покрывает данная гарантия. рабо belkin International, Inc. ("belkin") гарантирует первоначальному покупателю данного изделия сист belkin отсутствие у изделия дефектов конструкции, сборочных материалов или изготовления. Как п Срок действия гарантии. Для Компания belkin сопровождает данное изделие belkin гарантией на три года. 1. О Что делать для решения проблем? Гарантия качества изделия. п Компания belkin, по своему усмотрению, произведет бесплатный ремонт или бесплатную т замену любого дефектного изделия (исключение составляют затраты на доставку изделия). belkin оставляет за собой право без предварительного уведомления снять с производства любое из выпускаемых изделий и не берет на себя никаких обязательств по ограниченной гарантии на ремонт или замену таких снятых с производства изделий. Если belkin не может произвести ремонт или замену изделия (например, в случае если такое изделие было снято с производства), при приобретении покупателями другого изделия на сайте belkin.com компания belkin предложит покупателям возмещение либо скидку в размере стоимости старого изделия (которая подтверждается оригиналом документа о факте покупки изделия) с учетом его 2. П естественного износа. т Что входит в данную гарантию? с...
- Page 125 информация разделы разделы Содержание Содержание молнии), как наводнение, землетрясение, война, акты вандализма, хищение, естественный износ, эрозия, истощение запасов, устаревание, злоупотребление, ущерб, вызванный перепадами низкого напряжения (т. е. исчезновение или падение напряжения в электросети), работа несанкционированных программных продуктов или модификация либо изменение я системного оборудования. я. Как получить обслуживание. Для получения технического обслуживания изделия belkin необходимо выполнить следующее. 1. Обратитесь по адресу: belkin ltd, express business Park, shipton Way, Rushden, nn10 6Gl, united Kingdom, Attn: Customer service, позвоните по номеру + 44 (0) 1933 35 2000 или позвоните в бесплатную службу технической поддержки (см. последнюю страницу) в течение 15 дней после возникновения проблем. a. Инвентарный номер изделия belkin. b. Место покупки изделия. с c. Дата покупки изделия. ния ия d. Копия оригинала квитанции. 2. После этого представитель отдела обслуживания клиентов компании belkin даст указания о том, куда направить квитанцию и изделие belkin и как будет проводиться дальнейшая работа с заявкой. belkin оставляет за собой право осмотра поврежденных изделий belkin. Все затраты на доставку изделия в belkin для осмотра оплачиваются исключительно покупателем. Если компания belkin, исключительно по ее усмотрению, решает, что доставка поврежденного оборудования в belkin нецелесообразна, компания belkin может, исключительно по ее усмотрению, указать место ремонта оборудования, куда следует направить изделие для осмотра и оценки затрат на его RU-11 Крепление на стекло cw_8820cw00232.indb 11...
- Page 126 информация инф разделы разделы Содержание Содержание Сод Сод ремонт. Стоимость доставки оборудования в такое место ремонта оборудования и обратно, Бес а также оценки затрат на ремонт, оплачивается исключительно покупателем. Поврежденное Доп оборудование должно оставаться доступным для осмотра вплоть до истечения срока рассмотрения заявки. При урегулировании любых претензий belkin оставляет за собой право на теле суброгацию по любому из имеющихся страховых договоров покупателя. З во Как связаны с данной гарантией государственные законы. стр ДАННАЯ ГАРАНТИЯ СОДЕРЖИТ ИСКЛЮЧИТЕЛЬНО ГАРАНТИЙНЫЕ ОБЯЗАТЕЛЬСТВА belKIn, НЕТ АВС ИНЫХ ГАРАНТИЙ, ЯВНЫХ ЛИБО, ЗА ИСКЛЮЧЕНИЕМ ПРЕДУСМОТРЕННЫХ ЗАКОНОМ СЛУЧАЕВ, БЕЛ КОСВЕННЫХ, ВКЛЮЧАЯ КОСВЕННЫЕ ГАРАНТИЙНЫЕ ОБЯЗАТЕЛЬСТВА, ЛЮБЫЕ ГАРАНТИИ, ЧЕШ СВЯЗАННЫЕ С УСЛОВИЯМИ КАЧЕСТВА, НАЛИЧИЕМ РЫНОЧНЫХ КАЧЕСТВ ИЛИ ПРИГОДНОСТЬЮ ДАН ИЗДЕЛИЯ ДЛЯ КОНКРЕТНЫХ ЦЕЛЕЙ, И ТАКИЕ КОСВЕННЫЕ ГАРАНТИИ, В СЛУЧАЕ ИХ ФИН СУЩЕСТВОВАНИЯ, ОГРАНИЧИВАЮТСЯ ПО СРОКУ ДЕЙСТВИЯ УСЛОВИЯМИ ДАННОЙ ГАРАНТИИ. ФРА ГЕРМ В некоторых штатах не допускается ограничение срока косвенных гарантийных обязательств, ГРЕЦ поэтому вышеупомянутые ограничения могут оказаться неприменимыми к вам. ВЕН ИСЛ КОМПАНИЯ belKIn НЕ НЕСЕТ ОТВЕТСТВЕННОСТИ ЗА СЛУЧАЙНЫЕ, ОСОБЫЕ, ПРЯМЫЕ, ИРЛ...
- Page 127 информация разделы разделы Содержание Содержание Бесплатная техническая поддержка е Дополнительные сведения о технической поддержке можно найти на нашем сайте www.belkin. com, в разделе технической-поддержки. Чтобы связаться со службой технической поддержки по о на телефону, наберите один из указанных ниже номеров*. З вонки могут оплачиваться по тарифам страны страна номер адрес в интернете Т АВСТРИЯ 0820 200766 www.belkin.com/de/ БЕЛЬГИЯ 07 07 00 073 www.belkin.com/nl/www.belkin.com/fr/ ЧЕШСКАЯ РЕСПУБЛИКА 239 000 406 www.belkin.com/uk/ Ю ДАНИЯ 701 22 403 www.belkin.com/uk/ ФИНЛЯНДИЯ...
- Page 128 130 rue de silly Hanebergstrasse 2 shipton Way, Rushden 92100 boulogne-billancourt, 80637 Munich nn10 6Gl, united Kingdom Франция Германия belkin Iberia belkin Italy & Greece belkin b.V. C/ Anabel segura, 10 planta baja, Of. 2 Via Carducci, 7 boeing Avenue 333 28108, Alcobendas, Madrid Milano 20123 1119 PH schiphol-Rijk, Испания Италия Нидерланды © 2009 belkin International, Inc. Все права защищены. Все торговые наименования являются зарегистрированными товарными знаками соответствующих производителей. iPod является товарным знаком Apple, Inc., зарегистрированным в США и других странах. iPhone является товарным знаком Apple Inc. 8820cw00232 F8Z453cw cw_8820cw00232.indb 2 16/10/2009 14:0...
Need help?
Do you have a question about the 8820cw00232 and is the answer not in the manual?
Questions and answers