
Related Manuals for MEDICORE IRIS-XP


Summary of Contents for MEDICORE IRIS-XP
- Page 1 Service Manual Model: IRIS-QT MEDICORE Service Manual IRIS-XP (Quarantine) MEDICORE Co., Ltd. MM-711-33 Medicore Co., Ltd. Page 1 of 68...
-
Page 2: Table Of Contents
..................16 ONFIGURATION OF THE PRODUCT 3.4 N ...................... 17 AME FOR EACH PART 3.4.1 CAMERA ..........................17 3.4.2 Hub Connector ........................18 3.4.3 Camera – Front ........................19 3.4.4 Laptop ..........................20 MM-711-33 Medicore Co., Ltd. Page 2 of 68... - Page 3 9. TROUBLE SHOOTING GUIDE ..............64 9.1 C ......................64 AMERA ROUBLE 9.1.1 Camera Image Abnormality ....................64 9.1.2 Focus Failure ........................65 9.2 P ..................... 65 OWER BNORMALITY 9.2.1 Power Failure ........................65 MM-711-33 Medicore Co., Ltd. Page 3 of 68...
- Page 4 Service Manual Model: IRIS-QT MEDICORE 10. SPECIFICATION ..................66 10.1 I ....................66 NFRARED AMERA UNIT 10.2 S ....................... 66 AFETY STANDARDS MM-711-33 Medicore Co., Ltd. Page 4 of 68...
-
Page 5: Introduction
Reading the instruction manual ensures with reliable performance over the long term and safe use of the equipment. MEDICORE supplies products that can be trusted. ⚫ Assembly, eQTansion or repair, etc. of the equipment will be performed by the person authorized from Medicore. -
Page 6: Service Requirements
Service of Medicore Co., Ltd. products should be performed by. Customer Support Team of Medicore Co., Ltd or a person authorized by the company. The warranty period will be void if an unauthorized person repairs or attempts to repair the equipment within the warranty period. -
Page 7: How To Reach Us
How to Reach Us For the problems that are not solved by the contents of this manual, please contact the following phone number or address, and you can receive various services from Medicore Co., Ltd. Medicore’s services are always open. -
Page 8: How To Use This Manual
Please read the manual carefully when using the product. ⚫ In the event of the malfunctioning with the equipment, please contact Medicore Co., Ltd. or our customer service department for the parts that cannot be resolved after following the instruments. -
Page 9: Composition
Chapter 4 Exterior dimensions Chapter 5 Disassembly and assembly Chapter 6 Overall structure Chapter 7 Structure of the SOFTWARE Chapter 8 Structure of the HARDWARE Chapter 9 TROUBLE SHOOTING GUIDE Chapter 10 SPECIFICATION MM-711-33 Medicore Co., Ltd. Page 9 of 68... -
Page 10: Symbols And Definition In This Service Manual
To inform that it may cause no harm in life but lead to injury against the “Caution” sign. NOTE To inform that it is not dangerous but important for proper installation, operation, and maintenance of the equipment. MM-711-33 Medicore Co., Ltd. Page 10 of 68... -
Page 11: Remarks For Usage
Environmental Condition for installation - Humidity Range : 30% ~ 75% - Temperature Range : 15 C ~ 24 C (59°F~75°F) - For normal use : 20 C ~ 24 C (68°F ~75°F) MM-711-33 Medicore Co., Ltd. Page 11 of 68... -
Page 12: Safety Classification Of Iris-Qt
The independent power circuits and stable maintenance are required for IRIS-QT.) If you use distributed power from other electronic devices, it can causes inaccurate result. MM-711-33 Medicore Co., Ltd. Page 12 of 68... - Page 13 IR-QT. Spray carpets, linoleum top in order to prevent damage caused by such ESD events, use an antistatic mat, or prevent damage for the ground connection between the system and the beds. MM-711-33 Medicore Co., Ltd. Page 13 of 68...
-
Page 14: Maintenance And Cleanliness
Do not immerse accessories in liquids or detergents. No liquids should enter the equipment or accessories. Caution ⚫ Do not clean the camera lens. ⚫ If there is an unknown substance on the camera lens, wipe it with a cloth that is dedicated for lens cleaning. MM-711-33 Medicore Co., Ltd. Page 14 of 68... - Page 15 ⚫ After cleaning the equipment, check the body and the sensors carefully. ⚫ If the equipment is aged or damaged, do not use the equipment. MM-711-33 Medicore Co., Ltd. Page 15 of 68...
-
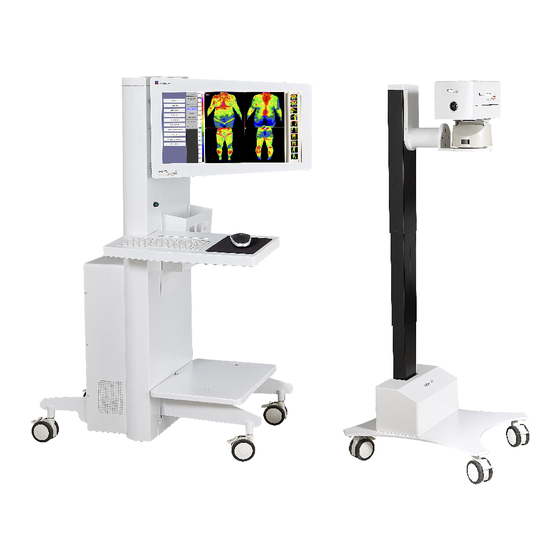
Page 16: Details Of Iris-Qt
CCD Camera : 1ea Main Cable : 1ea Laptop (Optional) : 1ea Mouse (Optional) : 1ea USB Hub : 1ea User Manual : 1ea Power Cable : 1ea Tripod (Optional) : 1ea MM-711-33 Medicore Co., Ltd. Page 16 of 68... -
Page 17: Name For Each Part
③ Power Connection Terminal: Camera Power Input Warning ⚫ The assembly, eQTansion and repair of the product can only be performed by Medicore Co., Ltd. or a person who is authorized by the company. MM-711-33 Medicore Co., Ltd. Page 17 of 68... -
Page 18: Hub Connector
⑤ Hub Power: Power terminal of the hub Warning ⚫ The assembly, eQTansion and repair of the product can only be performed by Medicore Co., Ltd. or a person who is authorized by the company. MM-711-33 Medicore Co., Ltd. Page 18 of 68... -
Page 19: Camera - Front
② IR Camera : IR (Infrared) image acquisition Warning ⚫ The assembly, eQTansion and repair of the product can only be performed by Medicore Co., Ltd. or a person who is authorized by the company. Caution ⚫ Do not clean the camera lens. -
Page 20: Laptop
① USB Port : Connects to USB Hub Warning ⚫ The assembly, eQTansion and repair of the product can only be performed by Medicore Co., Ltd. or a person who is authorized by the company. MM-711-33 Medicore Co., Ltd. Page 20 of 68... -
Page 21: Description Of Equipment Symbols
“Lock” (Used only in part of the equipment) “Unlock” (Used only in part of the equipment) Operating Instruction Follow operating instruction (User Manual) Do not push Do not sit Do not step on MM-711-33 Medicore Co., Ltd. Page 21 of 68... -
Page 22: Exterior Dimensions
Service Manual Model: IRIS-QT MEDICORE Chapter 4 4. Exterior Dimensions 4.1 Dimensions and weight 1) CAMERA Dimension (Unit: mm) - 138(W) x 229(L) x 142(H) Weight (Unit: kg) - Body: about 5kg MM-711-33 Medicore Co., Ltd. Page 22 of 68... - Page 23 Service Manual Model: IRIS-QT MEDICORE 2) TRIPOD Dimension (Unit: mm) - Height: 700 ~ 1600 Minimum (700mm) Maximum (1600mm) Weight (Unit: kg) - Body: about 10kg MM-711-33 Medicore Co., Ltd. Page 23 of 68...
-
Page 24: Assembly And Disassembly
Please assemble the equipment in the following order, and disassemble it in the reverse order of assembly. 5.2 Assembly Tripod + Tripod head 1) Assemble and fix the tripod and tripod head. MM-711-33 Medicore Co., Ltd. Page 24 of 68... -
Page 25: Assembly Camera + Tripod
Service Manual Model: IRIS-QT MEDICORE 5.3 Assembly Camera + Tripod 1) Fix the plate to the camera. MM-711-33 Medicore Co., Ltd. Page 25 of 68... - Page 26 Caution) The direction of the plate is assembled in accordance with the direction of the lens. 2) Fix the camera and tripod. Caution) When assembling camera and tripod, be careful not to fall off. MM-711-33 Medicore Co., Ltd. Page 26 of 68...
-
Page 27: Assembly Laptop + Hub
1) Connect the USB cable of the Hub to the Laptop. (Marked as “A”) Caution) Be careful not to damage the laptop and cable. Caution) Fully insert the USB cable for stable connection. MM-711-33 Medicore Co., Ltd. Page 27 of 68... -
Page 28: Hub + Camera Connection
3) Connect power cable to camera adapter port. 4) Connect the power to hub’s power port. Caution) Fully insert the USB cable for stable connection. 5.6 Disassembly 1) Disassembly (separation) is done in the reverse order of assembly. MM-711-33 Medicore Co., Ltd. Page 28 of 68... -
Page 29: Overall Structure
Detector. The converted infrared signal is amplified and converted into a digital signal through and A/D converter, and transmits to the cart (computer). The transmitted signal is displayed as a color image in the program. 6.2.2 Safety - Disconnect power with AC/DC adapter MM-711-33 Medicore Co., Ltd. Page 29 of 68... -
Page 30: Iris-Qt Block Diagram
Laptop screen. In a software, the focus of the camera can be adjusted. The software sends a focus control signal to the control board. This control signal adjusts the focus of the camera. MM-711-33 Medicore Co., Ltd. Page 30 of 68... -
Page 31: Software Structure
In order to repair the equipment, a person with service authority must be familiar with the software flow before servicing the equipment. Please refer to this service manual for a flow chart for each operation of the software. MM-711-33 Medicore Co., Ltd. Page 31 of 68... -
Page 32: Iris-Qt Program Installation Procedure
Service Manual Model: IRIS-QT MEDICORE 7.1 IRIS-QT Program Installation Procedure 1) Language Setting ① Install language package in a MS Windows and then select “English for windows display language MM-711-33 Medicore Co., Ltd. Page 32 of 68... - Page 33 Service Manual Model: IRIS-QT MEDICORE 2) Confirm USB PORT MM-711-33 Medicore Co., Ltd. Page 33 of 68...
- Page 34 Model: IRIS-QT MEDICORE 3) DISPLAY Setting ① Set the size of TEXT, APP and other items into “100%”. ② Set the Display Resolution into “1920 x 1080” Set Display Configuration into “Landscape” ③ MM-711-33 Medicore Co., Ltd. Page 34 of 68...
- Page 35 Service Manual Model: IRIS-QT MEDICORE 4) POWER & SLEEP Setting ① Select “Power & Sleep” on a setting item ② Select “None” for all of “Screen” and “Sleep” MM-711-33 Medicore Co., Ltd. Page 35 of 68...
- Page 36 Service Manual Model: IRIS-QT MEDICORE 5) Additional Power Setting ① Click “additional power setting” in a right side ② Click “Change advanced power settings” MM-711-33 Medicore Co., Ltd. Page 36 of 68...
- Page 37 Service Manual Model: IRIS-QT MEDICORE ③ Select “Disable” for both of “On battery” and “Plugged in” after selecting “USB setting” and “USB selective suspend setting” MM-711-33 Medicore Co., Ltd. Page 37 of 68...
- Page 38 Service Manual Model: IRIS-QT MEDICORE 6) USB 3.1 Power Management Setting ① Click “Properties after selecting “Universal Series Bus controllers” and “USB 3.1. H ost Controller” in the Device Manager. MM-711-33 Medicore Co., Ltd. Page 38 of 68...
- Page 39 Service Manual Model: IRIS-QT MEDICORE ② Check off “Allow the computer to turn off this device to save power” after clicking “Power Management”. MM-711-33 Medicore Co., Ltd. Page 39 of 68...
- Page 40 Service Manual Model: IRIS-QT MEDICORE 7) USB 3.1 Power Management Setting ① Enter into “Computer Management’ ② Push “Local Users and Groups” on left side and push “Users” on right side. MM-711-33 Medicore Co., Ltd. Page 40 of 68...
- Page 41 Service Manual Model: IRIS-QT MEDICORE ③ Check the PC name ④ Return to “PC Management” window and then change PC name. MM-711-33 Medicore Co., Ltd. Page 41 of 68...
- Page 42 Service Manual Model: IRIS-QT MEDICORE ⑤ Reboot up the PC and check the change of PC name. Program Setting 1. Connect USB memory of Program. MM-711-33 Medicore Co., Ltd. Page 42 of 68...
-
Page 43: Driver Folder: I3System Driver, Teamviewer, Usb To Serial
➔ Driver Folder: i3system driver, TeamViewer, USB TO Serial ➔ IRIS Program Folder: IRIS_QT_Install***, EQ1-******* ➔ EQ1-****** Folder: IRIS-QT, Refance 3. Install the software of “IRIS_QT_Install *** “ in provided USB drive. MM-711-33 Medicore Co., Ltd. Page 43 of 68... - Page 44 Install the USB TO SERIAL 6.1 Open the USB TO SERIAL folder in the USB flash drive. 6.2 Select the folder of either 32 bit or 64bit required to the laptop OS system. (32bit or 64bit) MM-711-33 Medicore Co., Ltd. Page 44 of 68...
- Page 45 Service Manual Model: IRIS-QT MEDICORE 6.3 Click to install the USB_Serial_Driver_Setup file. 6.4 Complete the driver installation. MM-711-33 Medicore Co., Ltd. Page 45 of 68...
- Page 46 ➔ Make a double-click “USB SERIAL PORT” to go into the Setup window. ➔ Port Settings -> Advanced -> On COM Port Number, change the Port to “COM2” and then, click “OK” button. MM-711-33 Medicore Co., Ltd. Page 46 of 68...
- Page 47 7. Install the Camera Driver 7.1 Perform the file after typing “Device Manager” in Windows Search. 7.2 Find the I3SYSTEM on “Device Manager “. ➔ Make a double-click “I3SYSTEM” to go into the Device Setup window. MM-711-33 Medicore Co., Ltd. Page 47 of 68...
- Page 48 Service Manual Model: IRIS-QT MEDICORE After going into “Update Driver…” when having the double-click on “I3SYSTEM”, click “Browse my computer for driver software”. MM-711-33 Medicore Co., Ltd. Page 48 of 68...
- Page 49 Service Manual Model: IRIS-QT MEDICORE 7.3 Search the Driver in provided USB flash drive and install it. MM-711-33 Medicore Co., Ltd. Page 49 of 68...
- Page 50 체크 항목을 해지 후 적용 한다.한다. 8. Set up the Power Management of USB CONTOLLERS 8.1 Cameras → Laptop Webcam → Driver → Disable Device MM-711-33 Medicore Co., Ltd. Page 50 of 68...
- Page 51 Model: IRIS-QT MEDICORE 8.2 Set up the Web Camera as “Disable Device” in the laptop that is not used. 9. Check the Web Camera in “Device Manager” that is disable in the laptop. MM-711-33 Medicore Co., Ltd. Page 51 of 68...
- Page 52 ➔ Go to the USB flash drive. ➔ Open the folder of USB\IRIS-QT\IRIS PROGRAM\EQ1-******\IRIS-QT. ➔ Check the file “Configuration” and make a copy. ➔ Go to C:\MEDICORE\IRIS-QT folder. ➔ Overwrite “Configuration” file in this folder. 10. Applying the values of camera reference ➔...
- Page 53 Service Manual Model: IRIS-QT MEDICORE 11. Run the program by clicking the “IRIS-QT” on the wallpaper. MM-711-33 Medicore Co., Ltd. Page 53 of 68...
-
Page 54: Hardware Structure
Therefore, it is necessary to familiarize yourself with the structure of hardware for A / S of IRIS-QT Control Board, Camera Header Board, and cable faults. MM-711-33 Medicore Co., Ltd. Page 54 of 68... -
Page 55: Iris-Qt Control, Camera Header Board Layout/Schematic
The control board consists of four parts. It consists of a controller that controls the entire board, a motor control that controls the focus motor, and a UART that communicates with the computer. MM-711-33 Medicore Co., Ltd. Page 55 of 68... - Page 56 Service Manual Model: IRIS-QT MEDICORE <IRIS-QT CMOS Camera Header Board Layout> MM-711-33 Medicore Co., Ltd. Page 56 of 68...
- Page 57 <IRIS-QT Control Board Motor Controller Part Schematic> 2. The motor control part receives the signal from the MPU chip of the main control part and plays a role in creating a signal that can drive the focus motor. MM-711-33 Medicore Co., Ltd. Page 57 of 68...
- Page 58 3. UART is the part that receives the signal to control the IRIS-QT control board from the computer. It is configured to perform RS-232 communication and receives signals from the computer to transmit signals to the main controller part. MM-711-33 Medicore Co., Ltd. Page 58 of 68...
- Page 59 0(1608) DGND <IRIS-QT Control Board CONNECTOR Part Schematic> 5. The above circuit is the circuit of CMOS camera header board. Consists of a connector that connects the camera power and the camera. MM-711-33 Medicore Co., Ltd. Page 59 of 68...
-
Page 60: Iris-Qt Cable Schematic
Service Manual Model: IRIS-QT MEDICORE 8.2 IRIS-QT Cable Schematic < IRIS-QT DRS_Laptop Type_Motor_Sens_Thermistor Cable Schematic> < IRIS-QT CBL-i3-Laptop PANEL ASS'Y Schematic> MM-711-33 Medicore Co., Ltd. Page 60 of 68... - Page 61 Service Manual Model: IRIS-QT MEDICORE < IRIS-QT CBL-i3-Laptop USB Schematic> < IRIS-QT CBL-i3-CMOS-Laptop image Schematic> MM-711-33 Medicore Co., Ltd. Page 61 of 68...
- Page 62 Service Manual Model: IRIS-QT MEDICORE <IRIS-QT CBL-i3-Laptop power Schematic> <IRIS-QT CBL-i3-CMOS-Laptop Cable ASS'Y Schematic> MM-711-33 Medicore Co., Ltd. Page 62 of 68...
- Page 63 Service Manual Model: IRIS-QT MEDICORE <IRIS-QT CBL-i3-Laptop MAIN serial Schematic> <IRIS-QT CBL-i3-CMOS-Laptop Main USB Cable Schematic> MM-711-33 Medicore Co., Ltd. Page 63 of 68...
-
Page 64: Trouble Shooting Guide
Camera Trouble: If the camera is not initialized or there is a problem with the camera, Trouble3 the camera image will not be displayed or the IRIS-QT Program will not work. In this MM-711-33 Medicore Co., Ltd. Page 64 of 68... -
Page 65: Focus Failure
Broken Adapter: If the adapter is broken, the power will not be supplied. In this case, Trouble2 the user should contact the customer support department for replacement and inspection of the adapter. The failure level is 4. Chapter 10 MM-711-33 Medicore Co., Ltd. Page 65 of 68... - Page 66 3) SSD : 256GB or above 4) LCD : 15.6” , Resolution 1920 x 1080 pixels 5) OS system : Microsoft Windows 10 10.2 Safety standards Safety Standards 10.2.1 -Protection class classⅠ -Degree of Protection Type B MM-711-33 Medicore Co., Ltd. Page 66 of 68...
- Page 67 ◼ This product is manufactured with the thorough quality control and strict inspection. ◼ Medicore Co., Ltd. warrants its product against defects in material and workmanship for one year. During the warranty period, Medicore will, at its option, repair or replace product which proves to be defective.
- Page 68 3F, Samwoo Bldg., 13-8, Baekjegobunro 20 gil, Songpa-gu, Seoul, Korea Tel: +82-2-2056-2650 /Fax: 82-2-412-1948 Factory #801~803, Junganginnotech, Sagimakgolro 148, Jungwon-gu, Sungnam-city, Kyunggi-do, Korea Tel: +82-031-726-1172 /Fax: 82-31-726-0866 Medicore co.,Ltd. Product Name : IRIS-QT MM-711-33 Medicore Co., Ltd. Page 68 of 68...
Need help?
Do you have a question about the IRIS-XP and is the answer not in the manual?
Questions and answers