Table of Contents
Advertisement
Advertisement
Table of Contents

Related Manuals for Empire MINI


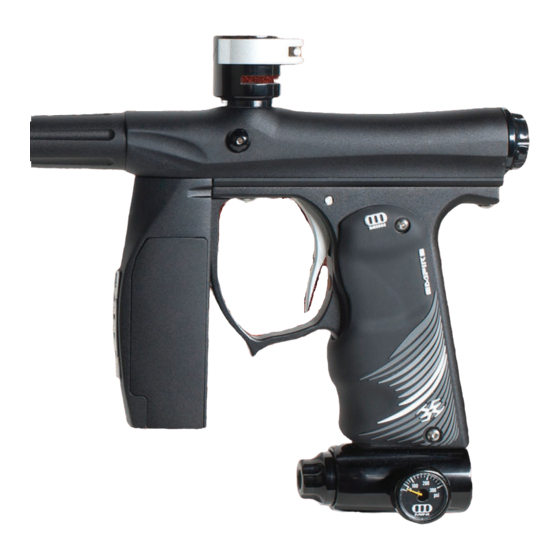
Summary of Contents for Empire MINI
- Page 2 No part of this document may be copied or reproduced in any form or by any means without the prior written consent of Empire Paintball and KEE Action Sports, its assigns and/or its distributors. Notice is hereby given that this manual is part of the article owned in whole by KEE Action Sports, its assigns and/or its distributors, known as indicated in this manual and drawings.
-
Page 3: Table Of Contents
9. Regulator and Velocity Adjustments ..............p. 8 10. Shockwave Board ....................p. 10 1 1. Trigger Adjustments ....................p. 13 12. Mini Assembly/Disassembly and Maintenance ..........p. 13 13. Storage and Transportation ..................p. 20 14. Trouble Shooting Guide ..................p. 21 15. Diagram and Parts List ..................p. 26... -
Page 4: Rules For Safe Marker Handling
1. RULES FOR SAFE MARKER HANDLING WARNING! PAINTBALL GUNS AND PAINTBALL GUN ACCESSORIES Welcome to the world of the Empire MINI. The MINI is a modern culmination ARE NOT TOYS! in the pursuit of speed, technology, weight reduction, and overall performance. -
Page 5: Battery Replacement And Life Indicator
-Spare Parts Notes: -Barrel Sleeve - Some rechargeable batteries are too large for the MINI battery compartment. If they don’t fit, please don’t force them as this may damage the MINI. -One 9 Volt Battery (installed) - The stock circuit board does not keep user defined settings. You must change the battery quickly to keep your settings. -
Page 6: Compressed Air/Nitrogen Supply
2 - Make sure there are no paintballs in the marker and that the Mini is turned OFF. seconds and the LED light will - Air can now be applied and the marker will become pressurized. -
Page 7: Firing The Mini
To switch the MINI On, locate the button on the back side of the front foregrip, process. Be sure your goggles are securely in place and make sure the in front of the trigger guard and directly under the LED. -
Page 8: Break Beam Eyes Operation
- Be sure your finger is away from the trigger area. To turn the eyes OFF, ensure that there are no paintballs in the MINI breech - Place the barrel plug, sock, or barrel blocking device into the end of the barrel. - Page 9 - This marker is not designed to shoot above the safety limits established by industry At the back of the MINI main body is the Bolt Guide Cap. The Allen screw in standards but under certain conditions it may. It is therefore important to check the the bolt guide cap serves as your velocity adjuster.
-
Page 10: Shockwave Board
Dwell adjusting any of the board functions, remove the propellant source from the MINI Flashing Red De-Bounce and install a barrel blocking device. The board inside your MINI features 4 fi ring Flashing Green Ball In Place Flashing Amber Ramp Start modes and 6 adjustable functions. - Page 11 NPPL/Semi Auto: Marker will shoot 1 time for each time the trigger is pulled. Example: 10 LED blinks = 12.5 BPS The default setting meets 2011 NPPL marker rules. # of Blinks BPS value # of Blinks BPS value # of Blinks BPS value Default: Max ROF = 15.0bps 12.5...
- Page 12 RAMP START TRIGGER DE-BOUNCE - WILL BE INDICATED BY A FLASHING RED LED - WILL BE INDICATED BY A FLASHING AMBER LED Time in milliseconds the trigger pull must be released before the next This setting controls the amount of semi-automatic shots must be fired be- trigger pull can be registered.
-
Page 13: 1. Trigger Adjustments
11. TRIGGER ADJUSTMENTS 12. MINI ASSEMBLY/DISASSEMBLY AND MAINTENANCE The MINI features a Hall Effect Sensor Trigger. There is no trigger switch to CAUTION: Before attempting to perform any maintenance operations or any worry about, clog with paint, or break. The LED is also used to indicate trigger marker disassembly, make sure that all paintballs and propellant sources pulls. - Page 14 MAINTENANCE OF BOLT AND BOLT GUIDE - Inspect the O-rings on both the bolt and bolt guide for any wear or damage. Replace damaged or worn O-rings if necessary. - Lubricate all O-rings on Bolt and Bolt Guide with Dow 33 or supplied grease.
- Page 15 REINSTALLATION OF POPPET, POPPET-SPRING AND BOLT GUIDE REMOVAL OF FOREGRIP ASSEMBLY - Using a 1/16" Allen key, loosen the Foregrip Retention Set Screws. They do - Place poppet assembly into the back of the bolt guide and gently push not need to be fully removed, only loosened. forward.
- Page 18 REMOVAL OF GRIP FRAME - Using a 1/8" Allen key, remove both grip frame screws turning counter- clockwise. - Gently pull down frame from body. - When frame is back on, use the 1/8" Allen key and tighten the (2) grip frame screws clockwise.
- Page 19 INSTALLATION OF REGULATOR ASSEMBLY REMOVAL OF REGULATOR - Loosen the two Regulator Mount Set Screws located on the grip frame with - Make sure the Female air transfer Tube O-ring is on the bottom of the Air a 3/32" Allen key by turning them counter clockwise. tube, Grease if necessary.
-
Page 20: Storage And Transportation
For information concerning any of the laws in your area, contact your nearby law enforcement agency. If you must ship your MINI for any reason, the box in which you purchased the marker should be used to protect your marker against rough handling during INSTALLATION OF SENSOR BOARD transport. -
Page 21: Trouble Shooting Guide
Empire Paintball to work in the Mini, and they may be the cause of the problems. Do not contact Empire Paintball until you have returned the Mini to factory stock condition and tested. - Page 22 To reset the poppet, remove the gas source from your Mini. Gently turn the through the velocity adjuster all the way in until it stops. Then gas up your Mini. If the leak chamber has stopped, proceed to back out the velocity adjuster 3/4 of a turn, then measure velocity with a chronograph and adjust as needed.
- Page 23 This is typically the result of not screwing your air tank in enough. When screwing your air tank into the Mini’s regulator ASA, it is important to not stop as soon as the marker pressurizes, but to continue turning until the air tank stops.
- Page 24 Breaks paint Loader pushing too hard. Try a different loader, such as the Empire Magna Drive Loader. If using a Halo in chamber series or Empire Reloader B series loader, try installing an Empire Magna Clutch Upgrade Kit. Bolt or bolt guide O-rings may be worn. Air blowing past worn O-rings can easily break paintballs in the feedneck.
- Page 25 This is typically the result of not screwing your air tank in enough. When screwing your air tank into the Mini’s regulator ASA, it is important to not stop as soon as the marker pressurizes, but to continue turning until the air tank stops.
-
Page 26: Diagram And Parts List
Leaks sometimes Battery may be low. Replace battery with a fresh Name brand alkaline 9-volt. while shooting Solenoid may be sticking open. If the solenoid is sticking open occasionally, the regulator pressure may be multiple shots set too high. If the pressure is set to 200 psi or less, then the solenoid may be filled with dirt and/or grease. - Page 27 15. DIAGRAM AND PARTS LIST..CONTINUED PART # DESCRIPTION SKU # PART # DESCRIPTION SKU # Bolt Guide Small (Front) O-ring 17537 Trigger Set Screw W/ Magnetic Top 17564 Bolt Guide Cap 17583 Trigger Set Screw Long 17602 Bolt Guide Cap O-ring 17538 Trigger Set Screw Short 17603...
- Page 28 15. DIAGRAM AND PARTS LIST..CONTINUED...
-
Page 29: Warranty Information
16. WARRANTY INFORMATION LIMITED LIFETIME WARRANTY INFORMATION (ORIGINAL PURCHASE RECEIPT REQUIRED) KEE Action Sports (“KEE”) warrants that this product is free from defects in materials and workmanship for as long as it is owned by the original purchaser, subject to the terms and conditions set forth below. - Page 30 WARRANTY REGISTRATION SEND TO: KEE ACTION SPORTS 11723 LIME KILN RD. NEOSHO, MO 64850 WWW.PAINTBALLSOLUTIONS.COM PURCHASE INFORMATION PURCHASED FROM: PURCHASE DATE: CITY: STATE: ZIP: SERIAL: OWNER INFORMATION YOUR NAME: CITY: STATE: ZIP: PHONE: EMAIL:...
- Page 31 Complete your Mini with these great accessories. Check your local shop for availability. Rip Cord Halo Too Empire Basics Night Stick Barrel Bag Loader 68cu Air System Carbon Fiber Barel WWW.EMPIREPAINTBALL.COM...
Need help?
Do you have a question about the MINI and is the answer not in the manual?
Questions and answers