Table of Contents
Advertisement
Quick Links
Valencia Arch (Assembly Instructions)
F
C
G
PARTS LIST
A
POSTS
B
TRELLIS SECTIONS
C
ROOF BEAMS
D
LONG ROOF SECTION
E
SHORT ROOF SECTION
F
FINIAL
G
ROOF SUPPORT
A
STEP 3
Upon completion of assembly
(Steps 1-2 overleaf), the Arch may
now be positioned in the prepared
holes and fixed into position.
Ensure the arch is level and upright
before concreting it in.
AFTERCARE
To ensure longevity of your structure it is recommended that it is treated with a wood preservative on a yearly basis.
8/3/17
13:13
Page 1
E
C
D
B
A
G
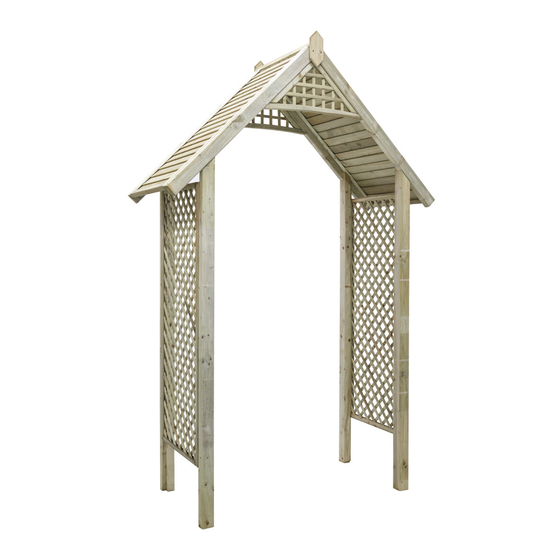
174cm
PLAN
274cm
135cm
74cm
274cm
©2015 Grange Fencing Ltd All rights reserved.
In line with the Company's policy of
continuous product development, the right
is reserved to change and improve product
design without prior notice.
All products and related emblems featured are
trademarks of Grange Fencing Ltd.
www.grangefen.co.uk
VALENCIA ARCH
VALARCH - 274cm [H] x 174cm [W] x 74cm [D]
Self-Assembly required
Home Delivery available
Pre-Painted available
Advertisement
Table of Contents

Related Manuals for Grange VALENCIA ARCH


Summary of Contents for Grange VALENCIA ARCH
- Page 1 Ensure the arch is level and upright before concreting it in. ©2015 Grange Fencing Ltd All rights reserved. In line with the Company’s policy of continuous product development, the right is reserved to change and improve product AFTERCARE design without prior notice.
- Page 2 Valencia Arch (Assembly Instructions) 8/3/17 13:13 Page 2 Thank you for choosing this garden structure from Grange. In order to gain the most benefit SITE PREPARATIONS from it please read the following instructions carefully. Fig.2. Excavate a 30cm square hole...
Need help?
Do you have a question about the VALENCIA ARCH and is the answer not in the manual?
Questions and answers