Advertisement
Quick Links
Advertisement

Related Manuals for DeFehr ALEX Series


Summary of Contents for DeFehr ALEX Series
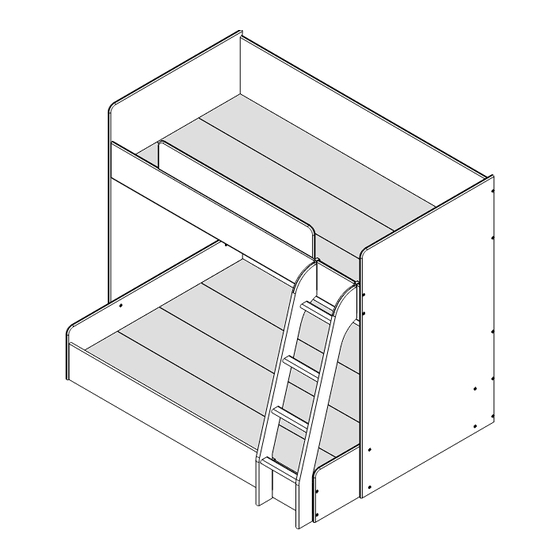
- Page 1 ALEX COLLECTION BUNK BED ASSEMBLY...
- Page 2 BUNK BED ASSEMBLY MONTAGE POUR LIT SUPERPOSÉ IMPORTANT! This unit is VERY HEAVY. Depending on model purchased, Three people are required for safe assembly of the unit may not be exactly as unit. shown. Selon le modèle que vous avez IMPORTANT! Ce meuble est TRÈS LOURD.
-
Page 3: Safety Warnings
SAFETY WARNINGS Follow the information appearing on the warnings on the upper bunk end structure and on the carton. DO NOT REMOVE WARNING LABEL FROM BED. Warning labels on end panel must face interior of upper bed. Always use the recommended size of mattress or mattress support, or both, to help prevent the likelihood of entrapment or falls. -
Page 4: Consignes De Sécurité
CONSIGNES DE SÉCURITÉ Suivez les instructions qui figurent sur les étiquettes de mise en garde qui se trouvent sur la structure du bout du lit supérieur et sur le carton d'emballage. NE PAS ENLEVER DU LIT L'ÉTIQUETTE DE MISE EN GARDE. Les étiquettes de mise en garde qui se trouvent sur le panneau du bout doivent faire face à... -
Page 5: Additional Safety Information
ADDITIONAL SAFETY INFORMATION 1. SIZE OF MATTRESS AND FOUNDATION: Only the following size of mattress is acceptable for top bunk use: • The mattress should be between 37 1/2" and 38 1/2” wide (95.25cm to 97.79cm) • The mattress should be 74"-75" long (187.96cm to 190.5cm) •... - Page 6 Tools required / Outils nécessaires The use of a power screwdriver is optional where indicated. L'utilisation d'un tournevis électrique est facultative là où elle est indiquée. Hardware Bag 1 / Sac de Quincaillerie 1 19051 1½” 19035 #15000 Cam / Came #19051 &...
- Page 7 Components / Composants Top Bunk / Lit du Haut Bottom Back Panel / Front Guard Rail / Wall-Side Guard Rail / Panneau Côté Mur Barrière de Sécurité Garde-Fou Côté Mur Avant End Panel / Slats / Platform Deck/ Panneau du Bout Planchettes Surface de la Plate-Forme 99.8 cm...
- Page 8 STEP 1 ASSEMBLE TOP BUNK FIRST Begin with HARDWARE BAG 1 Place Bottom Back Panel AA, Front Guard Rail BB, and Wall-Side Guard Rail CC face down on a soft surface to prevent scratching. Install Cams A into panels as shown. MONTEZ LA COUCHETTE SUPÉRIEURE EN PREMIER Commencez par le sac de quincaillerie 1 Posez le Panneau Arrière AA, la Barrière de Sécurité...
- Page 9 STEP 1 (continued/suite) Make sure the arrow on the cam points in the direction of the dowel hole (Diagram 1). Diagram 1 Assurez-vous que la fleche sur les cames Diagramme 1 pointe dans la direction du trou pour le goujon (Diagramme 1).
- Page 10 STEP 2 THREE PEOPLE ARE REQUIRED TO COMPLETE THIS STEP SAFELY. THIS UNIT IS VERY HEAVY. ASSEMBLE AS CLOSE AS POSSIBLE TO DESIRED LOCATION. Leave approximately 4” of space between the bed and the wall on all sides to allow room to lock the cams. Connect Panel AA to End Panels DD at both ends.
- Page 11 STEP 3 THREE PEOPLE ARE REQUIRED TO COMPLETE THIS STEP SAFELY. Connect Wall-Side Guard Rail CC to end panels as show. Lock all cams. Refer to Diagram 2 below. IL FAUT TROIS PERSONNES POUR COMPLÉTER CETTE ÉTAPE EN TOUTE SÉCURITÉ. Joindre Garde-Fou Côté...
- Page 12 STEP 4 THREE PEOPLE ARE REQUIRED TO COMPLETE THIS STEP SAFELY Secure Front Guard Rail BB using two bolts at each end. Lock all cams (Refer to Diagram 2) With the assistance of another person, CAREFULLY lift the bed and move it so that the wall-side guard rail (CC) is within 3”...
- Page 13 STEP 5 This step MUST be followed in order to prevent personal injury, or damage to your bed. Secure Slats EE to the top bunk as shown. The end slats should be 7.6cm (3”) from the headboard and footboard ends. Place the other slats evenly between them, 34.0cm (13-3/8”) between slats.
- Page 14 STEP 6 Place Platform Deck FF on top of slats. Placez les Supports de Matelas FF sur les planchettes. REMEMBER! Periodically check all connections to ensure that they are snug. Re-tighten if necessary. Keep the hex keys provided for future use. RAPPEL! Vérifiez régulièrement toutes les connections pour vous assurez qu'elles soient bien serrées.
- Page 15 STEP 7 ASSEMBLE THE LOWER BUNK Use HARDWARE BAG 2 TWO PEOPLE ARE REQUIRED TO COMPLETE THIS STEP SAFELY. Join the Headboard/Footboard (GG) to the end panels. Use Bolt Connectors D and Cap Connectors F, as shown. Note that the bolts will be to the outside of 30mm the end panels.
- Page 16 STEP 8 1) Insert Cross Dowels G into Bottom Front Panel HH as shown. Ensure that the holes in the dowels line up with the holes in the ends of the panels. 2) Set the bottom panel between the headboard and footboard. Line up all the holes and secure the panel using Bolt Connector E.
- Page 17 STEP 9 Secure Slats KK to the bottom bunk as shown. The end slats should be 7.6cm (3”) from the headboard and footboard ends. Place the other slats evenly between them, 33cm (13”) between slats. Installer les Planchettes KK sur la couchette inférieure comme indiqué. Laissez une distance de 7.6 cm (3'') entre les extrémités des planchettes et la tête de lit/ pied de lit.
- Page 18 STEP 10 Place Posture Boards LL on top of slats. Placez les Supports de Matelas LL sur les planchettes. It is strongly recommended to put the lower bunk mattress in place now as it may be difficult to do so once the ladder is attached.
- Page 19 STEP 11 This step MUST be followed in order to prevent personal injury, or damage to your bed. The ladder MUST be permanently secured to either the left hand or right hand side of the bed. Cette étape DOIT être suivie afin d’éviter des blessures, ou d’endommager votre lit.
- Page 20 STEP 11 - CONTINUED / SUITE This step MUST be followed in order to prevent personal injury, or damage to your bed. The ladder MUST be permanently secured to either the left hand or right hand side of the bed. Cette étape DOIT être suivie afin d’éviter des blessures, ou d’endommager votre lit.
- Page 21 STEP 11 - CONTINUED / SUITE This step MUST be followed in order to prevent personal injury, or damage to your bed. The ladder MUST be permanently secured to either the left hand or right hand side of the bed. Cette étape DOIT être suivie afin d’éviter des blessures, ou d’endommager votre lit.
- Page 22 ALEX COLLECTION MATES BED ASSEMBLY...
- Page 23 MATES BED with HEADBOARD LIT D’OFFICIER avec TÊTE DE LIT Depending on model purchased, unit may not be exactly as shown. Selon le modèle que vous avez acheté, le meuble peut ne pas ressembler à l’illustration. IMPORTANT! Two people are required for safe assembly of the unit.
- Page 24 Tools Required / Outils necessaires: Optional / #10220 Hex Key / Clé Allen En option Included in Hardware Bag Inclus dans le Sac de Materiel Hardware / Quincaillerie: TWIN ONLY TWIN SEULEMENT 1¼” 1½” 1” #15026 or/ou #15163 #15029 #13025 #10888 #10056 Bolt/Boulon...
- Page 25 STEP 1 STEP 1 Page 3 of 8 • Comp #P2084 • Revision #1 • 10/2017...
- Page 26 STEP 2 Optional / En option 1¼” Page 4 of 8 • Comp #P2084 • Revision #1 • 10/2017...
- Page 27 STEP 3 Optional / En option 1¼” Page 5 of 8 • Comp #P2084 • Revision #1 • 10/2017...
- Page 28 STEP 1 STEP 4 Optional / En option 1½” DD X5 D X5 D X5 Page 6 of 8 • Comp #P2084 • Revision #1 • 10/2017...
- Page 29 STEP 1 STEP 5 - TWIN BED / TWIN TWIN ONLY TWIN SEULEMENT Optional / En option 1” FF X2 E X4 EE X2 Page 7 of 8 • Comp #P2084 • Revision #1 • 10/2017...
- Page 30 STEP 1 STEP 5 - DOUBLE BED / FRENCH EE X3 Printed in Canada Page 8 of 8 • Comp #P2084 • Revision #1 • 10/2017...
Need help?
Do you have a question about the ALEX Series and is the answer not in the manual?
Questions and answers