
Subscribe to Our Youtube Channel
Related Manuals for NewAir NAC08KWH00


Summary of Contents for NewAir NAC08KWH00
- Page 1 SKU: NAC08KWH00 3-in-1 Portable Air Conditioner OWNER’S MANUAL Read and save these instructions. Manual v1.0...
-
Page 2: Table Of Contents
Register Your Product Online ................3 Safety Information & Warnings ................4 Product Features ....................6 Assembly & Installation ..................9 Cleaning & Maintenance ..................11 Limited Manufacturer’s Warranty ..............14 SPECIFICATIONS NAC08KWH00 ODEL 120V~ OLTAGE 60Hz REQUENCY 900W OWER Width: 14.7 in... -
Page 3: Register Your Product Online
REGISTER YOUR PRODUCT ONLINE Register Your NewAir Product Online Today! Take advantage of all the benefits product registration has to offer: Service and Support Troubleshoot, diagnose, and service issues faster and more accurately Recall Notifications Stay up to date on safety, system updates, and recall notifications... -
Page 4: Safety Information & Warnings
If the power cord is damaged, it must be replaced by professional maintenance personnel. • Only use the accessories provided by the A/C manufacturer; otherwise, the A/C may be damaged and damage may not be covered under warranty. newair.com... - Page 5 Special warning: • Place the A/C on even ground and install it vertically to ensure normal operation of the compressor. • The A/C should be at least 20 inches away from surrounding objects to allow for adequate air flow. • Do not use the A/C near gasoline or any other flammable liquid. •...
-
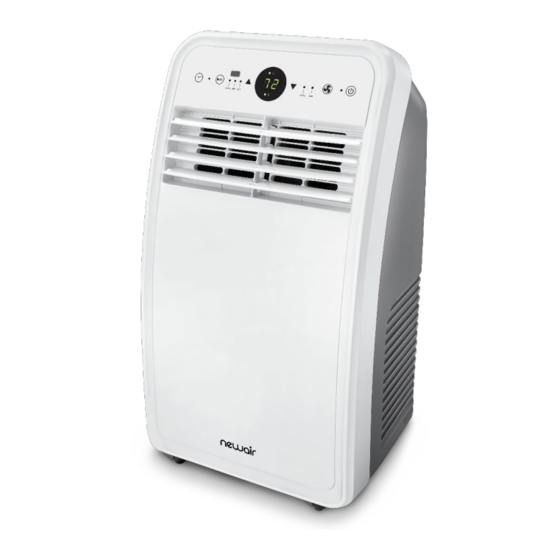
Page 6: Product Features
PRODUCT FEATURES 1. Carrying Handle 6. Air Intake 2. Control Panel 7. Moisture Drain Plug 3. Adjustable Front Grille 8. Remote Control 4. Casters 9. Exhaust Duct 5. Exhaust Output 10. Window Sealing Plate newair.com... - Page 7 CONTROL PANEL AND REMOTE CONTROL 1. Power button Press this button to turn the unit on and off. 2. Mode button Press this button to cycle between the 3 modes: cool (full A\C cooling with temperature setting), fan (just fan operation without any temperature setting) and dry (fan operation plus dehumidification).
- Page 8 A/C will be shut off until the unit warms up again. If you see the E4 code, please turn off the unit and wait at least one hour before attempting to use it again. newair.com...
-
Page 9: Assembly & Installation
ASSEMBLY & INSTALLATION 1. Placement Place the unit on an even floor and in a dry place, and keep it at least 20 inches away from any other surrounding objects, e.g., walls, curtains, etc. 20 in 2. Installation Screw the exhaust duct into the exhaust opening on the back of the unit (counterclockwise) The exhaust hose extends up to 59 inches. - Page 10 Ensure that the exhaust hose remains as straight as possible. A bent or curved exhaust hose will not work efficiently. Warning: This exhaust duct is designed specifically for this unit. Do not replace it or attempt to modify it, as it may cause the unit to malfunction. newair.com...
-
Page 11: Cleaning & Maintenance
CLEANING & MAINTENANCE DRAINING THE WATER TANK This unit is equipped with an automatic water vaporization system. The condenser is cooled through the circulation of condensing water to improve cooling efficiency and energy conservation. If the tank is full, “FL” will appear on the display to indicate that it needs to be drained. - Page 12 Run fan mode for 2 hours to help dry any collected moisture within the unit Turn off the unit and unplug it • Wash and replace the dust filter • • Take apart the exhaust duct. Cover the unit and the exhaust duct pieces with something to keep dust • out. newair.com...
- Page 13 TROUBLESHOOTING In case of any of the following problems, please contact a NewAir™ authorized repair facility. ISSUE CAUSE SOLUTION The A/C doesn’t Unit is not plugged Plug the unit in work The display panel Restart the A/C after powering displays “FL”...
-
Page 14: Limited Manufacturer's Warranty
When making a warranty claim, please have the original bill of purchase with the purchase date available. Once confirmed that your appliance is eligible for warranty service, all repairs will be performed by a NewAir™ authorized repair facility. The purchaser will be responsible for any removal or transportation costs.
Need help?
Do you have a question about the NAC08KWH00 and is the answer not in the manual?
Questions and answers
the unit does not cycle nor get cold