Table of Contents
Advertisement
Advertisement
Table of Contents

Related Manuals for BOWHEAD REACH


Summary of Contents for BOWHEAD REACH
- Page 1 The REACH Electric Bike User Manual bowheadcorp.com...
-
Page 2: Table Of Contents
Table of Contents 1 GENERAL ..............................2 1.1 Use of the manual ..........................2 1.2 Service and technical support ......................2 1.3 Initial Checks Before Use........................2 1.4 Product Information and Specifications .................... 3 1.5 Diagram of General Bike Components ....................4 2 SAFETY ............................... -
Page 3: General
1 GENERAL 1.1 Use of the manual Read this manual carefully before you start riding on your new Bowhead Reach. Safety instructions are very important and should not be overlooked. By doing so you will have a better understanding of the general operation of the bike and various bike parts. Some frequently asked questions and troubleshooting methods will be covered as well. -
Page 4: Product Information And Specifications
1.4 Product Information and Specifications Model The REACH Overall Length and 80 in Width 26.5 in Front Wheel Diameter 20 in (406 ERD) Rear Wheel Diameter 26 in (559 ERD) Max Speed 33 km/h Range Per Charge 25-30 km (80V) -
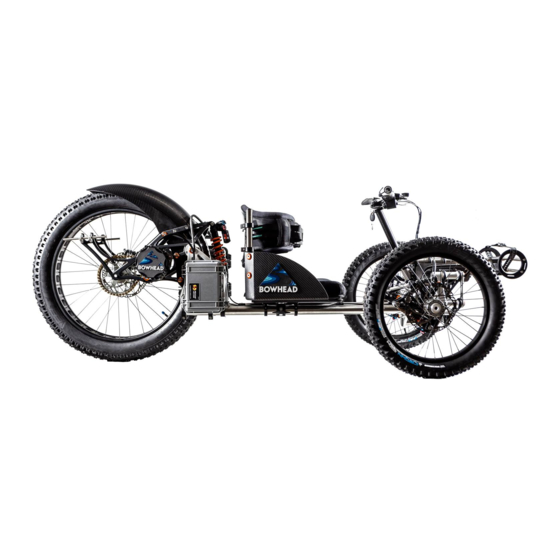
Page 5: Diagram Of General Bike Components
1.5 Diagram of General Bike Components Adjustable Foot Rest Right side Accessory Mount Harness Motor Seat Plate Swivel Seat Lever Battery Brake and Throttle Controls Left side Accessory Mount Articulation Pin Storage Holder P a g e... -
Page 6: Safety
2.2 Bike Usage Before using the Reach on the open road, ride the bike in a secure area to get acquainted with riding this bike. Try all settings and differing terrain on the bike and get familiar with the results. -
Page 7: Rear Push Handle Usage
2.4 Transportation and Riding IMPORTANT NOTICE All riders MUST wear a helmet and leg straps at ALL TIMES when operating the Bowhead Reach. A step by step demonstration of leg strap usage is outlined in section 2.5 following. Batteries are not designed to be on the bike during transportation by car. Batteries must be taken off the bike(s) and transported separately inside the car. -
Page 8: Leg Strap Information
2.5 Leg Strap Information Ensure the logo is facing outward and thread through the slot in the plastic foot rest spacer. Thread the end around both of your legs and then through the buckle. Stretch and secure the strap over flange. The tension in the strap is what secures it in place. -
Page 9: Battery Over View
3 BATTERY OVER VIEW A-Battery B-Charging plug C-Handle D-Magnetic self-locking tab E-Power socket A- Power cord B- Fuse C- Power Supply to Battery 3.1 General Remarks • Stop the charging procedure immediately if you notice a strange smell or smoke. Call the dealer for service or replacement. -
Page 10: Removal Of Battery
3.2 Removal of Battery The battery is locked in place via a secure magnetic locking system under typical operating conditions. User input is required to remove the system and recharge the battery. To remove the battery: Press down (the direction indicated by the red arrow in the diagram) on the self-locking tab... - Page 11 While pressing down on the self- locking tab, grab the handle mounted on the top of the battery case and pull upwards. iii. Once the case begins to move along the case slots it is no longer necessary to manually engage the tab.
-
Page 12: Charging The Battery
3.3 Charging the Battery Charging the battery should be at room temperature (±20°C/68°F). Charging below 0°C or above 40°C (32°F~104 °F) can lead to insufficient charging and can be harmful to the battery life cycle. Charger • Not connected: Charger LED is green (constant). •... -
Page 13: Battery: Further Information
3.5 Battery: Further Information ➢ Do not expose battery or charger to wet, rainy, or extremely humid conditions ➢ If battery or controller are exposed to moisture (from rain or washing your bike) you must open both cases and allow the internal components to completely dry before usage ➢... -
Page 14: Bike Usage
4 BIKE USAGE 4.1 Maintenance Do not use high-pressure water or air hoses for cleaning. It can force water into electric components, which may cause malfunctioning. Do not wash plastic components with excessive water. When the internal electrical parts are infected with water, the insulator may corrode which leads to power-drain or other problems. -
Page 15: Torque Chart - Metric And Imperial
4.1.1 Torque Chart – Metric and Imperial Torque Chart Size of Screw Required Torque (Nm) Required Torque (lbft) 3.76 5.75 19.1 14.09 14 | P a g e... -
Page 16: Range
4.2 Range The range on one charge strongly depends on several circumstances, such as (but not limited to): • Weather conditions such as ambient temperature and wind; • Road conditions such as elevation and road surface; • Bike conditions such as tire pressure and maintenance level; •... -
Page 17: Seat Plate Adjustment
The entire seat assembly may now be slid forward and backward to reach a comfortable position. After locating the seat in the iii. appropriate position, the 6 screws must be tightened (4.6... -
Page 18: Foot Rest Adjustment
4.4 Foot Rest Adjustment Similar to the seat, the footrest may also be adjusted to an appropriate length for each individual user. It is secured in place by 2 M6 socket head cap screws. To move the footrest: The 2 screws located on the left side of the footrest frame must be loosened. -
Page 19: Mounting Accessories
4.5 Mounting Accessories The rails installed on either side of the swing arm can be used to mount various accessories such as panier bags. 18 | P a g e... -
Page 20: Articulation Locking Pin Removal And Storage
4.6 Articulation Locking Pin Removal and Storage The pin highlighted by the red circle as seen in the figure locks any articulation movement of the bike. This pin MUST be removed before riding the bike. To remove the pin: Press down on the pin and pull the pin from its slot ensuring you have a firm grip on the seat or harness... -
Page 21: Adjustable Screw Callout
4.7 Adjustable Screw Callout Figure A: Adjustable Seat Screws Figure B: Adjustable Footrest Screws 20 | P a g e... -
Page 22: Troubleshooting
5 TROUBLESHOOTING Issue/Problem Description of Troubleshooting Methods Potential Cause No power: Bike is not a. One or more of the 1. Check the throttle connection. moving connections may 2. Check the battery/controller be loose, not connection. plugged in, or 3. Unplug and re-plug all damaged. -
Page 23: Frequently Asked Questions
➢ Do I need insurance for my bike? ✓ No, you do not require any insurance to ride the Reach; however, many of our customers do choose to add these bikes to their home / tenants insurance policies. - Page 24 complete range of parts and spares available directly from our shop found on the bowheadcorp.com website. ➢ I don't live local to you, what happens in the event of a problem? ✓ In the unlikely event of a problem, you can contact us via email where we will be happy to assist getting any issues resolved.
Need help?
Do you have a question about the REACH and is the answer not in the manual?
Questions and answers