Table of Contents
Advertisement
Advertisement
Table of Contents

Subscribe to Our Youtube Channel
Related Manuals for Netafim FROSTIE


Summary of Contents for Netafim FROSTIE
- Page 1 GUIDE BOOK FROSTIE FROST FIGHTING CONTROLLER...
-
Page 3: Table Of Contents
Installing Batteries How to install and use FROSTIE Overview Installation for FROSTIE FROSTIE Settings The FROSTIE Alarm Menu - monitor and set-up the alarm FROSTIE Alarm Status Display Testing the FROSTIE installation Routine Maintenance, Care and Cleaning Event Log Table... -
Page 4: Introduction
This manual describes how to install, configure and use FROSTIE. Take time now to familiarise yourself with all its features and settings. Read the entire manual before installing or using FROSTIE. There is space at the end of the manual to record details of your... -
Page 5: How The Display And Buttons Work
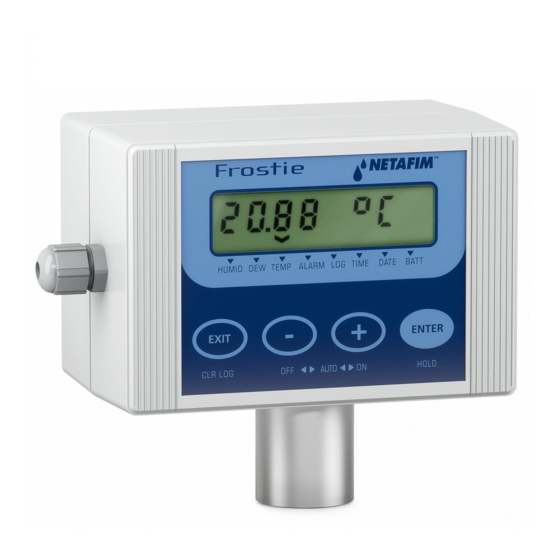
HOw THE dISpLAy ANd BuTTONS wORk Display icon FROSTIE’s screens are collected into eight menus, shown below the display: Humidity, Dew point, Temperature, Alarm, Log, Time, Date and Battery. NORmALLy yOu wILL BE AT THE TOp OF ONE OF THE mENuS:... -
Page 6: The Humidity Menu - Monitoring The Humidity
Relative humidity is the percentage of moisture in the air compared to the saturation content at the same temperature. When humidity reaches 100%, moisture condenses and dew or frost forms. FROSTIE measures humidity once each minute. Running high and low records are maintained, which may be cleared manually at any time. -
Page 7: The Dew Point Menu - Monitoring The Dew Point
A dew point below 0º is referred to as a frost point, because moisture condenses as ice rather than liquid water at that temperature. This term is not directly related to crop frost damage or to the temperature at which FROSTIE’s alarm is activated. -
Page 8: The Temperature Menu - Monitoring The Temperature
THE TEmpERATuRE mENu - mONITORING THE TEmpERATuRE Temperature is measured once each minute. Running high and low records are maintained, which may be cleared manually at any time. The Temperature menu displays the current temperature: Press ENTER to access the other screens in the Temperature menu: Lowest temperature: Press at the same time to clear the lowest value (sets to the current temperature.) Press ENTER to move to the next... -
Page 9: The Log Menu - Displaying The Event Log
5.37ºC 35 % Once the events have been noted, the log can be emptied ready to accumulate new events. FROSTIE can hold up to 20 events. If more than 20 events accumulate, the oldest ones are overwritten first. TO CLEAR THE LOG: Go to the Log menu and hold down the EXIT button for 3 seconds to clear all events from the log. - Page 10 Event number: Number of events: Press ENTER Press ENTER Start date: Press ENTER Press to show the previous Start time: or next event. The event number is shown while pressed. Press ENTER Event Duration: Press ENTER Start temperature: TO REAd THE EvENT LOG: 1.
-
Page 11: The Hourly Statistics Log
THE HOuRLy STATISTICS LOG FROSTIE maintains an Hourly Statistics Log covering the last 24 hours which contains the minimum and maximum values of temperature and humidity for each hour. To access the Hourly Statistics Log, go to the normal Log menu and hold down the ENTER button for 3 seconds. -
Page 12: The Time Menu - Setting The Time
Press ENTER to access the other screens in the Time menu: Time format: Press to choose 12 or 24 hour mode. FROSTIE will use this format whenever it displays a time. Press ENTER to continue. Set time: to change the flashing number. -
Page 13: Error Messages
Charge failure The charge failure message indicates that FROSTIE was unable to build up enough charge to reliably fire the solenoid. This may occur as a result of very flat batteries. Replace the batteries and test the operation of the solenoid (eg. as described on page 17). -
Page 14: Installing Frostie - Placement And Mounting
Avoid installing the unit close to the ground as heavy rain could cause mud to be spattered up over the sensors. FROSTIE is designed to be mounted to a metal plate on a pole using four screws or bolts (M4 or M5, or #8 self-tapping). Do not drill holes in the FROSTIE case! Drill four suitable holes in the mounting plate with centres at the corners of a rectangle 106.0 mm wide... -
Page 15: Connecting To Frostie
Two-wire solenoids use only the Red and Black terminals, and the White (common) is left empty. Three-wire solenoids use all three terminals. FROSTIE does not use the Digital inputs. The cable passes through the gland on the side of the case, which is sealed with a cap to protect the circuit board from dust and moisture. -
Page 16: Installing Batteries
Using A.C. supply (and it is working) It is strongly recommended that you still install batteries in FROSTIE so that data is not lost if the power supply fails: FROSTIE will only use the battery if the external power fails or when the standard outputs turn on or off. -
Page 17: How To Install And Use Frostie
FROSTIE compensates for this chill factor. Heaters or sprinklers may be installed to protect against frost damage. Frost sprinklers protect plants by covering the leaves in sheets of ice. -
Page 18: Installation For Frostie
Then repeat from step 2.) 4. If FROSTIE detects a wiring problem when firing the solenoid, it will display one of the error messages described on page 12. If so, check all connections or it might be necessary to change the Output Device (as shown above). Repeat testing until satisfied. -
Page 19: Frostie Settings
FROSTIE SETTINGS To configure the FROSTIE alarm settings: 1. Ensure that the Frost alarm is chosen, as shown on page 17. 2. Make sure you read and understand the Overview on page 16. 3. Go to the Alarm menu and press ENTER to skip the Alarm Status. -
Page 20: The Frostie Alarm Menu - Monitor And Set-Up The Alarm
THE FROSTIE ALARm mENu - mONITOR ANd SET-up THE ALARm The FROSTIE Alarm menu displays the FROSTIE alarm status. See next page for more information on the FROSTIE Alarm Status display. Hold EXIT to change alarm mode or to change output device. See page 17. -
Page 21: Frostie Alarm Status Display
If the alarm mode is set to Auto mode: FROSTIE will normally display the temperature margin - when it reaches 0 the alarm output switches on or off, and a start/stop voltage is shown as FROSTIE charges up the energy required (around 12V) to fire the output. Then the output fires and the on/off timer countdown proceeds. -
Page 22: Testing The Frostie Installation
ROuTINE mAINTENANCE, CARE ANd CLEANING When properly installed FROSTIE can relieve much of the tedium of manually operating crop protection systems. However, the responsibility for the well-being of the crop ultimately rests with the grower. Perform regular tests to ensure that the entire system is operating properly. -
Page 23: Event Log Table
EvENT LOG TABLE Start date Start time Duration Temperature Humidity NOTES Frost Alarm Crop description: Crop location: Solenoid / relay: Sprinkler / heater: Alarm Air temp: Humidity setting: Chill On time: Off time: Hysteresis:... - Page 24 E-mAIL: pROduCTS_SOLuTIONS@NETAFIm.COm...
Need help?
Do you have a question about the FROSTIE and is the answer not in the manual?
Questions and answers