Table of Contents
Advertisement
Quick Links
e
CM
3100
DIN-mounted intelligent TCP/IP M-Bus master
IntroduCtIon
CMe3100 is an intelligent TCP/IP M-Bus master with logging
functionality that can read and interpret meter data from all M-Bus
meters. CMe3100 can also read and organize networks with Elvaco's
wireless M-Bus receiver via M-Bus and TCP/IP . It is ready to use with all
ABB DIN-mounted electricity meters and any M-Bus meter following
the M-Bus standard protocol. Meter data can be downloaded or sent
through a variety of formats and protocols, such as FTP , e-mail, Modbus,
M-Bus slave port, M-Bus over TCP/IP and REST-protocol. For a complete
description of the product or for information in Swedish, visit the Elvaco
AB website, www.elvaco.com.
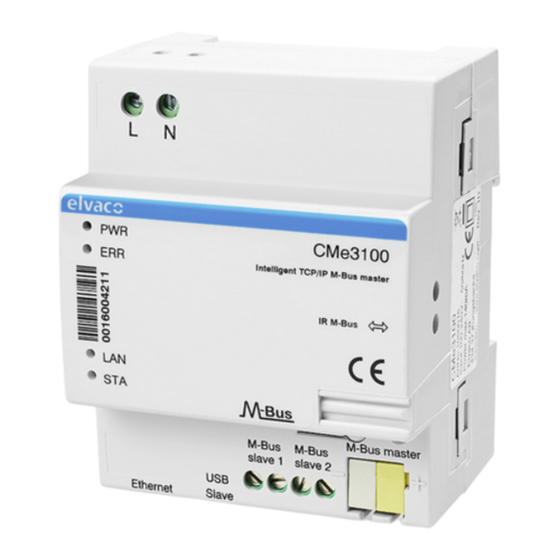
overvIew
MountIng
The CMe3100 should be mounted in a DIN-rail enclosure on a DIN-rail.
The metallic clip on the bottom is used to mount and demount the unit
from the DIN-rail. For safety reasons, a DIN-rail enclosure must cover
the terminals.
power supply
The installation should be performed by a qualified electrician or an
installer with the required knowledge. The power supply must be
protected with a 10 A circuit breaker of characteristic C or slow blow
fuse. The power supply should be connected via a clearly marked, easily
accessible and nearby switch so the unit can be switched off during
service work. Main supply should be connected to screw terminal (1)
and (2). Main supply voltage should be in the range of 100-240 VAC,
50/60 Hz.
M-Bus Master
M-Bus is a multi-drop 2-wire bus with no polarity. CMe3100 is
equipped with an M-Bus master for 32 slaves (32 M-Bus loads , 48
mA). Overloading the bus will turn the ERR LED (4 ) on and turn off
the M-Bus bus. If you wish to connect more slaves, mount an M-Bus
extender from the CMeX Series on the right side of the CMe3100
to expand the capacity. The master can communicate with 300 and
2400 baud. All connected M-Bus slaves must have unique primary or
secondary M-Bus addresses depending on addressing mode. Use a
1.
Power supply L
2.
Power supply N
3.
Green PWR LED
4.
Red ERR LED
5.
Serial number
6.
Yellow LAN LED
7 .
Blue STA LED
8.
USB master
9.
Ethernet connection
10.
USB slave
11.
M-Bus slave 1
12.
M-Bus slave 2
13.
M-Bus master
14.
IR interface
15.
Push button
cable of area 0.25-1.5 mm2, e.g. a standard telephone cable (EKKX
2x2x0.5). Connect the wiring to the connector (13). Do not exceed the
maximum cable length of 1000 m.
wIreless M-Bus
CMe3100 supports reading of wireless meters via Elvaco's wireless
M-Bus receiver. The M-Bus receivers can be connected to the local
M-Bus master on CMe3100 or via CMe3000 over TCP/IP .
Elvaco's wireless M-Bus system is automatically configured and
wireless meters can be read directly.
M-Bus slave ports
CMe3100 is equipped with two M-Bus slave ports used for sharing
meter data to other M-Bus systems. The ports can be configured
individually in the web interface. Connect the cables from the other
system's M-Bus master to the terminal marked "M-Bus slave 1" (11) or
"M-Bus slave 2" (12).
ethernet ConneCtIon
Connect the TP cable of type Cat 5e or better to the RJ45 connection
(9). On successful connection to the switch/hub, the yellow LAN
LED (6) will be permanently on or flashing. If CMe3100 has or will be
assigned an IP address, the red ERR LED will flash 50/50.
Ir InterfaCe
The IR interface can be used beside an ABB electricity meter or CMeX
module. Remove the IR shield (14) and mount CMe3100 on the left
side of the meter or CMeX module and leave no space between the
products. Do not remove the shield unless the IR interface is used.
gettIng started vIa usB slave port
The CMe3100 is configured via the integrated web interface. This is
easily reached via the local USB slave port (10) that is connected to a
PC. Connect the included USB cable between the computer and USB
slave port. After approximately 30 seconds, a removable disk will be
available on the computer. Open the folder on the removable disk
and run the file CMe3100-SETUP .EXE and follow the instructions.
When the installation is finished a browser with address
192.168.100.1 will be opened.
It is also possible to log in via the network that the product is connected
to. In this case, a DHCP server is needed in the network or that
CMe3100 has a static IP address configured. Find out which IP address
CMe3100 uses and enter it in a browser.
logIn
Username: admin, Password: admin
At the first login, the user should change the username and password.
Write down the new password.
wIrIng dIagraM
Advertisement
Table of Contents

Subscribe to Our Youtube Channel
Related Manuals for Elvaco CMe3100


Summary of Contents for Elvaco CMe3100
- Page 1 Connect the TP cable of type Cat 5e or better to the RJ45 connection (9). On successful connection to the switch/hub, the yellow LAN LED (6) will be permanently on or flashing. If CMe3100 has or will be assigned an IP address, the red ERR LED will flash 50/50.
- Page 2 E-mail: support @elvaco.com Online: www.elvaco.com © 2015, Elvaco AB. All rights reserved. The documentation and product are provided on an “as is” basis only and may contain deficiencies or CMe3100 Quick manual A4 English inadequacies. Elvaco AB takes no responsibility for damages, liabilities or other losses by using this product. No part of the contents of this Document id: 1090079 manual may be transmitted or reproduced in any form by any means without the written permission of Elvaco AB.
Need help?
Do you have a question about the CMe3100 and is the answer not in the manual?
Questions and answers