Advertisement
Quick Links
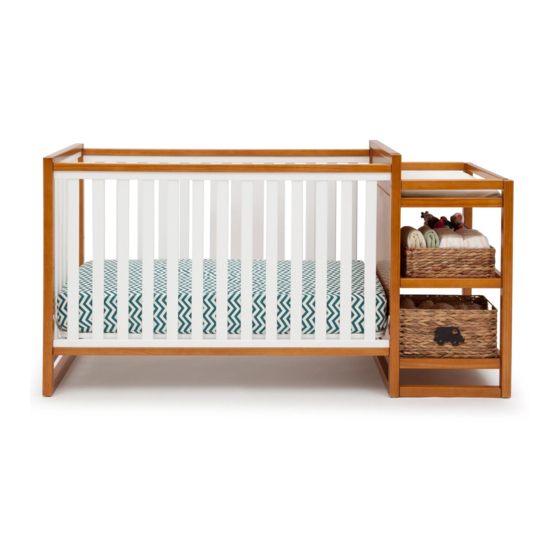
Crib 'n' Changer
Lit bébé et Meuble à langer
Cuna y Cambiador
Consumer Care:
www.DeltaChildren.com
Delta Children's Products
114 West 26th Street
New York, NY 10001
Tele.212-645-9033
This product is not intended for institutional or commercial use.
Ce produit ne pas destine a un usage institutionnel ou commercial.
Este producto no esta hecho para uso institucional o comercial.
When contacting Delta Consumer Care please reference the above information. Before contacting Delta Consumer Care
please ensure that the information above matches the information found on the label on the Crib End bottom rail, please
reference the information found on the product when contacting Delta Consumer Care.
Lorsque vous contactez le Service client de Delta, veuillez faire référence aux informations ci-dessus. Avant de contacter le
Service client de Delta, veuillez vous assurer que les informations ci-dessus correspondent aux informations indiquées sur
l'étiquette qui se trouve sur Traverse inférieure de l'extrémité du lit bébé; veuillez faire référence aux informations indiquées
sur le produit lorsque vous contactez le Service client de Delta.
Al contactar al servicio al cliente de Delta, entregue la información anteriormente mencionada. Antes de contactar al servicio
de atención al cliente de Delta, asegúrese de que la información anteriormente mencionada calza con la que aparece en la
etiqueta en Barra inferior del extremo de la cuna; al contactar al centro de atención al cliente de Delta, mencione la
información que aparece en el producto.
To register your product for important safety alerts and updates to your product please visit www.DeltaChildren.com and click
on Product Registration.
Pour enregistrer votre produit afin de recevoir des alertes de sécurité et des mises à jour importantes relatives à votre
produit, veuillez visiter le site www.DeltaChildren.com, puis cliquer sur Enregistrement de produits.
Para registrar su producto a fin de recibir importantes alertas y actualizaciones de seguridad, visite www.DeltaChildren.com y
haga clic en Registro de Productos (Product Registration).
November 02, 2015, 25495 (82160), R0
Conforms to
ASTM F1169 Full
Size Crib & F1821
Safety Standards
Need Help?
Please visit www.DeltaChildren.com/assembly-videos to
watch our easy and effective assembly videos
Besoin d'aide?
Veuillez visiter www.DeltaChildren.com/assembly-videos
pour regarder nos vidéos faciles et efficaces concernant
l'assemblage
Necesita ayuda?
Por favor, visite www.DeltaChildren.com/assembly-videos
para que vea nuestros videos que muestran como ensamblar
de una manera efectiva y fácil.
Read all instructions before assembly and use.
KEEP INSTRUCTIONS FOR FUTURE USE.
ADULT ASSEMBLY REQUIRED
Due to the presence of small parts during assembly, keep out of
reach of children until assembly is complete.
Lisez toutes les instructions avant l'assemblage et
l'utilisation. CONSERVEZ LES INSTRUCTIONS
POUR UN USAGE ULTERIEUR.
L'ASSEMBLAGE DOIT ETRE FAIT
PAR UN ADULTE
A cause de la presence de petites pieces, pendant l'assemblage gardez
hors de portee des enfants jusqu'a ce que celui-ci soit termine.
Lea todas las instrucciones antes de ensamblar
y usar. MANTENGA LAS INSTRUCCIONES
PARA SU USO FUTURO.
DEBE SER ENSAMBLADO POR
UN ADULTO
Debido a la presencia de piezas pequeñas durante el ensamblaje,
mantenga fuera del alcance de los niños hasta que complete el
ensamblaje.
Style #:
Lot:
Date:
___________
___________
___________
© 2015 DELTA ENTERPRISE CORP.
A
REV
Advertisement

Related Manuals for Delta Children Gramercy 82160


Summary of Contents for Delta Children Gramercy 82160
- Page 1 Consumer Care: Necesita ayuda? Por favor, visite www.DeltaChildren.com/assembly-videos www.DeltaChildren.com para que vea nuestros videos que muestran como ensamblar de una manera efectiva y fácil. Delta Children’s Products 114 West 26th Street Style #: ___________ New York, NY 10001 Tele.212-645-9033 Lot: ___________ This product is not intended for institutional or commercial use.
- Page 2 CAUTION: ANY MATTRESS USED IN THIS CRIB SHALL BE AT LEAST 27 1/4 BY 51 5/8 IN. (69x131CM) WITH A THICKNESS NOT EXCEEDING 6 IN (15 CM). WARNING: *Infants can suffocate on soft bedding. Never add a pillow or comforter. Never place additional padding under an infant.
- Page 3 ATTENTION: LE MATELAS UTILISÉ AVEC CE LIT D’ENFANT DOIT AVOIR UNE TAILLE MINIMALE DE 69CM PAR 131 CM, ET SON ÉPAISSEUR NE DOIT PAS DÉPASSER 15 CM AVERTISSEMENT: *Les nourrissons peuvent suffoquer sur une literie molle. Ne jamais utiliser d’oreiller ou de couette. Ne jamais placer de rembourrage supplémentaire sous un bébé.
- Page 4 ATENCIÓN: CUALQUIER COLCHÓN QUE SE UTILICE EN ESTA CUNA DEBE TENER AL MENOS 69CM POR 131CM CON UN ESPESOR QUE NO EXCEDA LAS 15CM. ADVERTENCIA: *Niños pequeños y bebés pueden ahogarse en una cama blanda. Nunca añada una almohada ni un edredón. Nunca coloque almohadillado adicional debajo de un bebé.
- Page 5 Tighten all loose screws and bolts before each use. The maximum recommended weight of the child is 30lbs for the changing table. Use only the pad provided by Delta Children’s Products. Always secure the pad to the changing surface by inserting the strap through the hole in the middle of the pad.
- Page 6 ULTÉRIEURE. Inspecter régulièrement la table à langer. Ne pas l’utiliser si elle est endommagée ou brisée. Communiquer avec Delta Children’s Products pour toute question. Serrer tous les boulons et vis desserrés avant chaque usage. Le poids maximum recommandé est de 30 livres (13,6kg).
- Page 7 Coloque estas instrucciones en un lugar seguro para su uso futuro. Inspeccione este cambiador periodicamente. No use el cambiador si esta dañado o roto. En caso de que tenga cualquier tipo de duda, contacte a Delta Children’s Products. Apriete los tornillos y pernos flojos antes de cada uso.
- Page 8 Note: during the assembly process whenever using screws or bolts, check each by placing the screw/bolt on the diagram of the item which is drawn actual size and design. Be sure to use the proper size and shape specified in the instructions. Remarque: au cours du procédé...
- Page 9 PARTS: MAKE SURE THAT ALL PRE-ASSEMBLED PARTS ARE TIGHT PIÈCES : VÉRIFIEZ QUE TOUTES LES PIÈCES PRÉ-MONTÉES SONT BIEN SERRÉES. PIEZAS: ASEGÚRESE DE QUE TODAS LAS PIEZAS PRE-ENSAMBLADAS ESTÁN BIEN APRETADAS. C. Changer Top and Bottom Rail x4 Traverse supérieure de la table à langer Barra superior del cambiador A.
- Page 10 K. Lower Shelf Support x2 Support de de la tablette inférieure N. Stabilizer Bar x1 Soporte del estante inferior H. Changer Lower Shelf x2 Barre stabilisatrice 25493 Tablette inférieure de la Barra estabilizadora table à langer 25494 Estante inferior del cambiador 25488 J.
- Page 11 Crib Hardware Note: Fasteners are shown full size Remarque: Les dispositifs de fixation sont Matériel de Lit de Bébé Montrés en taille réelle Pernos de la Cuna Nota: Los pernos se muestran en tamaño real Hardware kit is Part# 24664-987 for color 2053 L'ensemble de quincaillerie correspond à...
- Page 12 Section 1: Changing Table Assembly Section 1: Montage de la table à langer Sección 1: Montaje de la mesa cambiadora The following tools and parts are required: STEP #1 ÉTAPE N°1 Outils et pièces nécessaires: PASO #1 Se necesitan las siguientes herramientas y piezas: D.
- Page 13 Install Changer Top & Bottom Rails (Parts C ) using (4) Metal Pins (Part X), (4) 75mm Bolts (Part R) and (4) Barrel Nuts (Part V) as shown. Use the Flat Head Screwdriver to hold the barrel nut in the Proper alignment. Tighten all bolts with the M4 Allen Wrench.
- Page 14 Section 1: Changing Table Assembly Section 1: Montage de la table à langer Sección 1: Montaje de la mesa cambiadora The following tools and parts are required: STEP #2 Outils et pièces nécessaires: ÉTAPE N°2 PASO #2 Se necesitan las siguientes herramientas y piezas: Hole on one side Orifice sur un côté...
- Page 15 Hole with Insert goes to bottom of changing surface and aligns with hole in surface. L’orifice avec l’insertion va jusqu’au fond du plan à Small Notch-Top langer et s’aligne avec l’orifice sur la surface. Petite encoche - supérieure Muesca pequeña – superior El agujero con el inserto va en el fondo de la superficie del cambiador y se alinea con el agujero en la superficie.
- Page 16 Section 1: Changing Table Assembly Section 1: Montage de la table à langer Sección 1: Montaje de la mesa cambiadora The following tools and parts are required: STEP #3 ÉTAPE N°3 Outils et pièces nécessaires: PASO #3 Se necesitan las siguientes herramientas y piezas: B.
- Page 17 Carefully align all Panels, the pre-installed Dowels and (4) M7x37mm Metal Pins (Part X) with the holes and slots in the Changer Right Side(Part B). Insert (4) 75mm Bolts (Part R) and (4) Barrel Nuts (Part V) as shown. Use the Flat Head Screwdriver to hold the barrel nut in the proper alignment. Tighten all bolts with the M4 Allen Wrench.
- Page 18 Section 1: Changing Table Assembly Section 1: Montage de la table à langer Sección 1: Montaje de la mesa cambiadora The following tools and parts are required: STEP #4 Outils et pièces nécessaires: ÉTAPE N°4 Se necesitan las siguientes herramientas y piezas: PASO #4 Note: Fasteners are shown full size Remarque: Les dispositifs de fixation sont Montrés en taille réelle...
- Page 19 Install Safety Strap (Part J) using (1) Nylon Washer (Part Y) and (1) 18mm Bolt (Part T). Tighten with M4 Allen Wrench. Installez la ceinture de sécurité (pièce J) en utilisant (1) rondelle en nylon (pièce Y) et (1) boulon 18mm (pièce T).
- Page 20 Section 2: Crib Assembly Section 2: Montage du lit de bébé Sección 2: Montaje de la cuna The following tools and parts are required: STEP #1 Outils et pièces nécessaires: ÉTAPE N°1 Se necesitan las siguientes herramientas y piezas: PASO #1 M.
- Page 21 Attach (1) Crib Side Rail (Part L) and (1) Crib End (Part M) to the assembly from Section 1 Step 4 using (2) M7 x 37mm Metal Pins (Part X), (4) 75 mm Bolts (Part R) and (4) Barrel Nuts (Part V). Tighten with the m4 Allen Wrench.
- Page 22 Section 2: Crib Assembly Section 2: Montage du lit de bébé Sección 2: Montaje de la cuna The following tools and parts are required: STEP #2 Outils et pièces nécessaires: ÉTAPE N°2 PASO #2 Se necesitan las siguientes herramientas y piezas: Note: Fasteners are shown full size Remarque: Les dispositifs de fixation sont Montrés en taille réelle...
- Page 23 The Warnings printed on the pouch attached to the mattress support must face up, the springs must face up.This crib has (3) adjustment positions, use the highest only for newborns, move the mattress down as the child grows. Les AVERTISSEMENTS qui se trouvent sur la pochette fixée au support du matelas doivent être tournés vers le haut, les ressorts doivent être tournés vers le haut.
- Page 24 Section 2: Crib Assembly Section 2: Montage du lit de bébé Sección 2: Montaje de la cuna The following tools and parts are required: STEP #3 Outils et pièces nécessaires: ÉTAPE N°3 Se necesitan las siguientes herramientas y piezas: PASO #3 From Step 2 De l’étape 2 L.
- Page 25 ! CHECK TO ENSURE THAT ALL BOLTS ARE TIGHT. ! ASSUREZ-VOUS QUE TOUS LES BOULONS SONT BIEN SERRÉS. ! REVÍSELO PARA ASEGURARSE DE QUE TODOS LOS PERNOS ESTÁN APRETADOS Attach (1) Crib Side Rail (Part L) to the assembly from Step 2 using (2) M7 x 37mm Metal Pins (Part X), (4) 75 mm Bolts (Part R) and (4) Barrel Nuts (Part V).
- Page 26 Section 2: Crib Assembly Section 2: Montage du lit de bébé Sección 2: Montaje de la cuna The following tools and parts are required: STEP #4 Outils et pièces nécessaires: ÉTAPE N°4 Se necesitan las siguientes herramientas y piezas: PASO #4 W.
- Page 27 WARNING: Changing Table Always secure the pad to the changing surface by inserting the strap through the hole in the middle of the pad. See Instructions. AVERTISSEMENT: table à langer Toujours fixer le matelas à la surface de la table à langer en insérant la sangle dans le trou qui se trouve au milieu du matelas.
- Page 28 Consumer Care: Necesita ayuda? Por favor, visite www.DeltaChildren.com/assembly-videos www.DeltaChildren.com para que vea nuestros videos que muestran como ensamblar Delta Children’s Products de una manera efectiva y fácil. 114 West 26th Street Style #: ___________ New York, NY 10001 Tele.212-645-9033...
- Page 29 Section 3: Toddler Bed Conversion Section 3: Conversion en lit d’enfant Sección 3: Conversión en cama de bebé STEP #1 The following tools and parts are required: ÉTAPE N°1 Outils et pièces nécessaires: PASO #1 Se necesitan las siguientes herramientas y piezas: M4 Allen Wrench (Provided) Clé...
- Page 30 Section 3: Toddler Bed Conversion Section 3: Conversion en lit d’enfant Sección 3: Conversión en cama de bebé STEP #2 The following tools and parts are required: ÉTAPE N°2 Outils et pièces nécessaires: PASO #2 Se necesitan las siguientes herramientas y piezas: N.
- Page 31 Both Ends Les deux extrémités Ambos extremos Attach (1) Stabilizer Bar (Part N) to the assembly from Section 4 Step 1 using (2) M4x30mm Metal Pins (Part U), (2) 75 mm Bolts (Part R) and (2) Barrel Nuts (Part V). Tighten with the M4 Allen Wrench. Use the Flat Head Screwdriver to hold the Barrel Nut in the proper alignment Fixez (1) barre stabilisatrice (pièce N) à...
- Page 32 Section 3: Toddler Bed Conversion Section 3: Conversion en lit d’enfant Sección 3: Conversión en cama de bebé STEP #3 The mattress support must be in the lowest position.Store all hardware safely. ÉTAPE N°3 Read all warnings on page 5.As shown, use as a day bed or love seat sofa. PASO #3 Do Not use without stabilizer bar installed.Check to ensure all bolts are tight.
- Page 33 Section 4: Full Size Bed Conversion Section 4: Conversion en Grand Lit Sección 4: Conversión en Cama Tamaño Normal The following tools and parts are required: Outils et pièces nécessaires: Se necesitan las siguientes herramientas y piezas: N. Stabilizer Bar x1 L.
-
Page 34: Warranty
Consumer Care: www.DeltaChildren.com Delta Children’s Products 114 West 26th Street New York, NY 10001 Tele.212-645-9033 Warranty: This Delta product is warranted to be free from defects for a period of 1 year from the date of purchase under normal use. This warranty extends only to the original retail purchaser and is valid only when supplied with proof of purchase, or if received as a gift, when the registration is on file with Delta.
Need help?
Do you have a question about the Gramercy 82160 and is the answer not in the manual?
Questions and answers