
Related Manuals for MAJORITY BARTON 2


Summary of Contents for MAJORITY BARTON 2
- Page 1 B A R T O N D I G I T A L R A D I O & A L A R M C L O C K BAR-DAB-WDN | WAL-2 Instructions Guide...
-
Page 2: Table Of Contents
FM Radio Presets �������������������������������������������������������������������������������������� 12 Clock & Date Settings �������������������������������������������������������������������������������14 Dual Alarm Settings ����������������������������������������������������������������������������������16 Alarm Functions ����������������������������������������������������������������������������������������17 Other Functions ����������������������������������������������������������������������������������������18 Troubleshooting ���������������������������������������������������������������������������������������� 20 Spectifications ��������������������������������������������������������������������������������������������21 Warranty �����������������������������������������������������������������������������������������������������21 Safety Information ������������������������������������������������������������������������������������ 22 Register your product online for a FREE 3 year extended warranty at: www.majority.co.uk... -
Page 3: What's In The Box
What’s In The Box? Box Contents 1� Majority Barton Radio 2� UK Power Supply 3� User Guide... -
Page 4: Controls And Functions
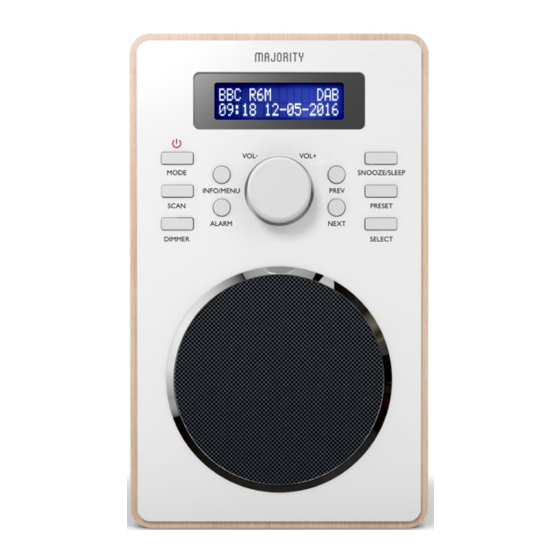
Controls And Functions Front View VOL - VOL+ MODE SNOOZE/SLEEP INFO/MENU PREV SCAN PRESET ALARM NEXT DIMMER SELECT 1� Info/Menu 8� Display Screen 2� Power/Mode 9� Previous 3� Scan 10� Snooze/Sleep 4� Dimmer 11� Preset 5� Alarm 12� Select 6� Volume -/+ 13�... - Page 5 Controls And Functions Back View 14� Off/On Switch 15� DC Power Input 16� Headphone Jack 17� Antenna...
-
Page 6: Instructions Guide
Instructions Guide Basic Operation: DAB Please note all (Ref.) refer to Page 1 Controls and Functions mapping guide. Plug the connector into the back of the system labelled DC 5V (Ref.15)� Ensure the antenna (Ref.17) is extended as far as possible so that you can rotate it which will enable you to get the best possible signal�... -
Page 7: Basic Operation
Instructions Guide Basic Operation: FM FM Scan Setting The first time you switch to FM mode, the FM frequency “87.5 MHz” will be displayed on the screen� Choose between scanning strong and weak signals (All) or only the strong stations (Only)� Press and hold the ‘Info/Menu’... -
Page 8: Dab/Dab+ Radio
Instructions Guide Station Information for DAB Radio DAB/DAB+ Radio When you are listening to a DAB/DAB+ radio station with good signal, you can press the ‘Info/Menu’ button (Ref.1) repeatedly to show the different programme information. Bit Rate: Shows the data rate at which the signal is being transmitted� Bit Error Rate (BER): Provides details of the signal error rate�... - Page 9 Instructions Guide FM/DAB Radio Presets How to store a preset station To be able to quickly access your favourite stations, you can preset them. Up to 10 different preset stations can be set. To store a station as a preset, first ensure the station is playing. Once listening to a station, press and hold the ‘Preset’...
-
Page 10: Fm Radio
Instructions Guide Station Information for FM Radio FM Radio When you are listening to an FM radio station with good signal, you can press the ‘Info/Menu’ button (Ref.1) repeatedly to show the different programme information� Signal Strength: Displays a signal bar with the strength of the current station�... -
Page 11: Clock & Date Settings
Instructions Guide Clock & Date Settings Once the radio has been put into DAB/DAB+ mode, the time and date should be automatically set� If this does not occur or you wish to alter the time and date, follow the steps below: Manually Setting the Date and Time To enter the radio settings, press and hold the ‘Info/Menu’... -
Page 12: Dual Alarm Settings
Instructions Guide Dual Alarm Settings 1. Press the ‘Alarm’ button (Ref.5) once for Alarm 1 or twice for Alarm 2� Press the ‘Select’ button (Ref.12) to confirm the alarm you wish to set. 2. Once alarm 1 or 2 is selected, the screen will display the word “OFF”� To turn the alarm on, use the ‘Next’... - Page 13 Instructions Guide Cancel/Snooze Alarm To Cancel Alarm 1 or Alarm 2 To cancel the alarm, press the ‘Alarm’ button (Ref.5) once for Alarm 1 or twice for Alarm 2� Press the ‘Select’ button (Ref.12) to confirm the alarm you wish to cancel� To turn the Alarm off, press the ‘Next’...
-
Page 14: Other Functions
Instructions Guide Other Functions Sleep Setting This enables you to program the radio to switch off at a specific time, up to 120 minutes from activation� Press the ‘Snooze/Sleep’ button (Ref.10)� Using the ‘Prev’ or ‘Next’ buttons (Ref.9/Ref.13), choose the sleep timer length: OFF/5 mins/15mins/30mins/45mins/60mins/90mins or 120mins�... - Page 15 Instructions Guide Other Functions System Reset To erase all settings and preset options, perform a factory reset� This would also be advisable if you are having any functionality issues with your radio� To perform a factory reset, press and hold the ‘Info/Menu’ button (Ref.1)�...
-
Page 16: Troubleshooting
To automatically set the time and date, turn on the system and setting automatically switch to DAB radio� Alternatively, you can edit these in radio settings� Support If you require further assistance with your new radio, please contact our support team on the Majority website: www�majority�co�uk/support... -
Page 17: Warranty
Warranty All products come with a standard 12 month warranty� All items must be registered on www�majority�co�uk for the warranty to be valid� Once on the web page, use the menu to find “Register Your Product”. You will also be given the chance to extend your warranty for an additional 24... -
Page 18: Safety Information
1� Read these instructions� 2� Keep these instructions� Instructions are also The apparatus shall not be exposed to dripping or available for download at www�majority�co�uk splashing and no objects filled with liquid, such as 3� Heed all Warnings vases, shall be places on the apparatus�... - Page 20 www�majority�co�uk...
Need help?
Do you have a question about the BARTON 2 and is the answer not in the manual?
Questions and answers