Advertisement
Quick Links
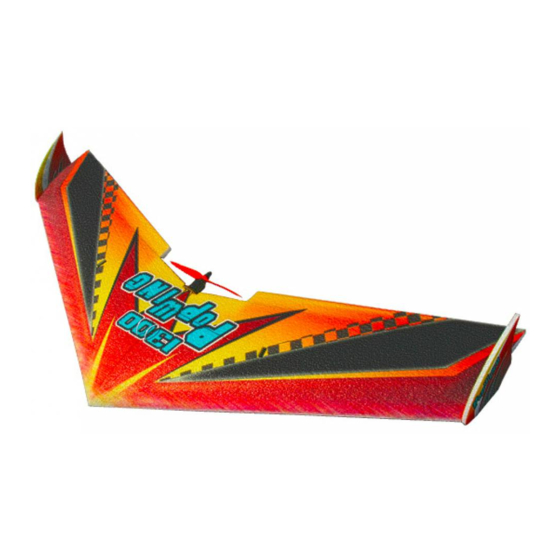
1. These EPP flying wings are very popular for
outdoor flying.
2. Made of high quality EPP material, it is very
durable and easy to fly.
3. Most of the parts are pre-assembled in our
factory, for you it's very easy to build.
Fuselage length: 390MM (15.3in.)
Wingspan: 1300MM (51.1in.)
Flying Weight:484g (with battery)
Motor: AS2216 KV 1250
ESC: 30 Amp
Propeller: 9*5 or 9047 sf
Servo: 10-17g micro servo*4pcs
Radio: 4/more channel
Battery: 11.1V1800mAh Li-po 25C
Wind strong enough to make the trees rustle
A street with many trees or street lamps
Close to high voltage electrical wires
High Population density areas
Cautions for flying
Large gyms, front lawns and parks make
excellent flying areas. Make sure you
have permission to fly and follow safety
guidelines set by local authorities.
The calmer the wind, the better!
Note for Storage
Please disconnect the lipo packs when
finished flying
Do not press or crush the airplane when
storing
The best way to store is to hang the airplane
to keep the control surface rigid
Recommended Flying Setup
Max servo travel of aileron: 40degrees up
and 40degrees down 28mm
Max servo travel of elevator:50 degrees up
and 50 degrees down 28mm
235-245mm away from the nose
235 245mm
Advertisement

Subscribe to Our Youtube Channel
Related Manuals for Techone 1300 Popwing


Summary of Contents for Techone 1300 Popwing
- Page 1 Note for Storage Please disconnect the lipo packs when 1. These EPP flying wings are very popular for finished flying outdoor flying. Do not press or crush the airplane when 2. Made of high quality EPP material, it is very storing durable and easy to fly.
- Page 2 Fix the left and right wing with glue. 1.Wing 2.Wing fences 2pcs 3.Skid 4.Motor mount 5.Reinforcement for wing connecting 2pcs square tube 6.Battery fixing board 7.Wing reinforcing carbon fiber rod 2pcs 8.Nylon strap 2pcs 9.Push rod with Z bend 2pcs Insert the wing connecting square tube into 10.Wing connecting square tube the pre-reserved slot and fix with glue.
- Page 3 Motor mount Cut a slot along the 2 burned holes on top of wing. Install the motor mount on corresponding place in above picture with glue. Please align the round holes at the central line of the airframe. Cut another slot along the 2 burned holes on bottom of wing.
- Page 4 Align the two burned holes with lower arc line of wing as picture shown, then fix with glue. Put the skid on the central line which is near the nose and fix with glue. Tighten the screw after finishing the installation of the servo and servo arm.
- Page 5 Use the reamer to enlarge the aperture to fit the adjustor. Place servo into the pre-reserved servo house and fix with glue. Cut a slot for embeding the servo wire. Fix the adjustor and control horn with glue as picture shown. Embed the servo wire into the slot.
- Page 6 Motor fixing screws Connect the servo and control horn with Z bend push rod. Cut off the redundant wire with pliers. Install motor on motor mount with screws. Tighten the screw of adjustor after make Propeller. sure the control surface and wing is in the same level.
- Page 7 Connect motor and ESC wire. Then put the washer on propeller as picture shown. Nylon strap Screw down the bullet head. Thread nylon straps through the equipment cabin. The planform of the installed motor and propeller. Make sure the motor and propeller is in neutral. Put ESC inside the equipment cabin as picture shown.
- Page 8 Tighten the nylon straps after placed all equipments neatly. The completion of the airplane. A perfect 1300 Popwing-EPP is done after your careful assembly. While assembly, the flying weight is really critical to the flight performance and will be affected by adding weight, so you Cut off redundant part with pliers.
Need help?
Do you have a question about the 1300 Popwing and is the answer not in the manual?
Questions and answers