Table of Contents
Advertisement
Available languages
Available languages
Quick Links
Showvitrine voor delicatessen
NL
Handleiding
Vitrine alimentaire
FR
Mode d'emploi
Feinkost-Display
DE
Bedienungsanleitung
Model • Modèle • Modell • Modello • Modelo • Malli:
GL178_ML_A5_v4_20190730.indb 1
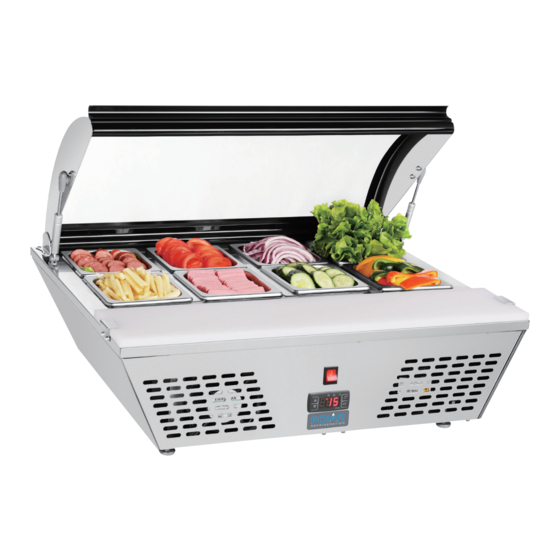
Refrigerated Prep
Counter
Instruction manual
Vetrina refrigerata
8
IT
Manuale di istruzioni
Vitrina para alimentos
14
ES
Manual de instrucciones
Vitrina Deli
20
PT
Manual de instruções
GL178
26
32
38
2019/7/30 13:29
Advertisement
Table of Contents

Related Manuals for Polar Electro GL178


Summary of Contents for Polar Electro GL178
- Page 1 Showvitrine voor delicatessen Vetrina refrigerata Handleiding Manuale di istruzioni Vitrine alimentaire Vitrina para alimentos Mode d'emploi Manual de instrucciones Feinkost-Display Vitrina Deli Bedienungsanleitung Manual de instruções Model • Modèle • Modell • Modello • Modelo • Malli: GL178 GL178_ML_A5_v4_20190730.indb 1 2019/7/30 13:29...
-
Page 2: Safety Tips
Safety Tips • Position on a flat, stable surface. • A service agent/qualified technician should carry out installation and any repairs if required. • Consult Local and National Standards to comply with the following: - Health and Safety at Work Legislation - BS EN Codes of Practice - Fire Precautions - IEE Wiring Regulations... -
Page 3: Pack Contents
• Children should be supervised to ensure that they do not play with the appliance. Caution Risk of Fire • Do not store explosive substances such as aerosol cans with a flammable propellant in this appliance. Warning: Keep all ventilation openings clear of obstruction. -
Page 4: Installation
Installation Note: If the appliance has been stored or moved in a non-vertical position, stand it in an upright position for approximately 12 hours before operation. If in doubt allow to stand. 1. Remove the appliance from the packaging and remove the protective film from all surfaces. 2. -
Page 5: Operation
Operation Control panel Refrigerant LED is on. Compressor is running Defrost LED is on. Unit is defrosting, compressor is not running Up Button Down Button Manual defrost button Set button On/off Adjusting the Temperature 1. Press SET button. The set temperature is displayed. 2. -
Page 6: Troubleshooting
Blocked Condenser • Call POLAR agent or qualified Technician Technical Specifications Power Current Capacity Dimensions Weight Model Voltage Refrigerant (Litres) H x W x D mm (kg) GL178 220-240V~ R600a 328 x 767 x 612 22.5 50Hz GL178_ML_A5_v4_20190730.indb 6 2019/7/30 13:29... -
Page 7: Electrical Wiring
Electrical Wiring POLAR appliances are supplied with a 3 pin, moulded, BS1363 plug and lead, with a 13 amp fuse as standard. The plug is to be connected to a suitable mains socket. POLAR appliances are wired as follows: • Live wire (coloured brown) to terminal marked L •... - Page 8 Veiligheidstips • Plaatsen op een vlakke en stabiele ondergrond. • De installatie en eventuele reparaties dienen door een servicetechnicus/vaktechnicus uitgevoerd te worden. • Raadpleeg en volg de plaatselijke en nationale regelgeving op m.b.t. het volgende: - Wetgeving voor gezondheid en veiligheid op de werkplaats - Werkregels BS EN - Brandpreventie - IEE bekabelingsnormen...
- Page 9 • Men dient er toezicht op te houden dat kinderen niet met het apparaat spelen. Voorzichtig Risico van Fire • Heeft explosieve stoffen zoals spuitbussen niet slaan met een brandbaar drijfgas in dit apparaat. Waarschuwing: Hou alle ventilatieopeningen vrij van obstakels. De eenheid mag niet ingesloten worden zonder geschikte ventilatie.
- Page 10 Installatie Opmerking: indien het apparaat in een niet verticale positie is opgeslagen of getransporteerd, dient men het apparaat 12 uur vóór gebruik in de verticale positie te plaatsen. Bij twijfels voorgaande instructie uitvoeren. 1. Haal het apparaat uit de verpakking en verwijder de beschermingfolie van alle oppervlakken. 2.
-
Page 11: Temperatuur Aanpassen
Bediening Bedieningspaneel Koel-LED is aan. Compressor in werking Ontdooiings-LED is aan. Ontdooiing is aan, compressor staat uit UP (omhoog) knop Down (omlaag) knop Knop handmatig ontdooien Instellingsknop Aan uit Temperatuur aanpassen 1. Druk op de instellingsknop SET. De ingestelde temperatuur wordt weergegeven. 2. -
Page 12: Problemen Oplossen
• Laat een POLAR-monteur of een vakman komen Technische specificaties Vermogen Stroom Inhoud Afmetingen Gewicht Model Voltage Koelmiddel (liters) H x B x D mm (kg) GL178 220-240V~ R600a 328 x 767 x 612 22,5 50Hz GL178_ML_A5_v4_20190730.indb 12 2019/7/30 13:29... -
Page 13: Elektrische Bedrading
Elektrische bedrading Men dient de steker op een geschikt stopcontact aan te sluiten. De bedrading van dit apparaat is als volgt: • Stroomkabel (bruin) naar de aansluitklem gemarkeerd met L • Neutraalkabel (blauw) naar de aansluitklem gemarkeerd met N • Aardekabel (groen/geel) naar de aansluitklem gemarkeerd met E Dit apparaat moet worden geaard. -
Page 14: Consignes De Sécurité
Consignes de sécurité • Poser sur une surface plate et stable. • L’installation et, le cas échéant, les réparations, doivent être effectués par un agent de maintenance/technicien qualifié. • Consultez les normes nationales et locales afin de vous assurer du respect des normes suivantes : - Législation santé... -
Page 15: Contenu De L'emballage
• Les enfants doivent être surveillés afin de s’assurer qu’ils ne jouent pas avec l’appareil. Attention Risque d’ incendie • Ne stockez pas de substances explosives telles que les aérosols avec un propulseur inflammable dans cet appareil. Attention : Évitez de bloquer toutes les ouvertires d’aération. - Page 16 Installation Remarque : si l’appareil a été rangé ou mis dans une position non verticale, positionnez-le debout pendant environ 12 heures avant de le mettre en fonctionnement. En cas de doute, laissez-le debout. 1. Retirez l’appareil de son emballage, ainsi que le film protecteur présent sur toutes les surfaces. 2.
-
Page 17: Panneau De Configuration
Fonctionnement Panneau de configuration Le DEL du réfrigérant est allumé (ON). Le compresseur fonctionne. Le DEL du dégivrage est allumé (ON). L’appareil dégivre, le compresseur ne fonctionne pas. Bouton haut (UP) Bouton bas (DOWN) Bouton de dégivrage manuel Bouton de réglage (SET) Allumé... -
Page 18: Dépannage
Appeler un agent POLAR ou un technicien qualifié Spécifications techniques Puissance Courant Capacité Dimensions Poids Modèle Tension Réfrigérant (Litres) h x l x p mm (kg) GL178 220-240V~ R600a 328 x 767 x 612 22,5 50Hz GL178_ML_A5_v4_20190730.indb 18 2019/7/30 13:29... -
Page 19: Raccordement Électrique
Raccordement électrique La prise doit être reliée à la prise secteur qui convient. Cet appareil est câblé comme suit : • Fil conducteur (brun) à la borne marquée L • Fil neutre (bleu) à la borne marquée N • Fil de terre (vert / jaune) à la borne marquée E Cet appareil doit être mis à... - Page 20 Sicherheitshinweise • Auf eine flache, stabile Fläche stellen. • Alle erforderlichen Montage- und Reparaturarbeiten sollten von Wartungspersonal oder einem qualifizierten Techniker durchgeführt werden. • Für folgende Aspekte sind die lokalen und nationalen Normen und Vorschriften heranzuziehen: - Arbeitsschutzvorschriften - BS EN Verhaltenspraktiken - Brandschutzvorschriften - IEE-Anschlussvorschriften - Bauvorschriften...
- Page 21 • Kinder sollten beaufsichtigt werden um sicherzustellen, dass sie nicht mit dem Gerät spielen. Vorsicht Gefahr von Feuer • Explosive Stoffe wie Sprühdosen mit brennbaren Treibmittel in diesem Gerät nicht speichern. Warnung: Halten Sie alle Lüftungsöffnungen frei. Das Gerät sollte nicht ohne geeignet Ventilation eingebaut werden.
- Page 22 Installation Hinweis: Falls das Gerät nicht waagerecht gelagert oder transportiert wurde, stellen Sie es ca. 12 Stunden aufrecht hin, bevor Sie es in Betrieb nehmen. Im Zweifelsfall lassen Sie es aufrecht stehen. 1. Das Gerät aus der Verpackung nehmen und den Schutzfilm von allen Flächen entfernen. 2.
-
Page 23: Betrieb
Betrieb Bedienfeld Kältemittel-LED ist an. Kompressor läuft Kältemittel-LED ist an. Gerät taut ab, Kompressor läuft nicht OBEN-Taste UNTEN-Taste Manuelle Abtautaste Einstelltaste An / aus Temperaturregelung 1. Die SET-Taste drücken. Die eingestellte Temperatur wird angezeigt. 2. Zum Einstellen der Temperatur die - oder -Taste drücken. -
Page 24: Störungssuche
Blockierter Kondensator • POLAR-Mitarbeiter oder qualifizierten Techniker anrufen Technische Spezifikationen Leistung Stromstärke Füllmenge Abmessungen Gewicht Modell Spannung Kühlmittel (Liter) H x B x T (mm) (kg) GL178 220-240V~ R600a 328 x 767 x 612 22,5 50Hz GL178_ML_A5_v4_20190730.indb 24 2019/7/30 13:29... - Page 25 Elektroanschlüsse Der Stecker muss in eine geeignete Steckdose gesteckt werden. Das Gerät ist wie folgt verdrahtet: • Stromführender Leiter (braun) an Klemme L • Neutralleiter (blau) an Klemme N • Erdleiter (grün/gelb) an Klemme E Dieses Gerät muss geerdet sein. Bei Fragen wenden Sie sich bitte an einen qualifizierten Elektriker.
- Page 26 Suggerimenti per un utilizzo sicuro • Posizionare su una superficie piana e stabile. • L’installazione e le eventuali riparazioni devono venire eseguite da un agente/tecnico qualificato. • Verificare la conformità alle normative locali e nazionali di quanto segue: - Normativa antinfortunistica sul lavoro - Linee guida BS EN - Precauzioni antincendio - Normativa IEE sui circuiti elettrici...
-
Page 27: Contenuto Dell'imballaggio
• Sorvegliare i bambini per assicurarsi che non giochino con l’apparecchio. Attenzione Rischio di incendio • Non conservare sostanze esplosive, come bombolette spray con propellente infiammabile in questo apparecchio. Attenzione: Tenere libere tutte le aperture di ventilazione. L’unità non deve essere installata senza una ventilazione adeguata. -
Page 28: Installazione
Installazione Nota: se l’apparecchio è stato immagazzinato o trasportato in posizione non verticale, lasciarlo in posizione verticale per circa 12 ore prima di metterlo in funzione. In caso di dubbio, osservare comunque questa precauzione. 1. Estrarre l’apparecchio dall’imballaggio e rimuovere la pellicola protettiva da tutte le superfici. 2. -
Page 29: Funzionamento
Funzionamento Pannello di controllo LED refrigerazione acceso. Compressore in funzione LED sbrinamento acceso. Sbrinamento unità in corso, compressore non in funzione Pulsante SU Pulsante GIÙ Pulsante sbrinamento manuale Pulsante Set (imposta) Acceso spento Regolazione della temperatura 1. Premere il pulsante SET. La temperatura viene visualizzata. 2. -
Page 30: Risoluzione Dei Problemi
Rivolgersi a un tecnico qualificato o a un agente POLAR Specifiche tecniche Alimentazione Corrente Capacità Dimensioni Peso Modello Tensione Refrigerante (litri) H x L x P (mm) (kg) GL178 220-240V~ R600a 328 x 767 x 612 22,5 50Hz GL178_ML_A5_v4_20190730.indb 30 2019/7/30 13:29... -
Page 31: Cablaggi Elettrici
Cablaggi elettrici La spina deve venire collegata a una presa di rete appropriata. L’apparecchio ha i seguenti cablaggi: • Filo sotto tensione (colore marrone) a terminale L • Filo del neutro (colore blu) a terminale N • Filo di terra (colore verde/giallo) a terminale E Questa apparecchiatura deve essere collegata a terra. -
Page 32: Consejos De Seguridad
Consejos de seguridad • Situar sobre una superficie plana y estable. • La instalación y cualquier reparación que pueda ser necesaria debe ser realizada por un agente de servicio/técnico cualificado. • Consulte la normativa nacional o local para cumplir los siguientes aspectos: - Legislación en materia de salud y seguridad laboral - Códigos de Prácticas BS EN... -
Page 33: Contenido Del Conjunto
• Los niños deben estar bajo supervisión para evitar que no jueguen con el aparato. Precaución Riesgo de Incendio • No guarde sustancias explosivas, tales como latas de aerosol con un propelente inflamable en este aparato. Advertencia: Mantenga los orificios de ventilación libres de obstrucciones. -
Page 34: Instalación
Instalación Nota: Si en algún momento se ha almacenado o movido la unidad en una posición que no fuera vertical, deberá colocarla de este modo durante 12 horas antes de ponerla en funcionamiento. En caso de duda, déjela reposar. 1. Extraiga la unidad de su embalaje y retire la película protectora de todas las superficies. 2. -
Page 35: Ajuste De Temperatura
Funcionamiento Panel de Control El LED del refrigerante está encendido. El compresor está en funcionamiento El LED de descongelación está encendido. La unidad está en proceso de descongelación. El compresor no está en funcionamiento Botón de flecha hacia arriba Botón de flecha hacia abajo Botón de descongelación manual Botón de ajuste (SET) Encender / apagar... -
Page 36: Solución De Problemas
Llame a un técnico cualificado o a un agente de POLAR Especificaciones técnicas Potencia Corriente Capacidad Dimensiones Peso Modelo Voltaje Refrigerante (litros) (a x a x f) mm (kg) GL178 220-240V~ R600a 328 x 767 x 612 22,5 50Hz GL178_ML_A5_v4_20190730.indb 36 2019/7/30 13:29... -
Page 37: Cableado Eléctrico
Cableado Eléctrico El enchufe tiene que conectarse a una toma eléctrica adecuada. Este aparato está conectado de la forma siguiente: • Cable cargado (de color marrón) al terminal marcado como L • Cable neutro (de color azul) al terminal marcado como N •... -
Page 38: Dicas De Segurança
Dicas de segurança • Posicione o aparelho numa superfície plana e estável. • Um agente de assistência técnica/técnico qualificado deve realizar a instalação e quaisquer reparações que sejam necessárias. • Consulte as Normas locais e nacionais de forma a cumprir com os seguintes itens: - Legislação acerca de Saúde e segurança no local de trabalho - Códigos de conduta BS EN... -
Page 39: Conteúdo Da Embalagem
• As crianças devem ser supervisionadas para assegurar que não brincam com o aparelho. Atenção Risco de Incêndio • Não guarde substâncias explosivas, tais como: latas de aerossol com um propulsor inflamável no aparelho ESTA. Aviso: Mantenha todas as aberturas de ventilação desobstruídas. - Page 40 Instalação Nota: Se o aparelho tiver estado armazenado ou se tiver sido deslocado numa posição não vertical, coloque-o numa posição vertical durante cerca de 12 horas antes de o colocar em funcionamento. Em caso de dúvida, efectue o procedimento na mesma. 1.
- Page 41 Funcionamento Painel de controlo O LED Refrigerante está ligado. O compressor está em funcionamento O LED Descongelação está ligado. A unidade está a descongelar, o compressor não está em funcionamento Botão Para cima Botão Para baixo Botão de descongelação manual Botão Set (Definição) Ligado desligado Ajuste da Temperatura...
-
Page 42: Resolução De Problemas
Chame o agente da POLAR ou um técnico qualificado Especificações técnicas Alimentação Corrente Capacidade Dimensões Peso Modelo Voltagem Refrigerante (Litros) A x L x P mm (kg) GL178 220-240V~ R600a 328 x 767 x 612 22,5 50Hz GL178_ML_A5_v4_20190730.indb 42 2019/7/30 13:29... -
Page 43: Cablagem Eléctrica
Cablagem eléctrica Deve-se utilizar tomadas adequadas para ligar a ficha do aparelho. O esquema de electricidade deste aparelho é o seguinte: • Cabo eléctrico (castanho) para o terminal marcado L • Cabo neutro (azul) para o terminal marcado N • Cabo terra (verde/amarelo) para o terminal marcado com E Este aparelho tem de estar ligado à... - Page 44 0845 146 2887 0800 – 29 1 29 040 – 2628080 0800 - 29 2 29 01 60 34 28 80 0800 – 1860806 901-100 133 vendas@nisbets.pt GL178_ML_A5_v4_20190730.indb 44 2019/7/30 13:29...
-
Page 45: Declaration Of Conformity
Tipo di apparecchiatura • Tipo de equipo • Tipo de equipamento Board Model • Modèle • Modell • Modello • Modelo • Malli GL178 Application of Council Directives(s) Low Voltage Directive (LVD) 2014/35/EC Toepassing van Europese Richtlijn(en) • Application de la/des EN 60335-1:2012 +A11:2014 +A13:2017 directive(s) du Conseil •... - Page 46 GL178_ML_A5_v4_20190730.indb 46 2019/7/30 13:29...
- Page 47 GL178_ML_A5_v4_20190730.indb 47 2019/7/30 13:29...
- Page 48 http://www.polar-refrigerator.com/ GL178_ML_A5_v4_20190730 GL178_ML_A5_v4_20190730.indb 48 2019/7/30 13:29...
Need help?
Do you have a question about the GL178 and is the answer not in the manual?
Questions and answers