Table of Contents
Advertisement
Quick Links
CONTENTS
SAFETY CONSIDERATIONS . . . . . . . . . . . . . . . . . . . 1
GENERAL . . . . . . . . . . . . . . . . . . . . . . . . . . . . . . . . . . . 2
INSTALLATION . . . . . . . . . . . . . . . . . . . . . . . . . . . . . . 2
Step 1 - Complete Pre-Installation Checks . . . . . . . 2
Step 2 - Rig and Place Unit . . . . . . . . . . . . . . . . . . 17
Step 4 - Install Return-Air Ductwork . . . . . . . . . . . 17
Step 5 - Check Return-Air Filters . . . . . . . . . . . . . 17
Step 6 - Make Condenser Connections . . . . . . . . 17
Step 7 - Install Condensate Drain Line . . . . . . . . . 17
Step 8 - Complete Electrical Connections . . . . . . 18
Step 9 - Install Piping . . . . . . . . . . . . . . . . . . . . . . . 21
Step 10 - Install Plenums (if Required) . . . . . . . . . 24
START-UP . . . . . . . . . . . . . . . . . . . . . . . . . . . . . . . . . 27
General . . . . . . . . . . . . . . . . . . . . . . . . . . . . . . . . . . . . 27
Compressor Rotation . . . . . . . . . . . . . . . . . . . . . . . . 27
Operating Sequence . . . . . . . . . . . . . . . . . . . . . . . . . 34
Water Regulating Valve . . . . . . . . . . . . . . . . . . . . . . 34
SERVICE . . . . . . . . . . . . . . . . . . . . . . . . . . . . . . . . . . 35
Cleaning Evaporator Coil . . . . . . . . . . . . . . . . . . . . . 35
Lubrication . . . . . . . . . . . . . . . . . . . . . . . . . . . . . . . . . 35
Indoor Fan Adjustment . . . . . . . . . . . . . . . . . . . . . . . 35
Pulley Alignment . . . . . . . . . . . . . . . . . . . . . . . . . . . . 35
Belt Tension Adjustment . . . . . . . . . . . . . . . . . . . . . 35
Changing Fan Wheel . . . . . . . . . . . . . . . . . . . . . . . . . 35
Fan Bearing Replacement . . . . . . . . . . . . . . . . . . . . 35
Concentric Alignment . . . . . . . . . . . . . . . . . . . . . . . . 35
Evaporator Motor Starter Setting (after Lockout/
Tagout) . . . . . . . . . . . . . . . . . . . . . . . . . . . . . . . . . . 36
MAINTENANCE . . . . . . . . . . . . . . . . . . . . . . . . . . . . . 37
Cleaning . . . . . . . . . . . . . . . . . . . . . . . . . . . . . . . . . . . 37
Inspection . . . . . . . . . . . . . . . . . . . . . . . . . . . . . . . . . 37
Condensate Drain . . . . . . . . . . . . . . . . . . . . . . . . . . . 37
Water-Cooled Condensers . . . . . . . . . . . . . . . . . . . . 37
Cleaning Heating Coils . . . . . . . . . . . . . . . . . . . . . . . 37
Cleaning Steam Coils . . . . . . . . . . . . . . . . . . . . . . . . 37
Checking System Charge . . . . . . . . . . . . . . . . . . . . . 38
Access Panel Removal . . . . . . . . . . . . . . . . . . . . . . . 38
Evaporator-Fan Motor Removal . . . . . . . . . . . . . . . . 38
Pressure Relief Device . . . . . . . . . . . . . . . . . . . . . . . 38
Manufacturer reserves the right to discontinue, or change at any time, specifications or designs without notice and without incurring obligations.
Catalog No. 04-53500265-01
Installation, Start-Up and
Service Instructions
Printed in U.S.A.
Indoor Self-Contained Systems
Current Protection Device . . . . . . . . . . . . . . . . . . . . .38
High and Low-Pressure Switches . . . . . . . . . . . . . .38
Page
Oil Charge . . . . . . . . . . . . . . . . . . . . . . . . . . . . . . . . . .38
TROUBLESHOOTING . . . . . . . . . . . . . . . . . . . . . . . .39
START-UP CHECKLIST . . . . . . . . . . . . . . . . . . . . .CL-1
SAFETY CONSIDERATIONS
Installing, starting up, and servicing air-conditioning components
and equipment can be dangerous. Only trained, qualified installers
and service mechanics should install, start-up, and service this
equipment.
When working on the equipment, observe precautions in the liter-
ature and on tags, stickers, and labels attached to the equipment.
Follow all safety codes. Wear safety glasses and work gloves.
Electrical shock can cause personal injury and death. Shut off
all power to this equipment during installation. There may be
more than one disconnect switch. Tag all disconnect locations
to alert others not to restore power until work is completed.
Use care in handling, rigging, and setting bulky equipment.
Personal injury could result.
DO NOT USE TORCH to remove any component. System
contains oil and refrigerant under pressure.
To remove a component, wear protective gloves and goggles
and proceed as follows:
a. Shut off electrical power to unit.
b. Recover refrigerant to relieve all pressure from system
using both high-pressure and low pressure ports.
c. Traces of vapor should be displaced with nitrogen and
the work area should be well ventilated. Refrigerant in
contact with an open flame produces toxic gases.
d. Cut component connection tubing with tubing cutter and
remove component from unit. Use a pan to catch any oil
that may come out of the lines and as a gage for how
much oil to add to the system.
e. Carefully un-sweat remaining tubing stubs when neces-
sary. Oil can ignite when exposed to torch flame.
Failure to follow these procedures may result in personal inju-
ry or death.
Form 50XCW-8SI
Pg 1
Omnizone™
50XCW06-24
Water-Cooled
WARNING
CAUTION
DANGER
11-19
Replaces: 50XCW-7SI
Advertisement
Table of Contents

Related Manuals for Carrier Omnizone 50XCW06


Summary of Contents for Carrier Omnizone 50XCW06
-
Page 1: Table Of Contents
Omnizone™ 50XCW06-24 Water-Cooled Indoor Self-Contained Systems Installation, Start-Up and Service Instructions CONTENTS Current Protection Device .....38 High and Low-Pressure Switches ....38 Page Oil Charge . -
Page 2: General
INSTALLATION CAUTION Omnizone 50XCW units are intended for indoor installation only. Determine building alterations required to run piping, wiring and DO NOT re-use compressor oil or any oil that has been ex- ductwork. Follow dimensional drawings for ductwork, piping lo- posed to the atmosphere. - Page 3 SIZE SIZE SUPPLY/ WATER WATER COND EVAP EVAPORATOR EVAP SUPPLY DUCT RETURN WIDTH HEIGHT DEPTH RETURN SUPPLY UNIT SECTION SECTION RETURN DUCT (Blower Opening) DIAMETER CONN CONN 50XCW (OD) 53.1 57.0 29.0 25.8 31.0 47.2 24.8 28.9 14.4 23.0 22.9 13.4 12.8 19.8...
- Page 4 WATER WATER COND EVAP EVAPORATOR EVAP SUPPLY DUCT SUPPLY/RETURN WIDTH HEIGHT DEPTH RETURN SUPPLY UNIT SECTION SECTION RETURN DUCT (Blower Opening) DIAMETER (OD) CONN CONN 50XCW 68.0 64.0 31.2 28.0 35.5 61.1 31.8 29.4 17.7 22.7 10.8 12.5 13.8 13.6 2.125 68.0 64.0...
- Page 5 WATER WATER COND EVAP EVAPORATOR EVAP SUPPLY DUCT SUPPLY/RETURN WIDTH HEIGHT DEPTH RETURN SUPPLY UNIT SECTION SECTION RETURN DUCT (Blower Opening) DIAMETER (OD) CONN CONN 50XCW 68.0 64.0 31.2 28.0 35.5 61.1 31.8 29.4 17.7 22.7 25.6 10.1 12.5 13.8 13.6 2.125 68.0...
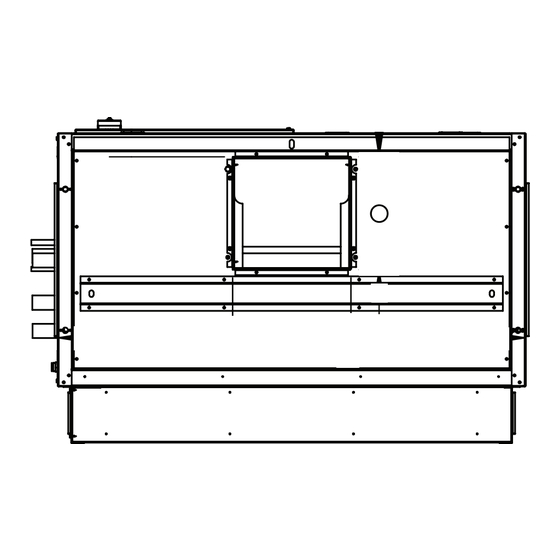
- Page 6 EVAP ACCESS PANEL CONTROL TOP VIEW DISCONNECT (OPT) FRONT VIEW 5.1 (1"-2" FLTR) 6.8 (4" FLTR) INDOOR SUPPLY AIR FLOW AIR FLOW 1.25 FILTER ACCESS CONTROL ENTRY (BOTH SIDES) 1.25 POWER ENTRY WATER RETURN CONDENSER ACCESS PANEL WATER SUPPLY 3/4" MPT DRAIN a50-8847 REAR VIEW RIGHT VIEW...
- Page 7 WATER WATER COND EVAP EVAPORATOR EVAP SUPPLY DUCT SUPPLY/RETURN WIDTH HEIGHT DEPTH RETURN SUPPLY UNIT SECTION SECTION RETURN DUCT (Blower Opening) DIAMETER (OD) CONN CONN 50XCW 68.0 64.0 31.2 28.0 35.5 61.1 31.8 29.4 17.7 22.7 10.8 12.5 13.8 13.6 2.125 68.0 64.0...
- Page 8 WATER WATER COND EVAP EVAPORATOR EVAP SUPPLY DUCT SUPPLY/RETURN WIDTH HEIGHT DEPTH RETURN SUPPLY UNIT SECTION SECTION RETURN DUCT (Blower Opening) DIAMETER (OD) CONN CONN 50XCW 68.0 64.0 31.2 28.0 35.5 61.1 31.8 29.4 17.7 22.7 25.6 10.1 12.5 13.8 13.6 2.125 68.0...
- Page 9 5.1 (1"-2" FLTR) 6.8 (4" FLTR) EVAP ACCESS PANEL (BOTH SIDES) AIR FLOW 1.25 CONTROL ENTRY FILTER ACCESS 1.25 POWER ENTRY WATER RETURN EVAP ACCESS PANEL 3/4" MPT DRAIN WATER SUPPLY TOP VIEW RIGHT VIEW CONTROL CONDENSER ACCESS PANEL DISCONNECT (OPT) FRONT VIEW REAR VIEW...
- Page 10 WATER WATER COND EVAP EVAPORATOR EVAP SUPPLY DUCT SUPPLY/RETURN WIDTH HEIGHT DEPTH RETURN SUPPLY UNIT SECTION SECTION RETURN DUCT (Blower Opening) DIAMETER (OD) CONN CONN 50XCW 88.0 66.7 31.2 31.2 35.5 81.0 31.8 33.2 5.5 17.8 22.8 10.7 4.2 12.5 13.8 8.5 13.5 11.7 2.625 88.0 70.8...
- Page 11 WATER WATER COND EVAP EVAPORATOR EVAP SUPPLY DUCT SUPPLY/RETURN WIDTH HEIGHT DEPTH RETURN SUPPLY UNIT SECTION SECTION RETURN DUCT (Blower Opening) DIAMETER (OD) CONN CONN 50XCW 88.0 66.7 31.2 31.2 35.5 81.0 31.8 33.2 5.5 17.8 22.8 25.6 10.1 12.5 13.8 8.5 13.5 11.7 2.625 88.0 70.8...
- Page 12 a50-8673 WATER WATER COND EVAP EVAPORATOR EVAP SUPPLY DUCT SUPPLY/RETURN WIDTH HEIGHT DEPTH RETURN SUPPLY UNIT SECTION SECTION RETURN DUCT (Blower Opening) DIAMETER (OD) CONN CONN 50XCW 88.0 66.7 31.2 31.2 35.5 81.0 31.8 33.2 5.5 17.8 22.8 24.0 8.9 12.5 13.8 8.5 13.5 11.7 2.625 88.0 70.8...
- Page 13 WATER WATER COND EVAP EVAPORATOR EVAP SUPPLY DUCT SUPPLY/RETURN WIDTH HEIGHT DEPTH RETURN SUPPLY UNIT SECTION SECTION RETURN DUCT (Blower Opening) DIAMETER (OD) CONN CONN 50XCW 88.0 66.7 31.2 31.2 35.5 81.0 31.8 33.2 5.5 17.8 22.8 10.7 4.2 12.5 13.8 2.6 13.5 11.7 2.625 88.0 70.8...
- Page 14 WATER RETURN WATER SUPPLY WATER WATER COND EVAP EVAPORATOR EVAP SUPPLY DUCT SUPPLY/RETURN WIDTH HEIGHT DEPTH RETURN SUPPLY UNIT SECTION SECTION RETURN DUCT (Blower Opening) DIAMETER (OD) CONN CONN 50XCW 88.0 66.7 31.2 31.2 35.5 81.0 31.8 33.2 5.5 17.8 22.8 25.6 10.1 12.5 13.8 2.6 13.5 11.7 2.625 88.0 70.8...
- Page 15 5.1 (1"-2" FLTR) 6.8 (4" FLTR) EVAP ACCESS PANEL (BOTH SIDES) AIR FLOW 1.25 FILTER ACCESS CONTROL ENTRY 1.25 POWER ENTRY EVAP ACCESS WATER RETURN PANEL WATER SUPPLY TOP VIEW 3/4" MPT DRAIN RIGHT VIEW CONTROL CONDENSER ACCESS DISCONNECT PANEL (OPT) FRONT VIEW REAR VIEW...
- Page 16 Table 1 — Physical Data UNIT 50XCW NOMINAL CAPACITY (tons) UNIT OPERATING WEIGHT (lb) 1137 1228 1228 1790 COMPRESSOR Scroll Compressor Model ZPS60 ZPS67 ZP54/ZP49 ZP61/ZP57 ZP91/ZP67 ZP122/ZP91 Steps of Control Operating Charge R-410A (lb) 11.7 13.8 17.2 19.7 EVAPORATOR FAN Adjustable, Belt-Drive, Centrifugal Type Nominal Cfm 1750...
-
Page 17: Step 2 - Rig And Place Unit
The units should use a “pair of pants” configuration as shown in the skid when unit is in the final position. See Fig. 14 for rigging Fig. 16. Refer to the Carrier System Design Manual or ASHRAE details. standards for the recommended duct connection to unit with 2 or more fans. -
Page 18: Step 8 - Complete Electrical Connections
NOTE: A = min. straight duct length Fig. 16 — Typical Fan Discharge Connections for Multiple Fan Units The 50XCW unit has a drain connection for evaporator conden- Step 8 — Complete Electrical Connections sate. When connecting condensate drains from the unit to floor GENERAL drains, sinks, or hoppers, connect drains downstream of trap to en- sure that condensate does not drain back into the unit. - Page 19 See Fig. 18. The fan switch on the thermostat will con- be covered by Carrier warranty. trol fan operations. All wiring must be in accordance with local or NEC (National Electrical Code) regulations.
- Page 20 Table 3 — Fan Electrical Data VOLTAGE MOTOR RANGE V-PH-Hz CODE 208/230-3-60 1.8/2.2 0.50 460-3-60 575-3-60 208/230-3-60 2.5/2.6 0.75 460-3-60 575-3-60 208/230-3-60 3.2/3.2 1.00 460-3-60 575-3-60 208/230-3-60 4.6/4.8 1.50 460-3-60 575-3-60 208/230-3-60 6.0/5.8 2.00 460-3-60 575-3-60 208/230-3-60 9.2/8.6 3.00 460-3-60 575-3-60 208/230-3-60 14.5/13.6...
-
Page 21: Step 9 - Install Piping
50XC (12 SIZE UNIT AND LARGER) UNIT GROUND WIRE NUT SHIELD (CUT AND TAPE BACK) RS+5 REMOTE ROOM SENSOR (P/N ZONECCORRS01) RS GND 33CS250-01 NOTE: Remote sensor is field-installed option. Fig. 18 — Typical Thermostat Wiring Connections The return air duct system should be carefully designed to get Step 9 —... - Page 22 RETURN RISER GATE VALVE SUPPLY RISER FLANGES OR UNION GAGE COCK GATE VALVE CONTROL VALVE (3-WAY SHOWN) CAP FOR BLOWOUT Fig. 19 — Typical Hot Water Coil Piping LEGEND Compressor Contactor — Outdoor-Fan Contactor — Crankcase Heater — Outdoor-Fan Motor —...
- Page 23 STEAM COIL PIPING Recommendations for Steam Coils See Fig. 21 and 22. Be sure to provide adequate support for the piping and design the lines for expansion and vibration. Do not reduce the pipe size on the coil return connection. Keep the same size through the dirt loop and make any reduc- tion in the branch to the trap.
-
Page 24: Step 10 - Install Plenums (If Required)
LEGEND Compressor Contactor — Low-Pressure Switch — Crankcase Heater — Outdoor-Fan Contactor — COMP — Compressor — Outdoor-Fan Motor Compressor Lockout — Outdoor-Fan Relay — DISC Disconnect — Terminal Block — Freeze Protection TRAN — Transformer — Ground — Terminal Block Connection High-Pressure Switch —... -
Page 25: Step 11 - Check Fan Sheave And Belt Alignment
Step 11 — Check Fan Sheave and Belt Align- ment Factory-supplied drives are pre-aligned and tensioned, however, Carrier recommends checking the belt tension and alignment be- fore starting the unit. Always check the drive alignment after ad- justing belt tension. - Page 26 See Fig. 26. Adjustable pitch drives are installed on the result in uneven stretching and a mismatched set of belts. motor shaft. Carrier recommends that adjustable sheaves Do not allow belt to bottom out in sheave. should only be used for initial balancing and be replaced with Tighten belts by turning motor-adjusting jackscrews.
-
Page 27: Start-Up
Solution: Set thermostat at a setting below room temperature. Com- pressor will start. If compressor suction pressure does not a. From Fig. 27 find that deflection force for type A, super drop and discharge pressure does not rise to normal levels at belt with 5-in. - Page 28 Table 4 — Evaporator Fan Performance — 50XCW06 Units ESP (in. wg) 0.00 0.10 0.20 0.30 0.40 0.50 0.60 0.70 0.80 0.90 Rpm Bhp Rpm Bhp Rpm Bhp Rpm Bhp Rpm Bhp Rpm Bhp Rpm Bhp Rpm Bhp Rpm Bhp Rpm Bhp 1500 0.19 0.24...
- Page 29 Table 5 — Evaporator Fan Performance — 50XCW08 Units ESP (in. wg) 0.00 0.10 0.20 0.30 0.40 0.50 0.60 0.70 0.80 0.90 Rpm Bhp Rpm Bhp Rpm Bhp Rpm Bhp Rpm Bhp Rpm Bhp Rpm Bhp Rpm Bhp Rpm Bhp Rpm Bhp 2200 0.27 0.39...
- Page 30 Table 6 — Evaporator Fan Performance — 50XCW12 Units ESP (in. wg) 0.00 0.10 0.20 0.30 0.40 0.50 0.60 0.70 0.80 0.90 Rpm Bhp Rpm Bhp Rpm Bhp Rpm Bhp Rpm Bhp Rpm Bhp Rpm Bhp Rpm Bhp Rpm Bhp Rpm Bhp 3000 0.26 0.33...
- Page 31 Table 7 — Evaporator Fan Performance — 50XCW14 Units ESP (in. wg) 0.00 0.10 0.20 0.30 0.40 0.50 0.60 0.70 0.80 0.90 Rpm Bhp Rpm Bhp Rpm Bhp Rpm Bhp Rpm Bhp Rpm Bhp Rpm Bhp Rpm Bhp Rpm Bhp Rpm Bhp 3500 0.30 0.46...
- Page 32 Table 8 — Evaporator Fan Performance — 50XCW16 Units ESP (in. wg) 0.00 0.10 0.20 0.30 0.40 0.50 0.60 0.70 0.80 0.90 Rpm Bhp Rpm Bhp Rpm Bhp Rpm Bhp Rpm Bhp Rpm Bhp Rpm Bhp Rpm Bhp Rpm Bhp Rpm Bhp 4500 0.53 0.69...
- Page 33 Table 9 — Evaporator Fan Performance — 50XCW24 Units ESP (in. wg) 0.00 0.10 0.20 0.30 0.40 0.50 0.60 0.70 0.80 0.90 Rpm Bhp Rpm Bhp Rpm Bhp Rpm Bhp Rpm Bhp Rpm Bhp Rpm Bhp Rpm Bhp Rpm Bhp Rpm Bhp 6,000 1.10 1.37...
-
Page 34: Operating Sequence
13. When complete, Press EXIT. Operating Sequence All units require the addition of a thermostat accessory package to 14. Press EXIT until the status menu is visible (HZ, PSI, PSI). complete the control circuit. The sequence of operation may vary depending on which package is selected. -
Page 35: Service
loosen motor mounting bracket from unit. Adjust belt tensioning SERVICE bolts until proper belt tension is obtained. Cleaning Evaporator Coil Changing Fan Wheel Do not use high-pressure water or air. Damage to fins may result. If a fan wheel should fail, it may be replaced as follows: Clean coils with a vacuum cleaner, fresh water, compressed air, or a bristle brush (not wire). -
Page 36: Evaporator Motor Starter Setting
On the starter, adjust the Motor Overload to match the FLA Rating of the installed motor by turning the Overload Set- point wheel to the appropriate value. See Fig. 31. Evaporator and condenser motor FLA ratings are listed in Table 12. On the starter, turn the Motor Overload Reset wheel to M-O (referred to as Manual Reset). -
Page 37: Maintenance
Proper water treatment can minimize tube fouling and pitting. If PUMP PRIMING such conditions are anticipated, water treatment analysis is recom- CONN mended. Refer to the Carrier System Design Manual, Part 5, for SUCTION general water conditioning information. SUPPLY PUMP... -
Page 38: Checking System Charge
For best results wash coils from discharge side and wash back to- Table 13 — Subcooling Temperature ward the fan or unit return filters. Clean coils with a vacuum cleaner, fresh water, compressed air, or a bristle brush (not wire). UNIT 50XCW SUBCOOLING* Backflush coil to remove debris. -
Page 39: Troubleshooting
TROUBLESHOOTING Refer to Table 14 to determine the possible cause of the problem and the associated procedure necessary to correct it. See Fig. 34 and 35 for typical wiring. Table 14 — Troubleshooting Procedure PROBLEM POSSIBLE CAUSE CORRECTION PROCEDURE Check power source. Loss of unit power Check fuses, circuit breakers, disconnect switch. - Page 40 Table 14 — Troubleshooting Procedure (cont) PROBLEM POSSIBLE CAUSE CORRECTION PROCEDURE Discharge pressure is low See Discharge Pressure Too Low section of this table above. Low thermal load Check building load. Low refrigerant Check for and repair leaks and add refrigerant as necessary. Clean filter.
- Page 41 DISC1 IFC/IFR 208/230V 100/BLK 103/BLK 106/BLK 101/BLK 104/YEL 107/YEL 109/GRN 60 Hz 102/BLK 105/BLU 108/BLU CLO1-Loop COMP1 118/BLK 121/BLK 119/YEL 122/YEL 124/GRN 120/BLU 123/BLU 125/BLK 126/BLK CLO2-Loop COMP2 127/BLK 130/BLK 128/YEL 131/YEL 133/GRN 129/BLU 132/BLU 134/BLK 135/BLK TRAN1 150/BLK 500/BRN 240V 208V 151/YEL...
- Page 42 ECON-LLT Continued on Line Voltage Diagram 504/RED 601/RED 509/BRN 604/BRN 510/BLK 603/YEL 602/BLU 608/PNK 507/ORN LPS1 HPS1 FRZ1 CLO1 LOGIC CLO2 ECON LOGIC 609/PNK 629/PNK 608/PNK 628/PNK 605/BLU 625/BLU 604/BRN 624/BRN 574/BRN 603/YEL 623/YEL 602/BLU 622/BLU 601/RED 620/RED 572/RED CHANGEOVER Jump1 Jump2 ECON VALVE...
- Page 46 © 2019 Carrier Corporation Manufacturer reserves the right to discontinue, or change at any time, specifications or designs without notice and without incurring obligations. Catalog No. 04-53500265-01 Printed in U.S.A. Form 50XCW-8SI Pg 46 11-19 Replaces: 50XCW-7SI...
-
Page 47: Start-Up Checklist
START-UP CHECKLIST (Fill out this form on start up and file in job folder) NOTE: To avoid injury to personnel and damage to equipment or property when completing the procedures listed in this start-up checklist, use good judgment, follow safe practices, and adhere to the safety considerations/information as outlined in preceding sec- tions of this Installation, Start-Up and Service document. - Page 48 SUPPLY FAN AMPS: NOTES: _______________________________________________________________________________________ _______________________________________________________________________________________________ _______________________________________________________________________________________________ _______________________________________________________________________________________________ © 2019 Carrier Corporation Manufacturer reserves the right to discontinue, or change at any time, specifications or designs without notice and without incurring obligations. Catalog No. 04-53500265-01 Printed in U.S.A. Form 50XCW-8SI...
Need help?
Do you have a question about the Omnizone 50XCW06 and is the answer not in the manual?
Questions and answers