Advertisement
Quick Links
Trilennium
Locking System
Replacement Instructions
TOOLS REQUIRED:
• Screwdriver or Drill
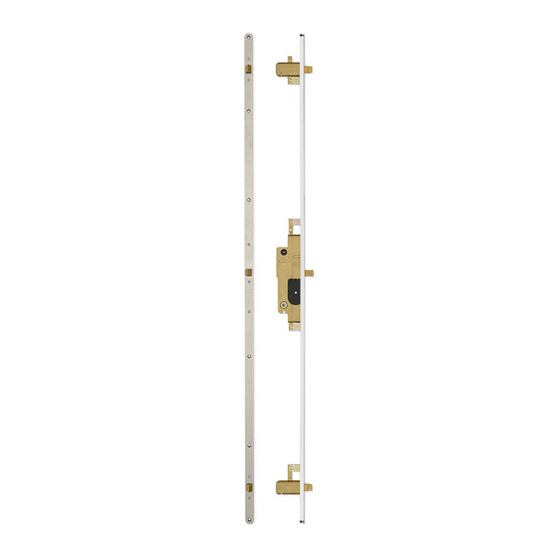
KIT INCLUDES:
• Trilennium
3000 Multi-Point Lock
®
• Mounting Screws
STEP 1: REMOVE THE EXISTING LOCK, IF PRESENT, FROM THE ACTIVE DOOR PANEL
Note: You must first remove the handle or grip lever before removing the lock.
* 6/8 Lock shown- longer
locks will have more
screws.
Phillips
Head
Screws
Phillips
Head
Screws
SKU: BD-INST-TRIL3000
Revised: 03.14.2017
3000 Multi-Point
®
Loosen the screws that secure the
lock on the panel and remove the
existing lock. Clear out any debris
that may be in the exposed channel.
You do not need to remove the torx-
head screws.
!
Use caution while loosening the
screws, as without the securing
screws the lock may fall out.
8817 West Market Street, Colfax, NC 27235
800.334.2006 Fax: 336.668.4478
www.enduraproducts.com
1
Advertisement

Related Manuals for Endura Trilennium 3000

Summary of Contents for Endura Trilennium 3000
- Page 1 Trilennium 3000 Multi-Point ® Locking System Replacement Instructions TOOLS REQUIRED: • Screwdriver or Drill KIT INCLUDES: • Trilennium 3000 Multi-Point Lock ® • Mounting Screws STEP 1: REMOVE THE EXISTING LOCK, IF PRESENT, FROM THE ACTIVE DOOR PANEL Note: You must first remove the handle or grip lever before removing the lock. * 6/8 Lock shown- longer locks will have more screws.
- Page 2 STEP 2: INSTALL NEW LOCK Place the new lock face out into the channel. Ensure the lock faceplate is flush with the panel. Screw the lock in using the screws provided. NOTES: • Check that the latch bevel faces the strikes on the jamb and is the same as the one that you are removing •...
Need help?
Do you have a question about the Trilennium 3000 and is the answer not in the manual?
Questions and answers