Table of Contents
Advertisement
Advertisement
Table of Contents

Subscribe to Our Youtube Channel
Related Manuals for FORESIGHT SIM-IN-A-BOX EAGLE PLUS PACKAGE


Summary of Contents for FORESIGHT SIM-IN-A-BOX EAGLE PLUS PACKAGE
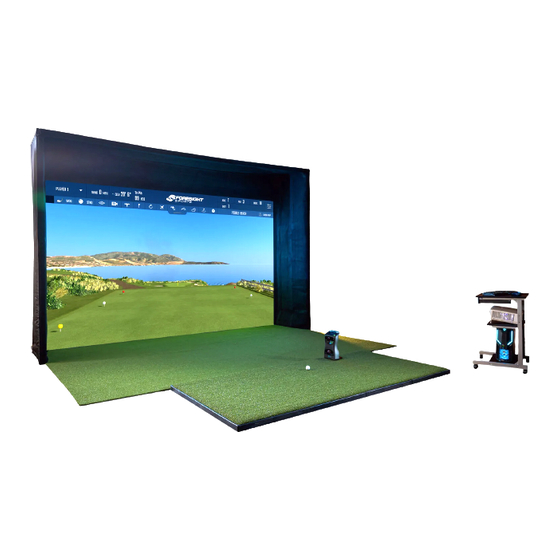
- Page 1 ASSEMBLY INSTRUCTIONS EAGLE PLUS / BIRDIE PACKAGE Version 1.1...
- Page 2 BEFORE YOU GET STARTED THANK YOU for purchasing our SIM-IN-A-BOX package. We're sure this package will provide you with years of enjoyment. Before getting started with assembly, please confirm the following to ensure your safety and those using your simulator: Measure and confirm you have enough space to safely install and play.
- Page 3 CONTENTS INSIDE THE BOX COMPONENTS ∙ (1) Frame Assembly System ∙ (1) Front (Hitting) Screen ∙ (1) Back Screen ∙ (2) Inner Walls ∙ (2) Outer Wall Covers ∙ (1) Lid Panel ∙ (1) Above Screen Panel ∙ (1) Blackout Panel ∙...
- Page 4 REQUIRED TOOLS & ITEMS REQUIRED TOOLS (NOT INCLUDED) ∙ (2) 6-8' Ladders RECOMMENDED TOOLS (NOT INCLUDED) ∙ Impact Drill with 3/8" Impact Adapter ∙ Snips for cutting Zip Ties ∙ Work Gloves ∙ Eye Protection Glasses ASSEMBLY INSTRUCTIONS EAGLE PLUS / BIRDIE PACKAGE VERSION 1.1 PAGE 4...
- Page 5 T A B L E O F C O N T E N T S STEP 1: FRAME ASSEMBLY ....Page 6 STEP 2: TURF & SCREEN .
- Page 6 STEP 1: FRAME ASSEMBLY Sim-in-a-Box Installation Guide Step One: Locate the ONE (1) Left Base (Grey Fiberglass) and the ONE (1) Rear Base Find the Red/Purple/Light Pink Left Base (Grey Fiberglass) (Horizontal) and connect to the Light Pink/Dark Blue Rear Base Left Corner Support (Black Steel) (Horizontal). Left Corner Support (Black Steel).
- Page 7 Step Two: STEP 1: FRAME ASSEMBLY Connect the Light Pink/Dark Blue Rear Base Left Corner Support (Black Steel - No Velcro) (Horizontal) to the Dark Blue/Dark Blue Rear Base Middle Support (Black Steel - No Velcro) (Horizontal). Locate the ONE (1) Rear Base Middle Support (Black Steel / No Velcro) Rear Base Middle Suppprt Connect to the step 1 assembly at the corners marked with the DARK BLUE color code using the bolts and nuts pre-attached to the Rear Base Left Corner Support.
- Page 8 STEP 1: FRAME ASSEMBLY Step Three: Connect the Dark Blue/Dark Blue Rear Base Middle Support (Black Steel - No Velcro) (Horizontal) to the Dark Blue/Tan Rear Base Right Corner Support (Black Steel - No Velcro) (Horizontal). Locate the ONE (1) Rear Base Right Corner Support (Black Steel / No Velcro) Rear Base Right Corner Support Connect to the step 2 assembly at the corners marked with the DARK BLUE color code using the bolts and nuts pre-attached to the Base Right Corner Support.
- Page 9 STEP 1: FRAME ASSEMBLY Step Four: Connect the Dark Blue/Tan Rear Base Right Corner Support (Black Steel - No Velcro) (Horizontal) to the Red/Purple/Tan Right Base (Grey Fiberglass) (Horizontal). Locate the ONE (1) Right Base (Grey Fiberglass). Right Base Connect to the step 3 assembly at the corners marked with the TAN color code using the bolts and nuts pre-attached to the Right Base.
- Page 10 Step Five: Connect One Purple/Light Blue Rear Right Side Wall Bottom Support (Grey Fiberglass) (Vertical) to the Red/Purple/Tan Right Base (Grey Fiberglass) (Horizontal). Then, connect One Purple/Light Blue Rear Left Side Wall Bottom Support (Grey Fiberglass) (Vertical) to the Red/Purple/Light Pink Left Base (Grey Fiberglass) STEP 1: FRAME ASSEMBLY (Horizontal).
- Page 11 Fiberglass) (Vertical) to the Red/Purple/Light Pink Left Base (Grey Fiberglass) (Horizontal). STEP 1: FRAME ASSEMBLY The frame assembly should now look like this: ASSEMBLY INSTRUCTIONS EAGLE PLUS / BIRDIE PACKAGE VERSION 1.1 PAGE 11...
- Page 12 Step Six: Step Six: Step Six: Connect the Pink/Light Blue Rear Right Side Wall Top Support (Grey Fiberglass) Connect the Pink/Light Blue Rear Right Side Wall Top Support (Grey Fiberglass) Connect the Pink/Light Blue Rear Right Side Wall Top Support (Grey Fiberglass) (Vertical) to the Purple/Light Blue Rear Right Side Wall Bottom Support (Grey (Vertical) to the Purple/Light Blue Rear Right Side Wall Bottom Support (Grey (Vertical) to the Purple/Light Blue Rear Right Side Wall Bottom Support (Grey...
- Page 13 Step Seven: Connect the White/Dark Blue Rear Top Frame Left Corner Support (Black Steel - With STEP 1: FRAME ASSEMBLY Velcro) (Horizontal) to the Dark Blue/Dark Blue Rear Top Frame Middle Support (Black Steel - With Velcro) (Horizontal). Then, connect the Dark Blue/Dark Blue Rear Top Frame Middle Support (Black Steel - With Velcro) (Horizontal) to the Dark Blue/Pink Rear Top Frame Right Corner Support Locate the THREE (3) Rear Top Frame Support components (Black Steel with Velcro).
- Page 14 REQUIRED FOR THIS STEP STEP 1: FRAME ASSEMBLY pport (Black Steel - With e Middle Support (Black Attach the assembled Rear Top Frame Support to the main assembly le Support (Black Steel - as illustrated using the pre-attached bolts and nuts. e Right Corner Support pport (Black Steel - With e Middle Support (Black...
- Page 15 REQUIRED FOR THIS STEP Step Nine: Connect the White/Yellow Left Top Side Frame Support (Grey Fiberglass) (Horizontal) to the White/Light Blue Rear Left Side Wall Top Support (Grey Fiberglass) (Vertical). STEP 1: FRAME ASSEMBLY Step Nine: Then, connect the Pink/Green Right Top Side Frame Support (Grey Fiberglass) Connect the White/Yellow Left Top Side Frame Support (Grey Fiberglass) (Horizontal) to (Horizontal) to the Pink/Light Blue Rear Right Side Wall Top Support (Grey Fiberglass) the White/Light Blue Rear Left Side Wall Top Support (Grey Fiberglass) (Vertical).
- Page 16 Step Ten: Connect One Red/Light Blue Front Right Side Wall Bottom Support (Grey Fiberglass) (Vertical) to the Red/Purple/Tan Right Base (Grey Fiberglass) (Horizontal). REQUIRED FOR THIS STEP Then, connect One Red/Light Blue Front Left Side Wall Bottom Support (Grey Fiberglass) (Vertical) to the Red/Purple/Light Pink Left Base (Grey Fiberglass) (Horizontal).
- Page 17 Then, connect the White/Yellow Left Top Side Frame Support (Grey Fiberglass) Then, connect the White/Yellow Left Top Side Frame Support (Grey Fiberglass) (Horizontal) to the Yellow/Light Blue Front Left Side Wall Top Support (Grey Fiberglass) (Horizontal) to the Yellow/Light Blue Front Left Side Wall Top Support (Grey Fiberglass) Step Six: (Vertical).
- Page 18 Step Twelve: Connect the Yellow/Black Front Top Frame Left Corner Support (Grey Fiberglass) STEP 1: FRAME ASSEMBLY (Horizontal) to the Black/Black Front Top Frame Middle Support (Grey Fiberglass) (Horizontal). Then, connect the Black/Black Front Top Frame Middle Support (Grey Fiberglass) (Horizontal) to the Black/Green Front Top Frame Right Corner Support (Grey Fiberglass) Locate the THREE (3) Front Top Frame Support components (Black Steel with Velcro).
- Page 19 port (Grey Fiberglass) (Vertical). Then, connect the Pink/Green Right Top Side Frame Support (Grey Fiberglass) Support (Grey Fiberglass) (Horizontal) to the Green/Light Blue Front Right Side Wall Top Support (Grey Fiberglass) t (Grey Fiberglass) Connect the Green/Light Blue Front Right Side Wall Top Support (Grey Fiberglass) (Vertical).
- Page 20 STEP 2: TURF & SCREEN Locate the Interior Turf Roll and place it inside the assembled frame. NOTE: Make sure the assembled frame and interior turf are in their final playing position. ASSEMBLY INSTRUCTIONS EAGLE PLUS / BIRDIE PACKAGE VERSION 1.1 PAGE 20...
- Page 21 REQUIRED FOR THIS STEP STEP 2: TURF & SCREEN Locate the Mesh Screen Backing and the Top Attachment Cord. Attach the Top Attachment Cord to the frame by placing the hook into the steel eye hook located on the inside top of the rear LEFT support as shown. ASSEMBLY INSTRUCTIONS EAGLE PLUS / BIRDIE PACKAGE VERSION 1.1 PAGE 21...
- Page 22 REQUIRED FOR THIS STEP STEP 2: TURF & SCREEN Unfold the Mesh Screen Backing and thread the Top Attachment Cord through the top row of grommet holes STARTING WITH THE SECOND HOLE as shown. Thread the Top Attachment Cord through all grommet holes BUT NOT the final grommet hole. Make sure the vertical strips of velcro are facing...
- Page 23 REQUIRED FOR THIS STEP STEP 2: TURF & SCREEN Attach the Top Attachment Cord to the frame by placing the hook into the steel eye hook located on the inside top of the rear RIGHT support as shown. Tighten the Top Attachment Cord by pulling on the loose end located on the left side. The included pulley system will prevent the cord from loosening once pulled.
- Page 24 REQUIRED FOR THIS STEP STEP 2: TURF & SCREEN With the Top Attachment Cord pulled tight and the Mesh Screen Backing spread out evenly, locate the two (2) provided Zip Ties and secure the OUTER grommet holes of the Mesh Screen Backing to the steel eye hooks holding the Top Attachment Cord on each side of the frame.
- Page 25 REQUIRED FOR THIS STEP STEP 2: TURF & SCREEN Locate the long Zip Tie provided and place it around both the center of the Rear Top Frame Support and the Top Attachment Cord as illustrated below. Use Zip Tie to raise the Mesh Screen Backing until it is LEVEL with both sides, and then secure as shown.
- Page 26 REQUIRED FOR THIS STEP STEP 2: TURF & SCREEN Secure the Mesh Screen Backing to the Frame Assembly by attaching the vertical velcro edges on each side of the Mesh Screen Backing to the vertical velcro edges on the back of the both rear frame support columns.
- Page 27 REQUIRED FOR THIS STEP STEP 2: TURF & SCREEN Using the provided wire feeder, feed the Bottom Attachment Cord through the bottom edge sleeve of the Mesh Screen Backing as illustrated. Tie the Bottom Attachment Cord securely to the lower LEFT steel eye hook, then pull the cord on the RIGHT until there is a small amount of tension on the cord before securing to the lower RIGHT steel eye hook.
- Page 28 REQUIRED FOR THIS STEP STEP 2: TURF & SCREEN It is now time to attach the Hitting Screen to the Mesh Screen Backing. To begin, first unfold the Hitting Screen and align the upper right hand corner to the velcro strips on the upper right hand corner of the Mesh Screen Backing and press firmly.
- Page 29 REQUIRED FOR THIS STEP STEP 3: EXTERIOR PANELS Locate the (1) Outer Lid Panel and attach to the outside top of the Frame Assembly using the velcro strips on each end. Align flush with the SIDES and BACK of the Frame Assembly. Once the Lid Panel is properly aligned and secure, remove the protective strip covering the velcro running along the (under side) front edge.
- Page 30 REQUIRED FOR THIS STEP STEP 3: EXTERIOR PANELS Pull the front edge of the Outer Lid Panel over and around the front bar of the Frame Assembly with even pressure and secure it to the underside surface using the velcro strip. ASSEMBLY INSTRUCTIONS EAGLE PLUS / BIRDIE PACKAGE VERSION 1.1 PAGE 30...
- Page 31 REQUIRED FOR THIS STEP STEP 3: EXTERIOR PANELS Locate the (2) Inner Side Panels. Attach the LEFT Inner Side Panel to the inside top left of the Frame Assembly using the velcro strip. Align the lid panel flush with the BACK edge of the Frame Assembly.
- Page 32 REQUIRED FOR THIS STEP STEP 3: EXTERIOR PANELS Pull the front edge of the Inner Side Panel over and around the side bar of the Frame Assembly with even pressure and secure it to the outside surface using the velcro strip. REPEAT Steps 2A - 2C with the RIGHT Inner Side Panel.
- Page 33 REQUIRED FOR THIS STEP STEP 3: EXTERIOR PANELS Locate the (1) Above Screen Panel and attach to the top edge of the Hitting Screen using the velcro strip, aligning flush with the top edge of the hitting screen as illustrated below. Once the Above Screen Panel is properly aligned and secured to the top edge of the Hitting Screen, remove the protective strips covering the velcro running along the front and side edges.
- Page 34 REQUIRED FOR THIS STEP STEP 3: EXTERIOR PANELS Starting in the center, attach the Above Screen Panel to the Lid Panel using the velcro strip, being careful to keep the edge straight and smooth as you move to each corner. Secure the side strips of velcro to the Inner Side panels to insure a tight, smooth fit.
- Page 35 REQUIRED FOR THIS STEP STEP 3: EXTERIOR PANELS Locate the (2) Outer Side Panels. Starting at the top, attach the LEFT Outer Side Panel to the outside top left of the Frame Assembly using the velcro strip. Align the panel flush with all edges before attaching the panel down the front and back edges, being careful to keep the edges straight and smooth as you move downward.
- Page 36 REQUIRED FOR THIS STEP STEP 3: EXTERIOR PANELS Locate the (1) Blackout Panel and move it to the back side of the frame assembly. Starting at one end, attach the Blackout Panel to the outside top corner of the Frame Assembly using the velcro strip.
- Page 37 STEP 4: COMPONENT SETUP Locate the second (outer) Turf Roll and unroll & position it in front of the first (inner) Turf Roll. ASSEMBLY INSTRUCTIONS EAGLE PLUS / BIRDIE PACKAGE VERSION 1.1 PAGE 37...
- Page 38 STEP 4: COMPONENT SETUP Follow the separately included instructions for the assembly of the Hitting Mat. Follow the separately included instructions for the assembly of the Rolling Computer Cart. ASSEMBLY INSTRUCTIONS EAGLE PLUS / BIRDIE PACKAGE VERSION 1.1 PAGE 38...
- Page 39 STEP 4: COMPONENT SETUP Place the Rolling Computer Cart in the correct position based on player handedness. RIGHT-HANDED Player Position (most common) LEFT-HANDED Player Position (less common) ASSEMBLY INSTRUCTIONS EAGLE PLUS / BIRDIE PACKAGE VERSION 1.1 PAGE 39...
- Page 40 STEP 4: COMPONENT SETUP Place the computer, Mouse/Keyboard, and Projector on the Rolling Computer Cart as shown. Then connect the following: ∙ Connect the projector to the Computer using the provided HDMI cable. ∙ Connect the Wireless Mouse/Keyboard to the Computer via BlueTooth. ∙...
- Page 41 STEP 4: COMPONENT SETUP Place the Launch Monitor on the Hitting Mat. Using a measurring tape, find the center line of the Turf & Hitting Mat. Placement of the launch monitors should be: from screen from centerline GCQuad 9' 5" 1' 10"...
- Page 42 STEP 4: COMPONENT SETUP Connect the Launch Monitor to the Computer using the provided USB Cord. Connect the Launch Monitor to a power source using the provided Power Cord. GCQuad Additional Connection Options If your package comes with the GCQuad, you may also connect to the computer via Ethernet or WiFi.
- Page 43 STEP 4: COMPONENT SETUP Power ON the Launch Monitor, Computer, and Projector. ASSEMBLY INSTRUCTIONS EAGLE PLUS / BIRDIE PACKAGE VERSION 1.1 PAGE 43...
- Page 44 STEP 4: COMPONENT SETUP With the Projector on and projecting an image, move the Rolling Computer Cart toward the Hitting Screen until the image covers ALL FOUR CORNERS of the screen. ASSEMBLY INSTRUCTIONS EAGLE PLUS / BIRDIE PACKAGE VERSION 1.1 PAGE 44...
- Page 45 STEP 4: COMPONENT SETUP Use the Projector’s included remote to calibrate the projector, including aligning the corners of the projected image with the screen (using the KEYSTONING feature). ASSEMBLY INSTRUCTIONS EAGLE PLUS / BIRDIE PACKAGE VERSION 1.1 PAGE 45...
- Page 46 SOFTWARE SETUP Power on the computer and navigate to the Windows desktop. Locate the Foresight Sports Software icon on the desktop and double click to launch. Important! If you FSX Live username and password had been created and provided to your Foresight Sports representative, then we have activated your software and assigned your courses to your username.
- Page 47 Launch the Foresight Sports Software. PLEASE NOTE: This software requires internet access to validate. Internet access will also allow your software to communicate to the Foresight cloud for additional FSX LIVE features. If you do not have regular internet access, you may setup your software to utilize offline hours using these instructions: www.foresightsports.com/fsx-2018-offline-hours-activation...
- Page 48 With the Launch Monitor now connected, you may begin navigating and using the software. For detailed information on the FSX software, please use the resources below: FSX Live User Guide: www.foresightsports.com/fsx-2018-user-manual Foresight Fairgrounds: www.foresightsports.com/foresight-fairgrounds-user-manual All support information can be found by scanning the QR Code below: www.foresightsports.com/library ASSEMBLY INSTRUCTIONS EAGLE PLUS / BIRDIE PACKAGE VERSION 1.1...
Need help?
Do you have a question about the SIM-IN-A-BOX EAGLE PLUS PACKAGE and is the answer not in the manual?
Questions and answers