Table of Contents
Advertisement
Advertisement
Table of Contents

Related Manuals for FORESIGHT GCQuad


Summary of Contents for FORESIGHT GCQuad
- Page 1 USER GUIDE...
- Page 2 We listened to what you wanted - and created the most accurate, versatile and game-enhancing ball and club analysis solution available today. The GCQuad is designed to deliver years of trusted, reliable performance. From range practice to full immersion simulation, whether for education or entertainment, the GCQuad will truly change your game.
-
Page 3: Table Of Contents
INCLUDED TABLE OF WITH YOUR CONTENTS FEATURE OVERVIEW GCQUAD GETTING STARTED SYSTEM OPTIONS PERFORMANCE BALL PLACEMENT & HITTING GCQuad Power Adapter/Cable USB Type-C PACKAGE APPLYING CLUB MARKER Quadrascopic System Cable Input 100-240VAC/50-60 Hz Output 15VDC/2.4 Amps TARGET ALIGNMENT CONNECTING THE... -
Page 4: System Options
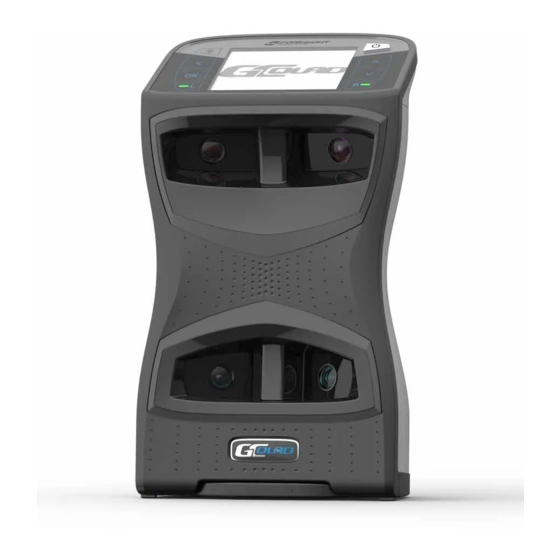
BACK FRONT OVERVIEW CARRYING HANDLE POWER BUTTON Turns device on/off POWER LED INDICATOR Indicates whether the GCQuad is LCD DISPLAY receiving power through the power Displays ball placement graphic, adapter ball and club data, and system options menu POWER PORT... - Page 5 Used to access Main Menu RIGHT HANDED TRACKING Deployed to provide stability on and select system options uneven surfaces Switches GCQuad to right handed LEFT HANDED TRACKING tracking mode, indicated by the blinking LED BATTERY Switches GCQuad to left handed...
- Page 6 POWER ON/OFF SETUP STARTED To properly use the GCQuad, place the device upright on a level surface approximately 22” away from the hitting area. If a hitting mat is used, make sure the device is raised to the same level as the hitting surface.
- Page 7 SYSTEM NAVIGATING THE MENU OPTIONS SCREEN OPTIONS The GCQuad Menu Options screen is accessible by selecting the OK key. The Main Menu consists of 5 options: Club Tracking, Target Alignment, Settings, Diagnostics, and About. Use the ar- row keys to select an option and the OK key to enter a screen.
- Page 8 CLUB TRACKING OFF When club tracking is turned on, When club tracking is turned off, the GCQuad will track both the the GCQuad will track only the golf ball and golf club (with the golf ball. In this mode, the device club markers applied).
- Page 9 TARGET ALIGNMENT SETTINGS The target alignment screen Settings options can be navigated shows the current alignment via the cursor keys and changed configuration of the device. If via the OK key. Once a setting is alignment has been adjusted via changed, it will be automatically the FSS Alignment Stick, the new saved once the screen is exited.
- Page 10 The first arrow keys. The first (defualt) (defualt) diagnostics screen about screen displays the shows battery information, GCQuad model, serial number, available flash memory, and firmware build version, date of shot/session information. manufacture, and hardware version.
-
Page 11: Ball Placement & Hitting
Too many balls detected mately 22” from the front of the Ball Ball & More than one ball is detected in the GCQuad, and the zone varies in size Only Club zone, excess balls should be removed. de-pending on the mode. The zone is approximately 14”... -
Page 12: Applying Club Marker
Place club marker at the desired location In order to capture club data • ATTACK ANGLE on the clubface, adhesive side down with the GCQuad, club markers • SWING PATH Clean the clubface with an must be applied to the clubface. - Page 13 FOUR MARKER Count the club’s score lines to determine the vertical center of the clubface. PLACEMENT FOR CLUB Note: For clubs with an even number of score lines, VERTICAL CENTER SCORE the vertical face center will be between the center LINE two score lines.
- Page 14 FOUR MARKER From the bottom of the club, count score lines up to find the approximate vertical hitting center. PLACEMENT FOR IRONS Carefully apply the first two markers between the sixth and seventh score lines at the toe and heel, keeping both markers level with each other.
- Page 15 SINGLE DRIVERS FAIRWAYS & recommended HYBRIDS MARKER placement PLACEMENT horizontal center For best results, place the marker high on the clubface and as close to the horizontal center as possible. IRONS & PUTTERS recommended placement horizontal center...
-
Page 16: Target Alignment
The new alignment angle will be shown on the LCD screen. Target alignment can be adjusted up to 10° on the GCQuad via the FSS Alignment Stick. To adjust alignment, place the FSS Alignment Stick in the GCQuad hitting zone and align to your Alignment can be viewed and reset at any target. -
Page 17: Battery Care
Firmly press on the blue battery release levers in the direction REMOVE indicated on the battery BATTERY Once battery is released, gently remove from the device IMPORTANT! Do not use the USB Type-C or Power Cables provided on ANY devices other than GCQuad. - Page 18 IMPORTANT! Your GCQuad battery should be fully discharged and recharged at least once a month. This includes batteries DEPLOY INSERT in storage, as well as batteries in GCQuad devices operating on BATTERY KICKSTAND LOCK continuous AC power. BATTERY...
-
Page 19: Safety
• The GCQuad uses four digital cameras that are precisely calibrated. Do not drop or subject the device to any impacts that may cause shock. • After use, always store the GCQuad in a safe, dry, and dust-free environment. - Page 20 Foresight Sports may have patents, patent applications, trademarks, copyrights, or other intellectual property rights covering subject matter in this document. Except as expressly provided in any written license agreement from Foresight Sports, the furnishing of this document does not give you any license to these patents, trademars,...
- Page 21 FORESIGHTSPORTS.COM...
Need help?
Do you have a question about the GCQuad and is the answer not in the manual?
Questions and answers