
Summary of Contents for MAKO TOOLS SROM 1197
- Page 1 Instruction Manual 250mm BENCH SAW Model SROM 1197 Our tool range has you covered for DIY. Whatever the job, make light work of it with MAKO tools.
- Page 2 This warranty excludes all Mako accessories, which are covered by their own appropriate warranties. MAKO TOOLS ARE FOR DIY USE ONLY. THEY ARE NOT DESIGNED OR APPROVED FOR INDUSTRIAL OR COMMERCIAL USE.
-
Page 9: Table Of Contents
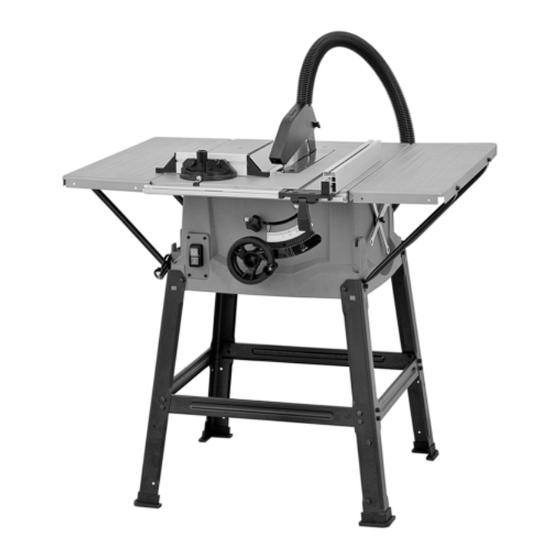
CONTENTS: 1. Safety Instructions and Warnings 8. Using the Saw 2. Components 9. Operation 3. Proper Usage 10. Replacing the Power Cable 4. General Safety Instructions 11. Maintenance & Cleaning 5. Specific Safety Instructions 12. Technical Data 6. Before Starting the Saw 13. -
Page 10: Safety Instructions And Warnings
SAFETY INSTRUCTIONS AND WARNINGS: The equipment complies with the safety regulations required for electrical equipment. Read through the instructions for use before starting up the equipment. Improper use can lead to personal Injury and properly damage. Persons who are not familiar with the instructions may not operate the equipment. -
Page 11: Proper Usage
PROPER USE: This machine is designed for ripping and crosscutting wood and plastic in sizes corresponding to the machine size. It is not suitable for cutting firewood or round-wood. Use only saw blades which are suitable for the machine. Do not use cutting discs. The manufacturer assumes no liability whatsoever for improper use, or if the machine has been tampered with. -
Page 12: Specific Safety Instructions
• Never overload the machine. If the speed drops, unload the machine or switch it off. You will work safer and better with the appropriate electric tool in a specific area of application. • Stop the workpiece from turning, for example with a clamping device or a vice. Don’t work on any workpiece that is too small to clamp in place. - Page 13 • Wear hearing protection. The generation of noise is influenced by various factors, including the characteristics of saw blades, condition of saw blade and electric tool. Use saw blades which were designed for reduced noise development, insofar as possible. • In times of non-use keep the push stick or the push block with the electrical power tool in its holder at all times.
-
Page 14: Assembly
• Observe the maximum speed. The maximum speed specified on the multi-piece blade or cutter head may not be exceeded. If specified, observe the speed range. • Confirm the motor/saw blade direction of rotation. • Do not use any multi-piece blades or cutter heads with cracks. Discard them. Repairs are not permitted. - Page 15 7.2 Fitting & removing the Saw Blade Guard – Fig 3 Mount the Saw Blade Guard (2) on the Riving Knife (5) so that the screw fits through the hole (18) in the Riving Knife. Do not tighten the screw (15) too far – the Saw Blade Guard must be able to move freely. To remove the Saw Blade Guard, proceed in reverse order.
-
Page 16: Using The Saw
• Align the Table Width Extensions (33) level with the Saw Table. • Finally, tighten all Screws (a). Connect the supplied dust collection hose to the top of the Saw Guard and to the side branch of the Tee fitting at the lower rear of the saw body. USING THE SAW 8.1 ON/OFF switch - Fig. -
Page 17: Operation
• Turn the Cross Slide (14) until the arrow points to the angle required. • Retighten the Pivot Clamp/Handle (20). 8.5 Setting the Saw Blade angle - Fig. 14 Undo the Adjusting and Locking Nut (9). Turn the Hand Wheel to set the desired angle on the scale. Lock the Adjusting and Locking Nut again in the required angle position. -
Page 18: Replacing The Power Cable
9.1.3 Making bevel cuts - Fig. 14 & 22 Bevel cuts must always be used using the Rip Fence (7). • Set the Saw Blade (4) to the desired angle. (See 8.5.) • Set the Rip Fence (7) according to the workpiece width and height (see 8.3.1) •... -
Page 19: Technical Data
TECHNICAL DATA This machine is double insulated. Voltage 230-240V, 50Hz Rating: 1800W No Load Speed: 3000rpm Saw blade: 250mm x 30 x 3.2 mm, 48T Angle or mitre bench: - -45º/0°/+45° 0ºx0º: 310mm x 70mm cutting size 0°x45°: 310mm x 42mm “...
Need help?
Do you have a question about the SROM 1197 and is the answer not in the manual?
Questions and answers