Table of Contents
Advertisement
Quick Links
Download this manual
See also:
User Manual
Advertisement
Table of Contents

Related Manuals for Fora D10


Summary of Contents for Fora D10
- Page 1 FORA D10 BLOOD GLUCOSE PLUS BLOOD PRESSURE MONITORING SYSTEM English 311-3224100-006 Version 4.0 2012/12...
- Page 2 Thank you for choosing BLOOD GLUCOSE PLUS BLOOD PRESSURE MONITORING SYSTEM This product can assist you in monitoring your blood glucose level as well as your blood pressure. You can visit our website www.foracare.com/usa to view other updated instructions or product information. This owner’s manual contains important information that you must know about your system.
-
Page 3: Important Safety Precautions
IMPORTANT SAFETY PRECAUTIONS READ BEFORE USE ● Users need to adhere to Standard Precautions when handling or using this device. All parts of the glucose monitoring system should be considered potentially infectious and are capable of transmitting blood-borne pathogens between patients and healthcare professionals. - Page 4 1. Use this device ONLY for the intended use described. 2. Do NOT use accessories which are not specified by the manufacturer. 3. Do NOT use the device if it is not working properly or if it is damaged. 4. Do NOT use the equipment in places where aerosol sprays are being used, or where oxygen is being administered.
-
Page 5: Table Of Contents
BEFORE USE Battery Installation and Replacement Setting the Monitor BLOOD GLUCOSE MEASUREMENT Important Information Checking with FORA Control Solution Important Control Solution Information Performing a Control Solution Test Testing Your Blood Glucose Reading Your Result Comparing Monitor and Laboratory Results... - Page 6 BLOOD PRESSURE MEASUREMENT Suggestions Before Measuring Correct Application of the Pressure Cuff Testing Your Blood Pressure MONITOR MEMORY Viewing Results on the Monitor Viewing the Average Blood Glucose Results Viewing Results on a Personal Computer TAKING CARE OF YOUR MONITOR & STRIPS Caring for Your Meter Storage TROUBLESHOOTING...
-
Page 7: Before You Start
BEFORE YOU START Warnings and Precautions The FORA D10 system is designed for use on individuals age 16 and above. It shall NOT be used under any circumstances on newborns, infants or persons who cannot communicate. This device does NOT serve as a cure for any symptoms or diseases. -
Page 8: Detailed Information
Detailed Information Reference Values Blood glucose monitoring plays an important role in diabetes con- trol. A long-term study showed that keeping blood glucose levels close to normal can reduce the risk of diabetes complications by up to 60%* . The results provided by this system can help you and your healthcare professional monitor and adjust your treatment plan to gain better control of your diabetes. - Page 9 Blood Pressure Clinical studies show that the diabetes in adult is often accompa- nied by elevated blood pressure. People with diabetes can reduce their heart risk by managing their blood pressure along with dia- betes treatment* . Knowing your blood pressure patterns can help determine whether or not your body is in good condition.
-
Page 10: About This System
ABOUT THIS SYSTEM Intended Use The FORA D10 system is a 2 in 1 system designed to measure blood glucose outside of human body and to measure blood pres- sure non-invasively. It is intended for use in the home and in clinical settings. -
Page 11: Principle Of Measurement
Principle of Measurement Blood glucose is based on the measurement of electrical current generated by the reaction of glucose with the reagent of the strip. The monitor measures the current and displays the corresponding blood glucose level. The strength of the current produced by the reaction depends on the amount of glucose in the blood sample. -
Page 12: Alternative Site Testing
Alternative Site Testing (AST) Important: There are limitations for doing AST (Alternative Site Testing). ● AST results should not be used for CGM calibration. ● AST results should not be used for insulin dosing calculations. Please consult your healthcare professional before you begin AST. - Page 13 We strongly recommend you perform AST ONLY during the follow- ing intervals: • In a pre-meal(more than 2 hours since the last meal) or fasting state. • Two or more hours after taking insulin. • Two or more hours after exercise. Do NOT use AST if: •...
-
Page 14: Content Of The System
Quick start user guide The products have been designed, tested, and proven to work to- gether as a system to produce accurate blood glucose test results. Use only FORA D10 test strips and FORA control solution with your FORA D10 Monitor. NOTE •... -
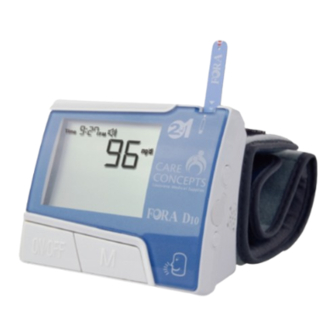
Page 15: Appearance And Key Function Of The Monitor
Appearance and Key Function of the Monitor Test Slot is where you insert test strip. Talking Symbol indicates that the monitor has speaking function. M Button is used to enter memory and assist setting. ON/OFF Button is a power button for blood pressure measurement. -
Page 16: Lcd Screen
LCD Screen Voice Symbol Memory Mode Symbol Blood Drop Symbol Temperature Symbol Test Strip Symbol Test Result & Error Message Good Symbol Day Average Result Systolic Pressure Pulse Rate Units for Blood Glucose Battery Symbol Units for Blood Pressure Ketone Indicator Diastolic Pressure Code Control Mode Symbol... -
Page 17: Test Strip
Test results might be wrong if the contact bar is not fully inserted into the test slot. NOTE The FORA D10 monitor should only be used with FORA D10 Test Strips. Using other test strips with this meter can produce inaccurate results. -
Page 18: Before Use
BEFORE USE Battery Installation and Replacement Use ONLY 1.5V AAA size alkaline batteries for best performance and optimal lifespan. When the power is getting low, the monitor will remind you by dis- playing two different messages: 1. Battery Symbol “ ”... - Page 19 Make sure the monitor is off when replacing the batteries. Step1 Press the buckle on battery cover and lift up to remove cover. Step2 Replace with two new 1.5V AAA alkaline batteries. Align the posi- tive and negative terminals of the batteries with the positive (+) and negative (-) signs engraved inside the battery compartment and close...
-
Page 20: Setting The Monitor
Setting the Monitor Time, date, units, memory deletion and speaking function (optional) can be set in the monitor. Two keys are involved: Set button and M button. Step1 Step3 Step5 Press the Set but- Press the M button Time flashes. Follow ton to start setting. - Page 21 Step7 Memory flashes. • If you’d like to skip this step, press the Set button to next. • If you’d like to delete memory, press theM button again so that “dEL” and will both flash. Press the M button again to delete ALL memory.
- Page 22 Please remember: • Number can be advanced faster by holding down the M button. • While setting speaking volume, number 0 indicates that the speak- ing function is off. “ ” will not display. Numbers 1 to 7 indi- cate speaking volume from low to high. They will be displayed together with “...
-
Page 23: Blood Glucose Measurement
BLOOD GLUCOSE MEASUREMENT Important Information 1. Severe dehydration and excessive water loss may cause inac- curate results. If you believe you are suffering from severe dehydra- tion, consult a healthcare professional immediately. 2. If your blood glucose results are lower or higher than usual, and you do not have symptoms of illness, first repeat the test. -
Page 24: Checking With Fora Control Solution
Checking with FORA Control Solution FORA control solution contains a known amount of glucose that re- acts with test strips. By comparing your control solution test results with the expected range printed on the test strip vial label, you can ensure that the monitor and the test strips are working together as a system and that you are performing the test correctly. -
Page 25: Important Control Solution Information
36°F-86°F (2°C-30°C). Do not freeze. NOTE The control solution range printed on the test strip vial is for FORA control solution only. It is used to test evaluate monitor and test strip performance. It is not recommended range for your blood glucose level. -
Page 26: Performing A Control Solution Test
Performing a Control Solution Test Step1 Take a test strip out with clean, dry hands first. Step2 Insert the Test Strip to Turn On the Me- ter. Insert the test strip into the meter and wait for the meter to display “ ”... - Page 27 get another drop and place the drop on the top of the cap. Step5 Apply control solution. While holding the monitor, move the absorbent hole of the test strip to touch the drop of control solution. Then the drop will be automati- cally drawn into the test strip.
- Page 28 Out-of-range results If test results fall outside the printed range, check the “Operating Problem” section in troubleshooting guide and repeat the test. If your results continue to be out-of-range, the system may not be working properly. Do NOT test your blood. Please contact the Cus- tomer Service at 1-888-307-8188, 1-866-469-2632 for help.
-
Page 29: Testing Your Blood Glucose
Testing Your Blood Glucose Potential Biohazard! Healthcare professionals using this system on multiple patients should follow the infection control procedure approved by their facil- ity. All products or objects which come in contact with human blood, even after cleaning, should be handled as if capable of transmitting viral diseases. - Page 30 We recommend you perform disinfection procedures between each patient. Please refer to the section Cleaning and Disinfection Pro- cedures for complete instructions. After disinfection, used gloves should be removed and hands washed before proceeding to the next patient. Please refer to the following practice guidelines for more information about the correct procedure: ●...
- Page 31 Please follow the suggestions below before obtaining a drop of blood: ● Wash and dry your hands before starting. Put on a new pair of gloves. ● Rub the puncture site for about 20 seconds before penetration. ● Select the puncture site either at the fingertips. ●...
- Page 32 Step1 Insert the test strip Take a test strip out with clean and dry hands. Insert test strip face up with contact bars end first into the test slot. The monitor will turn on automatically. The LCD screen will display the sequences shown below. A flashing “...
- Page 33 Step2 Get a drop of blood. Select the puncture site (either the finger or an alternative site). Clean the puncture site with 70% alcohol cotton and let it air dry. ► Fingertip testing Hold the lancing device firmly against the side of your finger.
- Page 34 Step3 Apply blood into the test strip. When “ ” flashes on the display, hold and touch the absorbent hole of test strip to the drop of blood until the confirma- tion window is completely filled. Step4 Read a result. Your test result, along with Date/ Time, appears after the monitor counts down to 0.
-
Page 35: Reading Your Result
Reading Your Result Your glucose test result comes along with indicators that transfer special messages for your reference. MESSAGE WHAT IT MEANS ACTION Appears when your result This indicates hypoglyce- is below measurement mia (low blood glucose.) limit, which is less than 20 You should immediately mg/dL. -
Page 36: Comparing Monitor And Laboratory Results
Comparing Monitor and Laboratory Results The meter provides you with whole blood equivalent results. The result you obtain from your monitor may differ somewhat from your laboratory result due to normal variation. Monitor results can be af- fected by factors and conditions that do not affect laboratory results in the same way. - Page 37 cose level from a finger stick can be up to 70 mg/dL(3.9 mmol/L) higher than blood drawn from a vein (venous sample) used for a test.* Therefore, it is best to fast for eight hours before doing comparison tests. Factors such as the amount of red blood cells in the blood (a high or low hematocrit) or the loss of body fluid (severe dehydration) may also cause a meter result to differ from a laboratory result.
-
Page 38: Blood Pressure Measurement
BLOOD PRESSURE MEASUREMENT Suggestions Before Measuring 1. Avoid caffeine, tea, alcohol, and smoking for at least 30 minutes before measurement. 2. Wait 30 minutes after exercising or bathing before measurement. 3. Sit down for at least 10 minutes before measuring. 4. -
Page 39: Correct Application Of The Pressure Cuff
Correct Application of the Pressure Cuff Slide the cuff onto your wrist. Wrap the cuff comfortably around your wrist. The top margin of the monitor should be 0.6 cm to 1.3 cm (1/4 to 1/2 inch) about 0.6 cm to 1.3 cm (1/4 to 1/2 inch) be- below the ball of thumb low the ball of thumb. -
Page 40: Testing Your Blood Pressure
Testing Your Blood Pressure Step1 Sit down for at least 10 minutes before measurement. Step2 Apply the wrist cuff according to page Step3 Press the ON/OFF button and place your arm in front of your chest. Relax and make sure the device is at the same height as your heart. - Page 41 After reaching the cuff pressure , the cuff will begin to deflate. You will see number decreasing and “ ” flashing on the dis- play. Step5 Read a result. The monitor displays the systolic pressure, diastolic pressure and heart rate, along with Date/Time. Press ON/OFF button to turn off.
-
Page 42: Monitor Memory
MONITOR MEMORY Your monitor stores the 450 most recent results, in addition to cal- culating their average. Please follow the steps listed below to review these results. View Results on the Monitor Step1 When the monitor is off, press and release the M button. “01” appears first, followed by the lat- est recall of blood glucose/pres- sure measurements and their... -
Page 43: Viewing The Average Blood Glucose Results
View the Average Blood Glucose Results Step1 When the monitor is off, press the M button for 3 seconds. The 7-day average of blood glucose The average of glucose tests. results appears first. The average was calculated from the test results over the last 7 days. -
Page 44: Viewing Results On A Personal Computer
Care System Software and an interface cable are required before installation. This software can be downloaded from the home page of FORA Care. The interface cable is an optional accessory. Please contact the Customer Service at 1-888-307-8188, 1-866-469-2632 for help. - Page 45 Follow the instructions provided in the software to transmit data (re- sults along with dates and times). Remove the cable and the moni- tor will automatically turn off. Please remember: The monitor is unable to perform a blood glucose or blood pressure test while connecting to the PC.
-
Page 46: Taking Care Of Your Monitor & Strips
TAKING CARE OF YOUR MONITOR & STRIPS To avoid the meter and test strips getting dirt, dust or other contami- nants, please wash and dry your hands thoroughly before use. Caring for Your Meter To avoid the meter and test strips attracting dirt, dust or other con- taminants, please wash hands thoroughly with soap and water be- fore and after use. - Page 47 We recommend using the disinfecting wipes/towelettes below for meter cleaning and disinfection because the active ingredients have been tested to be effective against Hepatitis B Virus (HBV) for FORA blood glucose meter. Micro-Kill+™ (Micro-Kill Plus™) by Medline (EPA Reg. No.
- Page 48 and disinfection cycles per day over 5 years, the expected life of the device. The meter should be replaced after the validated number of clean- ing and disinfection cycles or the warranty period, whichever comes first. • Stop using the meter if you see any signs of deterioration, for example: LCD display cracks or becomes cloudy, buttons no longer function, or outer casing cracks.
- Page 49 NOTE • Do NOT clean and disinfect the meter while performing tests. • Please follow the instructions on the package label of Micro-Kill+™ disin fecting wipe. • If the meter is being operated by a second person, the meter and lancing device should be decontaminated prior to use by the second person.
-
Page 50: Storage
Storage 1. Monitor Storage • Storage condition: -4°F to 140°F (-20°C to 60°C), below 95% rela tive humidity. • Avoid dropping the monitor. • Avoid direct sunlight. • Always store or transport the monitor in its original storage case. • Do not disassemble, modify or try to repair the monitor or wrist cuff by yourself. - Page 51 • Store test strip packages in a cool, dry place. Keep away from direct sunlight and heat. • After removing a test strip from the vial, imme- diately replace the vial cap and close it tightly. • Touch the test strip with clean, dry hands. •...
-
Page 52: Troubleshooting
TROUBLESHOOTING If you follow the action recommended but the problem persists, or error messages other than the ones below appear, please call your local customer service. Do not attempt to repair by yourself. Error Message MESSAGE CAUSE WHAT TO DO Batteries are dead. - Page 53 MESSAGE CAUSE WHAT TO DO Unable to detect systolic Refit cuff tightly and pressure. correctly. Relax and repeat Unable to detect diastolic measurement. pressure. Cuff pressure is insufficient. Used strip insertion. Repeat the test with a new strip. Weak pulse. Refit cuff tightly and cor- rectly, relax and repeat Cuff leakage.
-
Page 54: Problem In Operation
Problem in Operation 1. Blood Glucose Measurement What happened? The monitor does not display a message after inserting a test strip. POSSIBLE CAUSE WHAT TO DO Batteries exhausted. Replace the batteries. Batteries incorrectly installed or Check to see if the batteries are absent. - Page 55 What happened? The test does not start after applying the sample. POSSIBLE CAUSE WHAT TO DO Insufficient blood sample. Repeat the test with a new test strip and a larger sample. Defective test strip. Repeat the test with a new test strip.
- Page 56 What happened? If the control solution test result is out of range. POSSIBLE CAUSE WHAT TO DO Error in performing the test. Read the instructions thoroughly and repeat the test. Control solution vial shaken poorly. Shake the control solution vigor- ously and repeat the test again.
- Page 57 2. Blood Pressure Measurement What happened? No display after pushing the “ ” button. POSSIBLE CAUSE WHAT TO DO Batteries exhausted. Replace the batteries. Batteries incorrectly installed or Check that the batteries are cor- absent. rectly installed. What happened? Heart rate is higher/lower than user’s average. POSSIBLE CAUSE WHAT TO DO Moving during measurement.
- Page 58 What happened? A result is higher/lower than user’s average measurement. POSSIBLE CAUSE WHAT TO DO May be not in correct position while Adjust to the correct position to measuring. measure. Blood pressure naturally varies from Keep in mind for next measure- time to time.
-
Page 59: Specifications
SPECIFICATIONS Device name: FORA D10 Power source: Two 1.5V AAA size alkaline batteries Size of monitor w/o cuff: 6.3(L) x 7.5(W) x 4.0(H) cm Weight of monitor w/o cuff and batteries: 158g Memory: 450 measurement results with date& time Power saving: Automatic power off if idle for 3 minutes System operating condition: 50°F to 104°F(10°C to 40°C), below 85% R.H. - Page 60 Performance characteristics Accuracy Within ±15 mg/dL (0.83 mmol/L) at glucose concentration < 75 mg/dL (4.2 mmol/L) and within ±20% at glucose concentration ≥ 75 mg/dL (4.2 mmol/L). Precision CVs (%) of intermediate precision and repeatability are less than 5%. The product has been tested to meet the requirements of ISO 15197.
Need help?
Do you have a question about the D10 and is the answer not in the manual?
Questions and answers