
Related Manuals for ZKaccess ZKTeco OP-200


Summary of Contents for ZKaccess ZKTeco OP-200
- Page 1 OP200 Quick Start Guide QUICK START GUIDE Applicable Model: OP-200 Version: 1.2 Date: May 2019...
-
Page 2: Table Of Contents
OP200 Quick Start Guide Contents Safety Precautions ............................... 1 1 Appearance & installation & wiring..................... 2 1.1 Features ..............................2 1.2 Pin Layout ............................. 3 1.3 Dimensions & Installation ......................4 1.4 Power Connection.......................... 5 1.5 Ethernet Connection ........................6 1.6 RS485 Connection .......................... - Page 3 OP200 Quick Start Guide 7.2.2 Configuring the Firefox Browser ................35 7.3 OP-200 Webserver settings ...................... 38 7.3.1 Login Web Server ......................38 7.3.2 Name the Readers ......................39 7.3.3 Set Card formats ......................39 7.3.4 Configure Door Settings .................... 40 7.3.5 Reader Input and Output settings..............
-
Page 4: Safety Precautions
OP200 Quick Start Guide Safety Precautions Before installation, please read the following precautions carefully to prevent the risks of danger to the users of this product or those nearby and damaging the device. Do not expose to direct sunlight, water, dust and soot. Do not place any magnetic objects near the device. -
Page 5: Appearance & Installation & Wiring
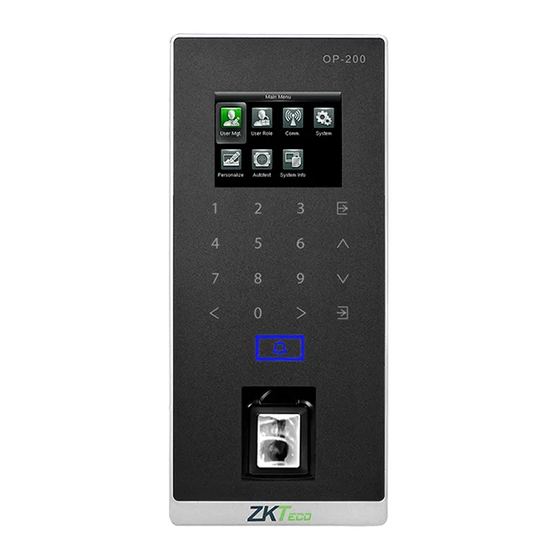
OP200 Quick Start Guide 1 Appearance & installation & wiring 1.1 Features Front view Left side view 2.4-inch color screen USB port Touch keypad Reset button LED indicator Fingerprint sensor & Card reader Right side view Bottom view Security screw holes (for securing the device onto its back plate) Speaker... -
Page 6: Pin Layout
OP200 Quick Start Guide 1.2 Pin Layout Back view 4 Pin cable connectors _Ethernet 11 Pin cable connectors 2 Pin cable connectors _Power in Tamper switch... -
Page 7: Dimensions & Installation
OP200 Quick Start Guide 1.3 Dimensions & Installation Front view Left side view Back view 7.70 in 7.34 in (195.5 mm) (186.5 mm) 0.51 in 3.43 in 3.0 in 1.38 in (13 mm) (87 mm) (76.1mm) (35mm) Mounting the device on Wall Fix the back plate on the wall using wall mounting screws. -
Page 8: Power Connection
OP200 Quick Start Guide 1.4 Power Connection Without PoE +12V 12V DC Adaptor (supplied with OP-200) With PoE (Optional) Power + Data Recommended power supply: 12V DC, at least 750mA (per OP-200) -
Page 9: Ethernet Connection
OP200 Quick Start Guide 1.5 Ethernet Connection LAN Connection... -
Page 10: Rs485 Connection
OP200 Quick Start Guide 1.6 RS485 Connection OSDP Connection 485A 485B Controller panel Important Notes: 1. For RS485 communication use shielded twisted pair wire. 2. To minimize chance of signal interference with RS485 communication, it’s recommended using a bus topology instead of star topology. 3. -
Page 11: Wiegand Output Connection
OP200 Quick Start Guide 1.7 Wiegand Output Connection GLED WD1 GND Controller panel... -
Page 12: Standard Installation
OP200 Quick Start Guide 1.8 Standard Installation TCP/IP Wiegand/OSDP... -
Page 13: Op-200 Primary Configuration
OP200 Quick Start Guide 2 OP-200 Primary Configuration 2.1 Communication Settings Press > Main Menu > Comm. Settings > Network Settings to configure. The Parameters below are the factory default values. Please configure the parameters for the actual network. IP Address: 192.168.1.201 Subnet Mask: 255.255.255.0 Gateway: 192.168.1.1 DNS: 8.8.8.8... -
Page 14: Primary/Secondary Settings
OP200 Quick Start Guide 2.3 Primary/Secondary Settings Click Main Menu > Comm. Settings > Primary/ Secondary Settings. Turn on Primary Device, the device will be used as primary reader, the following data will be same as Comm Settings, it doesn’t need change. 2.4 Backup to USB Flash drive Insert the USB disk to the reader, click Main Menu >... -
Page 15: Op-200 Secondary Configuration
OP200 Quick Start Guide 3 OP-200 Secondary Configuration 3.1 Comm. Settings Press > Main Menu > Comm. Settings > Network Settings to configure. Set the IP of secondary readers. 3.2 Primary/Secondary Settings Click Main Menu > Comm. Settings > Primary/ Secondary Settings. Turn off Primary Device;... -
Page 16: Administrator Settings
OP200 Quick Start Guide 4 Administrator Settings 4.1 Enroll an administrator After enrolling the administrator, the user needs administrator verification to enter the main menu. An administrator can enroll ten fingerprints and one card. 4.1.1 Enroll FP Press > > >... -
Page 17: Delete An Administrator
OP200 Quick Start Guide 4.2 Delete an administrator 4.2.1 Delete FP administrator > > After verification, click Main Menu Device Settings Admin > Settings Enroll FP, select the finger you want to delete, then click “Yes” to delete administrator’s fingerprint. 4.2.2 Delete Card administrator >... -
Page 18: Lenel-Onguard Configuration
OP200 Quick Start Guide 5 Lenel-OnGuard configuration 5.1 OnGuard Opera Installation Extract the ZKOperaHostInstall zip file and run setup from ZKOperaHostInstall- \DISK1 folder. The installation is currently simple and self-explanatory. When asked to choose a platform, select Lenel for a Lenel integration. -
Page 19: Basic Lenel Onguard Configuration
OP200 Quick Start Guide 5.2 Basic Lenel OnGuard Configuration All OnGuard related configuration is for OnGuard DataConduIT support and is not specific to Opera at all. DataConduIT is the OnGuard feature which allows 3rd party applications, such as the ZK Opera Service, to integrate with OnGuard via the Windows Management Instrumentation (WMI) interface. - Page 20 OP200 Quick Start Guide 2. Link the user account that you want to use automatic single sign-on to a directory account. (For more information please refer to “Link a User Account to a Directory Account” in the Users Folder chapter of the OnGuard System Administration User Guide.) Each OnGuard software manual contains the “Log into the Application Using Single Sign-On”...
- Page 21 OP200 Quick Start Guide The LS DataConduIT service must also be configured to run under the same account. In the OnGuard System Administration application, in the Administration \ System Options page, make sure that Generate software events is checked and make sure that the host name of the Linkage Server is configured. It is simplest to run the Linkage Server on the same machine as the main OnGuard server machine.
- Page 22 OP200 Quick Start Guide Make sure that the LS DataConduit and LS Linkage Server OnGuard services are running.
-
Page 23: Onguard Configuration Necessary To Receive Opera Events In Onguard
OP200 Quick Start Guide 5.3 OnGuard Configuration Necessary to Receive Opera Events in OnGuard In OnGuard System Administration, go to the Additional Hardware \ DataConduIT Sources page and create a DataConduIT source called Opera. It is important that Opera is the Name given. DataConduIT is based on names. A DataConduIT Device can be created underneath the Opera source for each OP-200 in the system. -
Page 24: Zk Opera Service Configuration
OP200 Quick Start Guide 5.4 ZK Opera Service Configuration The ZK Opera Service configuration tool is used to specify the Host and Port of the primary OP-200 to communicate with. This can also be used to configure credentials to communicate with a remote DataConduIT. However, it is simplest if OnGuard DataConduIT and Opera are installed on the same machine. -
Page 25: Zk Opera Service
OP200 Quick Start Guide a Windows Account with SSO capability to Lenel OnGuard and with DataConduIT authority. When Resync on service start is checked, the service will do a full re-sync with the OnGuard database every time it starts up. This can be checked to ensure full synchronization if the ZK Opera Service is ever down when OnGuard changes are made. -
Page 26: Troubleshooting
OP200 Quick Start Guide The service may then be started. 5.6 Troubleshooting The Opera Configuration application also has a Status tab which shows:... - Page 27 OP200 Quick Start Guide The status of the ZK Opera Service (Started, stopped, etc. Whether the configuration application is able to communicate with that service for additional status and actions. Whether a “Resync” between the OnGuard data and the service’s data is in progress, and the ability to initiate a manual sync.
- Page 28 OP200 Quick Start Guide made, logging similar to the following is logged indicating a good connection: 015-12-17 09:54:02,193 [5] INFO Z9.Drivers.Lenel.OnGuardDriver Registering for SoftwareEvents in OnGuard... 2015-12-17 09:54:30,201 [5] INFO Z9.Drivers.Lenel.OnGuardDriver SoftwareEvents registered 2015-12-17 09:54:30,210 [5] INFO Z9.Drivers.Lenel.OnGuardDriver Initial sync of Creds From OnGuard...
- Page 29 OP200 Quick Start Guide There is also a log file relating to the connection between the ZK Opera Service and the primary OP200 that can be viewed for troubleshooting purposes. It is the daemon.log in C:\Program Files(x86)\ZKTeco\Opera \z9-1.0-SNAPSHOT-dist-zkoperaserver\log Make sure it is really trying to connect to the OP-200 at the address and port that you think it should be as in this example setup, where a primary OP200 is at address 192.168.201.222 and listens for connections on port 9846.
-
Page 30: Op-200 Connect Lenel Software
OP200 Quick Start Guide 6 OP-200 Connect Lenel Software 6.1 Start the OnGuard software, local at the “System Tree” 6.2 Click the “Hardware” to add one “Access Panel” 6.3 Add OP-200 (1) In “Additional Hardware”, click “Data Conduit Sources... ” , then add “DataConduIT Sources”:... - Page 31 OP200 Quick Start Guide (2) Add “DataConduIT OP-200s”:...
- Page 32 OP200 Quick Start Guide Note: The name you enter here must match the name entered on the OP-200. (3) Start the “ZKOperaHostlnstall” middleware, add the IP address of OP-200 to the host, default Port: 9864, click “Save”. (4) Click “Cardholders” to start user enrollment:...
- Page 33 OP200 Quick Start Guide Note: You have to assign the door access rights.
-
Page 34: Op-200 Primary Settings On Webserver
OP200 Quick Start Guide OP-200 Primary Settings on Webserver 7.1 Install the SilkID driver Find Setup – ZKBIOOnline SDK application program to install. -
Page 35: Configuration Of Silkid Driver For Ssl (Optional)
OP200 Quick Start Guide 7.2 Configuration of SilkID driver for SSL (Optional) 7.2.1 Certificate Installation Installing the Client: xmzkteco.local.cer is bound with the domain name 127.0.0.1. Therefore, use 127.0.0.1 when calling the HTTPS interface. Installing the Certificate: 1. Double-click xmzkteco.local.cer, and install the certificate. - Page 36 OP200 Quick Start Guide 2. Install the certificate for all the users. 3. Install the certificate to [Trusted Root Certification Authorities].
- Page 37 OP200 Quick Start Guide 4. Complete the installation.
-
Page 38: Configuring The Firefox Browser
OP200 Quick Start Guide 7.2.2 Configuring the Firefox Browser Firefox of a higher version requires extra configuration of the certificate. 1. Access the Firefox options. - Page 39 OP200 Quick Start Guide 2. Display the certificate settings. 3. Add the server exception.
- Page 40 OP200 Quick Start Guide 4. Add the server address to the exception. ZKBIOOnline exception settings: ISSOnline exception settings:...
-
Page 41: Op-200 Webserver Settings
OP200 Quick Start Guide 7.3 OP-200 Webserver settings 7.3.1 Login Web Server a. Connect the controller to the network or PC, start the browser, enter the IP address of the reader. Then you can visit the Web Server. b. When Web Server is used, “User Name“ and “Password“ should be set firstly. The default “username”... -
Page 42: Name The Readers
OP200 Quick Start Guide 7.3.2 Name the Readers Choose Configuration > Opera Readers > Primary OP200 > Edit > In Edit Opera Reader Interface, you can Configure the Reader’s name > Save. 7.3.3 Set Card formats Choose Configuration > Card Formats > Create Card Format > enter Card Format date >... -
Page 43: Configure Door Settings
OP200 Quick Start Guide 7.3.4 Configure Door Settings Choose Configuration > Doors > Door > Edit to set verification mode. - Page 44 OP200 Quick Start Guide...
-
Page 45: Reader Input And Output Settings
OP200 Quick Start Guide 7.3.5 Reader Input and Output settings Reader Input: Choose Configuration > Doors > Door > Door-Door Reader Input > Edit to choose Card Formats. You can set card format which you want the reader to support here. - Page 46 OP200 Quick Start Guide Reader Output: Choose Configuration > Doors > Door > Door- Reader Output > Edit to choose Card Formats. You can set the format of Wiegand output here.
-
Page 47: Backup Database
OP200 Quick Start Guide 7.3.6 Backup Database Back up the server data or configuration data of the device to the device. Choose > Administration > Backups > Backup Now, the device backup the data (user data and network settings) immediately. - Page 48 OP200 Quick Start Guide Download: Download data to computer. Delete: Delete data from the host ( reader). primary Restore and restart: Select the backup data, you can restore it. If the backup data has been downloaded to your pc, then you first upload the backup data as following.
-
Page 49: Personnel Management & Fingerprint Registration
OP200 Quick Start Guide 7.3.7 Personnel management & fingerprint registration User Management Choose Access Control > Personnel, edit that person and enroll fingerprint. - Page 50 OP200 Quick Start Guide We need to register fingerprints three times on the SilkID fingerprint sensor.
- Page 51 OP200 Quick Start Guide...
- Page 52 OP200 Quick Start Guide The following figure shows enroll fingerprint successfully.
-
Page 53: Proper Fingerprint Enrollment
(due to cuts, scrapes, dirt, etc. adversely affecting the fingerprint image quality). ZKAccess fingerprint readers will give optimal results for fingerprint-matching if the following recommendations and suggestions are followed: We recommend enrolling two index fingers (images 3 and 6) or two middle fingers (images 2 and 7): Avoid using the thumb, ring or little finger for enrollment. - Page 54 OP200 Quick Start Guide Not Flat Not Centered Not Centered 3) Getting Good Fingerprint Images The quality of fingerprint images is relative to the number of minutiae points captured by the fingerprint sensor. Fingerprint images not possessing an adequate number of minutiae points may be unreadable. For those few users whose fingerprint images lack sufficient minutia points and cannot be read by the fingerprint sensor, it’s advised to issue those few users an RFID card (or fob) or issue them a secret PIN code, instead.
- Page 55 When enrolling and authenticating, be sure to maintain contact with the fingerprint sensor for a 2 full seconds, until the fingerprint Most ZKAccess fingerprint readers have both audio and visual reader responds. indicators which respond when the reader senses a finger.
-
Page 56: Enroll & Verification Op-200
OP200 Quick Start Guide 9 Enroll & Verification OP-200 > Main Menu > User Management. Press You can view the user information and edit the user’s fingerprint. Enroll the fingerprints on OP-200: Fingerprint to enroll the fingerprints on Press >... - Page 57 OP200 Quick Start Guide then panel will tell the results; if the Panel Ack is set to ON, but without connection to the panel, then you will get “Fingerprint Verified but Access Denied” message on screen. 2. If you do not connect OP-200 to panel, then set “panel ack” to OFF in primary/secondary settings interface on the OP-200.
-
Page 58: Trouble Shootings
OP200 Quick Start Guide 10 Trouble Shootings Here are some useful tips to help improve the reliability of your ZKAccess fingerprint reader(s): 1. A previous successfully enrolled finger cannot be subsequently matched, then assume something has CHANGED since you last successfully enrolled that same user’s fingerprint;... - Page 59 OP200 Quick Start Guide Lastly, it’s possible that based on your environment, users and/or budget that a traditional card-based access control system is best suited for you. 3. The Tamper Alarm rings? To cancel the triggered alarm mode, carefully check whether the OP-200 ...
Need help?
Do you have a question about the ZKTeco OP-200 and is the answer not in the manual?
Questions and answers