Table of Contents
Advertisement
Advertisement
Table of Contents

Related Manuals for National Instruments GPIB-USB Series


Summary of Contents for National Instruments GPIB-USB Series
- Page 1 GPIB Hardware Guide GPIB Hardware Guide January 2013 370426L-01...
- Page 2 11500 North Mopac Expressway Austin, Texas 78759-3504 USA Tel: 512 683 0100 For further support information, refer to the Technical Support and Professional Services appendix. To comment on National Instruments documentation, refer to the National Instruments Web site at and enter ni.com/info the Info Code feedback ©...
- Page 3 Instruments Corporation. National Instruments respects the intellectual property of others, and we ask our users to do the same. NI software is protected by copyright and other intellectual property laws. Where NI software may be used to reproduce software or other materials belonging to others, you may use NI software only to reproduce materials that you may reproduce in accordance with the terms of any applicable license or other legal restriction.
- Page 4 Operation of this hardware in a residential area is likely to cause harmful interference. Users are required to correct the interference at their own expense or cease operation of the hardware. Changes or modifications not expressly approved by National Instruments could void the user’s right to operate the hardware under the local regulatory rules.
- Page 5 Conventions The following conventions are used in this manual: » The » symbol leads you through nested menu items and dialog box options to a final action. The sequence Options»Settings»General directs you to pull down the Options menu, select the Settings item, and select General from the last dialog box.
-
Page 6: Table Of Contents
Enter Network Configuration Mode during Normal Operation..1-24 GPIB-ENET/1000......................1-25 GPIB-ENET/1000 Installation ................1-25 Baseplate Identification Label.................1-26 Startup......................1-27 Ethernet Connector LEDs................1-28 Software Recognition ..................1-28 Ethernet Configuration ..................1-28 Using the GPIB-ENET/1000 Configuration Web Page....1-29 Changing the Network Settings ............1-29 Auto IP Addressing................1-30 © National Instruments GPIB Hardware Guide... - Page 7 Contents Static IP Parameters................1-30 Choosing a Static IP Address ............1-31 Firmware Update..................... 1-31 READY LED Signaling.................. 1-32 Step 1. Count the Long Flashes ............1-32 Step 2. Count the Short Flashes............1-33 Step 3. Record Your Status Code Number ........1-33 CFG RESET Switch..................
-
Page 8: Gpib Hardware
Remove the top cover (or other access panels) to gain access to the computer expansion slots. Find an unused expansion slot in your computer. The AT-GPIB/TNT (PnP) board requires a 16-bit ISA expansion slot. Remove the corresponding slot cover on the back panel of the computer. © National Instruments GPIB Hardware Guide... - Page 9 Chapter 1 GPIB Hardware Insert the GPIB board into the slot with the GPIB connector sticking out of the opening on the back panel, as shown in Figure 1-1. It might be a tight fit, but do not force the board into place. Figure 1-1.
-
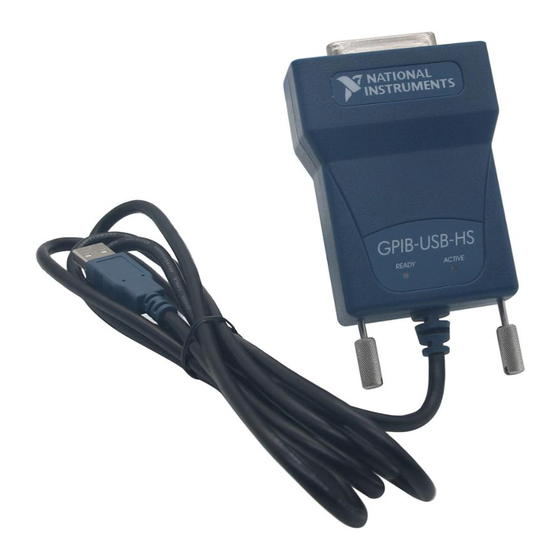
Page 10: Gpib-Usb Interfaces
These are also available at ni.com • Use a USB isolated hub. National Instruments does not sell these, but there are many available for sale elsewhere on the Web or in stores. •... -
Page 11: Ni Pcie-Gpib, Ni Pcie-Gpib+, Pci-Gpib, Pci-Gpib+, Pci-Gpib/Lp, And Pci-8232
Chapter 1 GPIB Hardware 1 PC 2 USB Connector 3 GPIB-USB Interface 4 To GPIB Devices Figure 1-2. Installing the GPIB-USB Interface The GPIB hardware installation is now complete. NI PCIe-GPIB, NI PCIe-GPIB+, PCI-GPIB, PCI-GPIB+, PCI-GPIB/LP, and PCI-8232 Caution Electrostatic discharge can damage several components on your GPIB board. To avoid such damage in handling your board, touch the antistatic plastic package to a metal part of your computer chassis before removing the board from the package. - Page 12 Screw the mounting bracket of the GPIB board to the back panel rail of the computer. Replace the top cover (or the access panel to the expansion slot). Power on your computer. The GPIB hardware installation is now complete. © National Instruments GPIB Hardware Guide...
-
Page 13: Pcmcia-Gpib
Chapter 1 GPIB Hardware PCMCIA-GPIB The PCMCIA-GPIB hardware does not have isolation built into it. If you have a Caution system where there are different ground potentials involved, the voltage difference could surge through the GPIB hardware and cause damage. This situation most often occurs when the PC is a laptop running on a battery and the GPIB device is powered by an AC wall connection. -
Page 14: Ni Expresscard-Gpib
Buy a pair of GPIB-140A units, which extend a GPIB system using fiber optics. Because the GPIB signals at each end are transformed into fiber optic signals, each unit can reside at a different ground potential. These are also available at ni.com © National Instruments GPIB Hardware Guide... - Page 15 Chapter 1 GPIB Hardware • Change the system setup so that all components in the system share the same earth ground to eliminate the possibilities of voltage differential running through the system. Follow these steps to install the NI ExpressCard-GPIB interface: ™...
-
Page 16: Pmc-Gpib
Remove the corresponding slot filler panel from the host. Insert the PMC-GPIB into the slot as shown in Figure 1-6. It might be a tight fit, but do not force the board into place. © National Instruments GPIB Hardware Guide... - Page 17 Chapter 1 GPIB Hardware 1 Host Face Plate 3 5 V Keying Hole 5 Mounting Screws 2 3.3 V Keying Hole 4 PMC-GPIB Board Figure 1-6. Installing the PMC-GPIB Use the mounting hardware provided to fasten the PMC-GPIB to the host.
-
Page 18: Pxi-Gpib And Pxi-8232
PXI card has an onboard DMA controller that can only be used if the board is installed in a slot that supports bus arbitration, or bus master cards. National Instruments recommends installing your PXI card in such a slot. If you install the board in a non-master slot, you must disable your PXI card’s onboard... - Page 19 Chapter 1 GPIB Hardware Insert your PXI card into the selected 5 V slot. Use the injector/ejector handle to fully inject the device into place. Figure 1-7 shows how to install your PXI card into a PXI or CompactPCI chassis. 1 Injector/Ejector Handle (In Down Position) 3 PXI Chassis 2 Your PXI Card...
-
Page 20: Gpib-Enet/100
Contact your network administrator to determine whether your network supports DHCP or if you need to manually perform the Ethernet configuration to set up the network parameters. If your © National Instruments 1-13 GPIB Hardware Guide... -
Page 21: Baseplate Identification Label
Chapter 1 GPIB Hardware network uses DHCP, the network configuration is performed automatically at startup. A steady yellow PWR/RDY LED indicates the GPIB-ENET/100 passed its self-tests and acquired its IP address. The unit is now ready to operate. You may need to run software configuration and verification utilities at this time. - Page 22 Instruments Technical Support. • If the PWR/RDY LED is steady red, the GPIB-ENET/100 has an unrecoverable error. Contact National Instruments Technical Support. Table 1-1 summarizes the functionality of all the front-panel LEDs on the GPIB-ENET/100. Table 1-1. GPIB-ENET/100 LED Descriptions...
-
Page 23: Software Recognition
On Windows, use the GPIB Ethernet Wizard to add the GPIB-ENET/100 to your system. Launch the GPIB Ethernet Wizard from Start» Programs»National Instruments»NI-488.2. (Windows 8) Click NI Launcher and select GPIB Ethernet Wizard. Accept the GPIB-ENET/100 default configuration settings or change them while running the wizard. -
Page 24: Using The Ni Ethernet Device Configuration Utility
View the properties for any of the following reasons: • You need to configure an unconfigured IP address. • You need to change the current network parameters. • You previously used DHCP, but it is no longer available. © National Instruments 1-17 GPIB Hardware Guide... -
Page 25: Changing The Network Settings
Chapter 1 GPIB Hardware • You are using DHCP and need to change the hostname of the GPIB-ENET/100. • The IP address/hostname column displays an exclamation point (!) next to your GPIB-ENET/100, indicating a configuration problem. Refer to Verifying the Hostname for help resolving this problem. -
Page 26: Static Ip Parameters
, the first three numbers in every IP address on the 255.255.255.0 network must be the same. If your subnet mask is , only the 255.255.0.0 first two numbers in the IP addresses on the network must match. © National Instruments 1-19 GPIB Hardware Guide... -
Page 27: Verifying The Hostname
Chapter 1 GPIB Hardware For either subnet mask, numbers between 1 and 254 are valid choices for the last number of the IP address. Numbers between 0 and 255 are valid for the third number of the IP address, but this number must be the same as other devices on your network if your subnet mask is 255.255.255.0 If you are setting up your own network, you probably do not have a gateway... -
Page 28: Firmware Update
The NI Ethernet Device Firmware Update utility communicates with the specified GPIB-ENET/100 to verify the box has no open network connections and determine the current version of the firmware in the unit. © National Instruments 1-21 GPIB Hardware Guide... -
Page 29: Pwr/Rdy Led Signaling
The PWR/RDY LED blinks slowly in a distinct red/yellow pattern to alert you of internal errors. Use this section to interpret and record the pattern that the PWR/RDY LED flashes, and then contact National Instruments. By recording the PWR/RDY LED status messages before calling National... -
Page 30: Step 3. Record Your Status Code Number
When you have computed your error message number, write it down and also note the ON/OFF state of the LINK, TX, and RX LEDs. Have this information available when calling National Instruments. CFG RESET Switch The Configuration Reset (CFG RESET) switch is a recessed switch located beside the ENET connector on the rear panel. -
Page 31: Enter Network Configuration Mode During Normal Operation
Chapter 1 GPIB Hardware At three seconds, the PWR/RDY LED becomes steady red. This indicates the network configuration will be set to the factory default settings. When you release the CFG RESET switch, the box continues to boot as normal, and the PWR/RDY LED indicates the boot process as described in Table 1-1, GPIB-ENET/100 LED Descriptions. -
Page 32: Gpib-Enet/1000
GPIB-ENET/1000 and make a note of the serial number, MAC address (Ethernet address), and default hostname. You will need this information when you run some of the utilities. © National Instruments 1-25 GPIB Hardware Guide... -
Page 33: Baseplate Identification Label
Chapter 1 GPIB Hardware Contact your network administrator to determine whether your network supports DHCP or if you need to manually perform the Ethernet configuration to set up the network parameters. If your network uses DHCP, the network configuration is performed automatically at startup. -
Page 34: Startup
Refer to READY LED Signaling to interpret the flash pattern before calling National Instruments Technical Support. • A steady red READY LED indicates that the GPIB-ENET/1000 has corrupt firmware and has entered Safe Mode. The only operation allowed in Safe Mode is to update the firmware. -
Page 35: Ethernet Connector Leds
Use the GPIB Ethernet Wizard to add the GPIB-ENET/1000 to your system. Launch the GPIB Ethernet Wizard from Start»Programs» National Instruments»NI-488.2. (Windows 8) Click NI Launcher and select GPIB Ethernet Wizard. Accept the GPIB-ENET/1000 default configuration settings or change them while running the wizard. -
Page 36: Using The Gpib-Enet/1000 Configuration Web Page
Some DHCP servers do not implement hostname registration. The GPIB-ENET/1000 requires Domain Name Server (DNS) registration when using DHCP. If your DHCP server does not support DNS registration, you must use an Auto IP address or static network parameters. © National Instruments 1-29 GPIB Hardware Guide... -
Page 37: Auto Ip Addressing
Chapter 1 GPIB Hardware Choose whether you need to use DHCP with Auto IP fallback or a static IP configuration. Leaving the checkbox unchecked enables DHCP with Auto IP fallback. You do not need to enter any network parameters unless you want to change the Ethernet device hostname. -
Page 38: Choosing A Static Ip Address
You must update the firmware to take advantage of any new features. You can obtain the latest upgrade by navigating to ni.com/info in a Web browser and entering Info Code GPIBENET1000FW © National Instruments 1-31 GPIB Hardware Guide... -
Page 39: Ready Led Signaling
The READY LED blinks red slowly in a distinct pattern to alert you of internal errors. Use this section to interpret and record the pattern that the READY LED flashes, and then contact National Instruments. Note By recording the READY LED status messages before calling National Instruments, you can save yourself time, and the Product Support Department can answer your questions more accurately and efficiently. -
Page 40: Step 2. Count The Short Flashes
When you have computed your error message number, write it down and also note the ON/OFF state of the ACT/LINK LED. Have this information available when calling National Instruments. CFG RESET Switch The Configuration Reset (CFG RESET) switch is a recessed switch located beside the power connector on the rear panel. - Page 41 Chapter 1 GPIB Hardware Once the READY LED flickers yellow, release the CFG RESET switch. The GPIB-ENET/1000 resets to its default network characteristics and resumes the boot process. The READY LED indicates the boot process progress, as described in Table 1-2. GPIB Hardware Guide 1-34 ni.com...
-
Page 42: Appendix A Specifications
PCI-8232 ..........+5 VDC @ 874 mA typical, 1160 mA max NI PCIe-GPIB (part number 198405x-0xL) ......... +3.3 VDC @ 320 mA typical, 500 mA max NI PCIe-GPIB+........+3.3 VDC @ 360 mA typical, 560 mA max © National Instruments GPIB Hardware Guide... - Page 43 Appendix A Specifications PCI-GPIB (with TNT4882C controller) ..........+3.3 VDC @ 121 mA typical, 182 mA max +5 VDC @ 300 mA typical, 450 mA max PCI-GPIB (with TNT5004 controller) ..........+5 VDC @ 150 mA max +VIO @ 5 mA max PCI-GPIB+ ..........+3.3 VDC @ 170 mA typical, 575 mA max PCMCIA-GPIB ........+5 VDC @ 65 mA typical,...
- Page 44 MIL-PRF-28800F.) Random vibration Operating ........5 to 500 Hz, 0.3 g Nonoperating ........5 to 500 Hz, 2.4 g (Tested in accordance with IEC-60068-2-64. Nonoperating test profile exceeds the requirements of MIL-PRF-28800F, Class 3.) © National Instruments GPIB Hardware Guide...
- Page 45 Appendix A Specifications Power Requirements PXI-8232 ..........+3.3 VDC @ 910 mA typical, 1,500 mA max PXI-GPIB (with TNT4882C controller) ..........+3.3 VDC @ 122 mA typical, 182 mA max +5 VDC @ 300 mA typical, 450 mA max PXI-GPIB (with TNT5004 controller) ..........+3.3 VDC @ 80 mA typical, 165 mA max +VIO @ 3 mA typical,...
- Page 46 Dimensions..........20.6 × 12.7 × 3.7 cm (8.125 × 5 × 1.438 in.) Weight ............ 402 g (14.2 oz) Operating Environment Ambient temperature range....0 to 55 °C (Tested in accordance with IEC-60068-2-1 and IEC-60068-2-2.) © National Instruments GPIB Hardware Guide...
- Page 47 Appendix A Specifications Relative humidity range......10 to 90%, noncondensing (Tested in accordance with IEC-60068-2-56.) Power requirements ........External source 9 to 30 VDC +12 VDC @ 250 mA typical, 500 mA max Storage Environment Ambient temperature range ....-40 to 70 °C (Tested in accordance with IEC-60068-2-1 and IEC-60068-2-2.)
- Page 48 75 cm onto no-cushioning vinyl tile surface Power requirements........ +3.3 VDC ± 10% @ 140 mA typical, 500 mA max Performance GPIB 3-wire ..........Up to 1830 Kbytes/s HS488 ..........Up to 7230 Kbytes/s © National Instruments GPIB Hardware Guide...
- Page 49 Appendix A Specifications All Devices Altitude ...........2,000 m (at 25 °C ambient temperature) Pollution Degree ........2 Indoor use only Safety This product is designed to meet the requirements of the following standards of safety for information technology equipment: • IEC 60950-1, EN 60950-1 •...
- Page 50 For more information about WEEE recycling centers, National Instruments WEEE initiatives, and compliance with WEEE Directive 2002/96/EC on Waste and Electronic Equipment, visit ni.com/environment/weee National Instruments (RoHS) National Instruments RoHS ni.com/environment/rohs_china (For information about China RoHS compliance, go to ni.com/environment/rohs_china © National Instruments GPIB Hardware Guide...
- Page 51 You can also register for instructor-led, hands-on courses at locations around the world. • System Integration—If you have time constraints, limited in-house technical resources, or other project challenges, National Instruments © National Instruments GPIB Hardware Guide...
- Page 52 Appendix B Technical Support and Professional Services Alliance Partner members can help. To learn more, call your local NI office or visit ni.com/alliance You also can visit the Worldwide Offices section of ni.com/niglobal to access the branch office Web sites, which provide up-to-date contact information, support phone numbers, email addresses, and current events.
Need help?
Do you have a question about the GPIB-USB Series and is the answer not in the manual?
Questions and answers