Advertisement
Quick Links
Advertisement

Subscribe to Our Youtube Channel
Summary of Contents for R-Tec controlR
- Page 1 INSTALLATION GUIDE & USER MANUAL...
- Page 2 INSTALLATION GUIDE 1. Disconnect the negative battery terminal (Before carrying out any electrical work on your vehicle including installing any electronic device the battery negative terminal should always be disconnected) NOTE - The negative battery terminal should remain disconnected till the installation is complete. 2.
- Page 3 firewall and should not be in direct contact with any metal edge as it may cause damage to the wires and in turn short the device. 3. Decide on a location inside the engine compartment for the HUB unit to be mounted. Please ensure the selected location is away from any moving parts and is as far from the engine as possible.
- Page 4 10. Installing the USER INTERFACE controlR comes with a provided mounting solution in the form of a two ball design and a cnc machined aluminium base. The base of the mount is to be secured to the predecided mounting location with the provided screws.
- Page 5 ACCESSORY RELAY WIRING...
-
Page 6: Turning On The Device
USER MANUAL TURNING ON THE DEVICE From factory the device is set to turn on with the key turned to the accessory ON position. The device powers on displaying the controlR logo which fades into the main screen. -
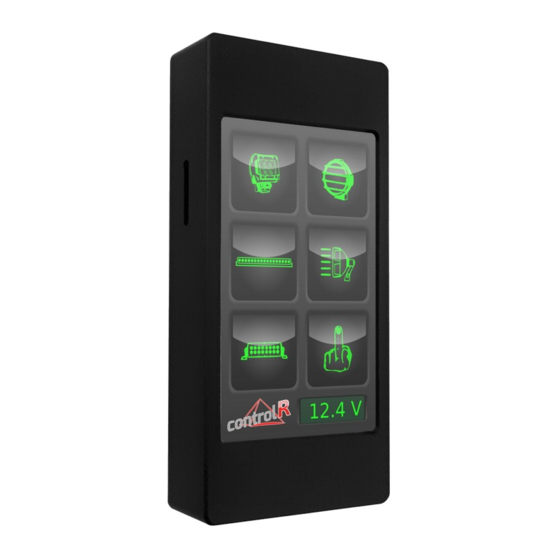
Page 7: Main Screen
HUB. Touch to the controlR logo takes you to the SETUP screen. Touching the voltage display area for more than 1.5 seconds turns off the device. To turn back on the device the screen can be touched anywhere on the screen for 1 second. - Page 8 LINK SETUP SCREEN On the LINK screen you have the option of linking switch 1 through switch 5 to switch 6. Touch of the LINK button will link the corresponding switch to switch 6. In this way one or all switches can be linked to switch 6.
- Page 9 From factory the cut off voltage is set to 11.2 volts which means as soon as the battery voltage drops to 11.2 volts the device will turn off all accessory relays that are powered on at the time for one second and turn back on for one second and repeat this once again and leave the...
- Page 10 ICON SETUP SCREEN Here you can touch the ICON button for the corresponding switch for which you would like to add or change the ICON. Touch to the Icon button changes the screen to the ICON selection screen. At the top of the screen the SWITCH for which the ICON is being selected is displayed below that is the...
- Page 11 SCREEN SETUP SCREEN At the top of the screen is the brightness slider. Sliding the slider to the left will reduce the brightness and to the right will increase it. From factory the brightness is at 100%. Below the brightness slider are two buttons the one on the left with the key icon which is in...
- Page 12 Go to the power setup screen of controlR and set it to power on with key in accessory on position. With the device OFF insert the micro sd...
-
Page 13: Factory Reset
INTERFACE side with the contacts of the micro sd card facing towards you. The slot is spring loaded and the micro sd will need to be pushed in till it locks in place. Turn ON the key to power up the device. The device will begin updating. - Page 14 Using the tip of your finger to operate a resistive touch screen is the right and effective way of operating the screen. The screen can be used with wet hands and with gloves. Website: www.r-tec.in Mail us at: team@r-tec.in...
Need help?
Do you have a question about the controlR and is the answer not in the manual?
Questions and answers