
Related Manuals for Shire Platform For Stork


Summary of Contents for Shire Platform For Stork
- Page 1 © Platform For Stork And Other Shire 1790x1190 Playhouses with a Verandah Complies with EN71 These instructions are for your safety. Please read through them thoroughly before use . PLEASE KEEP THIS LEAFLET FOR FUTURE REFERENCE...
-
Page 3: Table Of Contents
Let’s get started... Important information... Safety Base and positioning Warranty Care maintenance & Recycling In more detail... Hardware Chart Stacked Parts List Detailed Technical Drawing Before you start Assembly instructions 11-20 For a copy of the instructions or a copy in another language please send an email or write to the address below. -
Page 4: Safety
Safety Check that you have noted all the following instructions We advise the use of non slip protective gloves throughout the assembly process. We advise the use of steel capped protective footwear throughout the assembly process We advise the use of protective headwear and safety goggles throughout the assembly process Where a ladder is in use another person must hold the ladder. -
Page 5: Warranty
Base and Warranty Preparation of base... We recommend that the base onto which your platform will stand should be level and firm with at least 2m of clear space all around . You must not place this platform on a hard surface like slabs or concrete. Actual floor area of the building: 1790mm x 2240mm Total height clearance: 2500mm See drawing on front cover Warranty... -
Page 6: Care Maintenance & Recycling
Care, Maintenance and Recycling The 5 golden rules of care Ensure your base is level and firm Ensure the building is not sitting directly on the ground using damp proof membrane or the optional timber base. Ensure every piece of timber and surface, especially that is hidden upon assembly is treated with a top quality wood preservative at least twice (see note on pressure treated buildings in warranty section). -
Page 7: Hardware Chart
Fascia & nail bag contents Hardware Chart Scale 1:1 50mm Posi-drive screw (A0557) x 64 60mmPosi-drive screw (A0035) x 20 80mm Posi-drive screw (A0036) x 100... -
Page 8: Stacked Parts List
Stacked parts list Description (part No ) qty Top rail long Top rail short Deck support (A0079)x02 (A0080)x05 (A0082)x03 70mm 70mm 70mm Brace Legs Decking Platform rail (A0081)x08 (A0083)x04 (A0563)x05 (A0606) x02 822mm 545mm 28mm 90mm Note assembly also uses 2 rails with your building Rail post... -
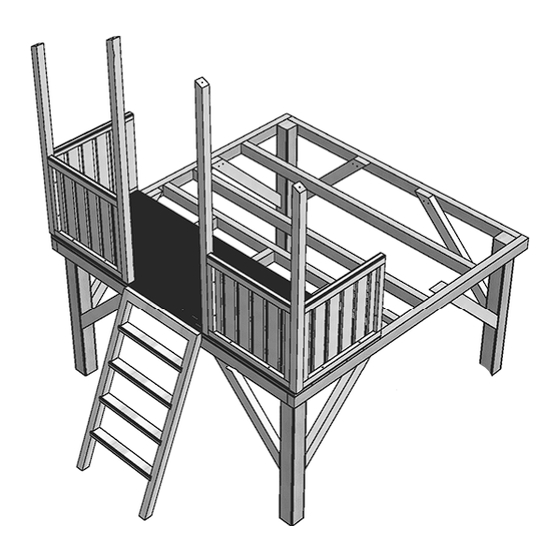
Page 9: Detailed Technical Drawing
Detailed Technical drawing platform A2950 A0607 A2949 A0606 From building Note 2 of the A0606 rails Are from the Building. A0606 A0606 A0606 A0084 A0563 A0084 A0084 A0084 A0080 A0080 A0080 A0080 A0079 A0082 A0082 A0082 A0081 A0081 A0079 A0080 A0081 A0081 A0083... -
Page 10: Before You Start
Before you start Things to check before you start Ensure your base is ready– See page 3 Check all parts as listed in the parts lists Read the instructions fully before starting work Follow all the health and safety guidelines When you see the drill icon Only ever drill through the first piece of framework which will be a... -
Page 11: Assembly Instructions
Building Photographs It will be greatly appreciated if you could forward images of your completed building to - sales@shiregb.co.uk. - Page 12 Assembly These instructions are for your safety. Please read through them thoroughly before use . Treat all the parts before assembly –see page 5 GB-IE Always lay your pieces into position first before drilling (You can do this with steps 1-4 )to familiarise yourself with the build.
- Page 13 GB-IE It does not matter which edge of the “step 1” square you choose for this step. This assembly will be used for the decking later. You can put a “A0080” on top of the square and mark the drill centres on both pieces before moving it into position at the other end of the “A0082 “...
- Page 14 Again place your pieces into position first before drilling GB-IE Space out the 2 “A0080” top rail short pieces as specified below ensuring everything is square. Mark their centres on the outer square and drill two holes each end and fix with 80mm screws. A0080 A0080 Step 2...
- Page 15 Again place your pieces into position first before drilling Get a helper to hold the bracing ”A0081” in position-one end inside the square that will be the top and the other end flush with the outer edge of the post. GB-IE Mark for two holes on the wide face of the brace central to the outer square.
- Page 16 Again place your pieces into position first before drilling Get a minimum of 2 helpers to help you turn the assembly over and place it in its final position. Place the floor from your building pack on the platform GB-IE Drill through the floor and floor framework only,ensuring the holes are over the platform framework and fix with 60mm screws Step 5...
- Page 17 In all 4 platform rails drill 4 holes through the side framework and 2 holes through the bottom close to the outer uprights., Decide where you wish to put the ladder, GB-IE We will fit the rails as shown in the largest image below. IMPORTANT If you fit the ladder in a corner You must remove the angle brace...
- Page 18 Note the rail overhangs the floor sides by 12mm, flush with the building cladding. Using the holes drilled previously attach the first rail “A0606” to the building (ensuring you have 2 holes at the GB-IE bottom and at the opposite end), Repeat with the rail at the other end IMPORTANT If you fit the ladder in a corner...
- Page 19 Fix the two front rails to the posts fitted in step 10. GB-IE Place the posts against the front and mark and cut the top to fit. Fix the two posts to the rails as before. Platform rail (A0606) x02 IMPORTANT 44mm` If you fit the ladder in a corner...
- Page 20 Position the ladder “A0609” and attach with 80mm screws. GB-IE Ladder (A0609) x01 80mmScrew (A0036) x02 customerservice@shiregb.co.uk Brigstock Road Wisbech Cambridgeshire PE13 3JJ Tel 01945 465 295...
Need help?
Do you have a question about the Platform For Stork and is the answer not in the manual?
Questions and answers