ALDI AMBIANO User Manual
Espresso maker with integrated grinder
Hide thumbs
Also See for AMBIANO:
- User manual (45 pages) ,
- User manual (40 pages) ,
- User manual (30 pages)
Table of Contents
Advertisement
Great care has gone into the manufacture of this product and it should
therefore provide you with years of good service when used properly. In
the event of product failure within it's intended use over the course of the
fi rst 3 years after date of purchase, we will remedy the problem as quickly
as possible once it has been brought to our attention. In the unlikely event
of such an occurrence, or if you require any information about the product,
please contact us via our helpline support services, details of which are to be
found both in this manual and on the product itself.
GB
PRODUCED IN CHINA FOR:
ALDI STORES LTD. PO BOX 26, ATHERSTONE,
WARWICKSHIRE, CV9 2SH.
Visit us at www.aldi.com
3
AFTER SALES SUPPORT
99602
GB
0800 / 328 6020
info@globaltronicssupport.com
YEAR
MODEL:
WARRANTY
GT-EMG-01-UK
03/2020
User Manual
ESPRESSO MAKER WITH
INTEGRATED GRINDER
Contents
Scope of delivery ...................................................................................4
Device parts ........................................................................................... 5
Scope of delivery/Device parts .............................................................6
General ................................................................................................... 7
Read and keep operating instructions ...................................................... 7
Explanation of symbols .........................................................................8
Safety .....................................................................................................9
Intended use .................................................................................................. 9
Safety instructions ....................................................................................... 10
Prior to initial use .................................................................................17
Unpacking .....................................................................................................17
Prepare grinding mechanism ................................................................... 19
Flush the water system ................................................................................21
Use ........................................................................................................ 24
Degree of grinding pre-selection ............................................................. 24
Prepare espresso ......................................................................................... 25
Empty brewing fi lter ...................................................................................30
Prepare cappuccino / froth milk ................................................................30
Hot water function ...................................................................................... 33
Empty drip tray ............................................................................................ 33
Change water quantity for coffee preparation .......................................34
Water tank empty ........................................................................................35
Switch off espresso machine ..................................................................... 35
Cleaning ............................................................................................... 36
Cleaning the grinding mechanism ........................................................... 37
Clean brewing fi lter .....................................................................................39
Cleaning during daily use ..........................................................................39
Clean steam nozzle/hot water nozzle ......................................................39
Descale espresso machine ...................................................................40
Storage ..................................................................................................41
Faults and rectifi cation ........................................................................ 42
Technical data ......................................................................................45
Conformity declaration .......................................................................45
Disposal ................................................................................................45
Dispose of packaging and appliance .......................................................45
Advertisement
Table of Contents

Related Manuals for ALDI AMBIANO


Summary of Contents for ALDI AMBIANO
-
Page 1: Table Of Contents
Change water quantity for coffee preparation ........34 Water tank empty ..................35 PRODUCED IN CHINA FOR: Switch off espresso machine ..............35 ALDI STORES LTD. PO BOX 26, ATHERSTONE, Cleaning ....................36 WARWICKSHIRE, CV9 2SH. Cleaning the grinding mechanism ............37 Clean brewing fi... -
Page 2: Scope Of Delivery
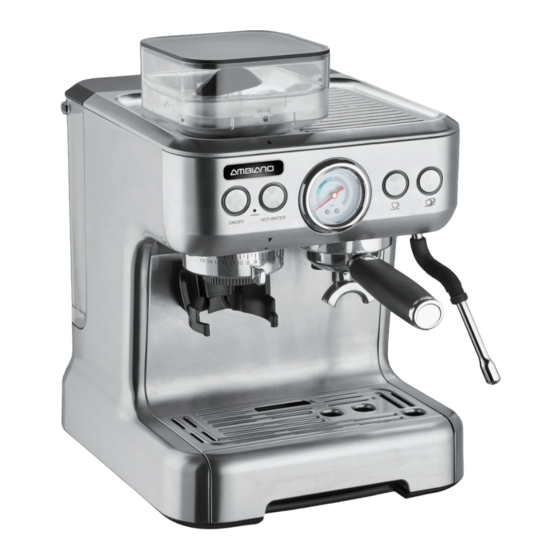
Scope of delivery Device parts Scope of delivery/Device parts Scope of delivery Device parts Scope of delivery/ Device parts Grinding mechanism standby display Coffee bean container with lid ON/OFF key Water tank HOT WATER key Tamper Pressure indicator (bar) Large brewing fi lter Key for single espresso Small brewing fi... -
Page 3: General
General General Read and keep operating instructions Dear customer, Thank you for deciding to purchase this product. We hope that you like it and enjoy using it. Please take the time to study this fi lter holder machine. So far, no one has ever been born a master barista. The diverse options for espresso preparation require a certain amount of willingness to experiment. -
Page 4: Explanation Of Symbols
Explanation of symbols Explanation of symbols The following symbols and signal words are use in these operat- ing instructions, on the product or on the packaging. Indicates a hazard with moderate risk, which can WARNING! lead to death or severe injury, if it is not avoided. Property damage can occur if not observed. -
Page 5: Safety
Safety Safety Intended use • The espresso machine is exclusively designed for the preparation of household quantities of coffee/espresso and for frothing milk using steam. Cold, still water without carbon dioxide may exclu- sively be fi lled into the water tank. You can also fi ll water with a reduced chalk content (fi... -
Page 6: Safety Instructions
Safety Safety instructions Danger for children and other persons. • Hazards for children and persons with impaired physical, sensory or mental capabilities (e.g. par- tially disabled, elderly persons with impairment to their physical and mental capabilities) or a lack of experience and knowledge (for example, older children). - Page 7 Safety • The grinding mechanism must not be used by children in any case. • Do not leave the espresso machine unattended during operation. • Do not let children play with the packaging fi lm. Children may become caught in it while playing and suffocate.
- Page 8 Safety • The power cable, the power plug and the appliance must not be exposed to dripping or splashing water. • Do not operate the appliance outdoors and do not expose it to weather infl uences, such as rain, snow or frost. •...
- Page 9 Safety • Remove the power plug from the socket: – if you are not using the appliance, – before cleaning or putting the appliance away, – if an obvious fault occurs during operation, – in a thunder storm. Always pull on the power plug, not on the power cable. •...
- Page 10 Safety WARNING! Injury hazard! The grinding mechanism has sharp edges. Never insert fi n- gers, parts of cutlery or other items into the grinding mecha- nism. • Always disconnect the appliance from the power supply, if it is unsupervised and prior to assembly, dismantling or cleaning the grinding mechanism.
- Page 11 Safety • Do not touch the coffee spout during operation and do not reach underneath it. • Do not release the fi lter holder while the machine is running: Hot water may spray out. The fi lter holder must be turned as far as it will go.
- Page 12 Safety • Never fi ll hot or carbonated water into the water tank. • Never operate the espresso machine without water, as otherwise the pump may become damaged. • Protect the espresso machine from frost: Water residues may freeze at temperatures below 0 °C and damage the heater. •...
-
Page 13: Prior To Initial Use
Prior to initial use Prior to initial use Unpacking Risk of damage! NOTICE! If you open the packaging without due care and attention using a sharp knife or other pointed objects, the appliance may become damaged. 1. Remove the appliance and accessories from the packaging. 2. - Page 14 Prior to initial use Wipe the parts dry and let them dry off completely. Only wipe off the double-wall coffee bean container damply, do not immerse in water. The grinding mechanism does not need to be cleaned sepa- rately prior to initial use. After use, also only clean in a dry state, using a brush.
-
Page 15: Prepare Grinding Mechanism
Prior to initial use Prepare grinding mechanism 1. Ensure that the steam controller is switched to OFF and dis- connect the power plug, if necessary. The grinding mechanism is removed for transport. At- tach the grinding mechanism, as described in the Clean- ing the grinding mechanism section, Point 8. - Page 16 Prior to initial use 7. Press the ON/OFF button. The grinding mechanism standby in- dicator lights up. Initially ignore the keys lighting up. 8. Turn the degree of grinding pre-selection to the right to level 15 (the setting mark is above the scale from 1 to 15). 9.
-
Page 17: Flush The Water System
Prior to initial use Flush the water system Prior to initial use and after a longer period of disuse of the espresso machine, allow the contents of approx. 2-3 cups of water to run through the machine. This will clean the water circuit and all parts will be heated up. - Page 18 Prior to initial use 8. Press the ON/OFF button . The grinding mechanism standby indicator lights up. The ON/OFF, HOT-WATER , single es- presso and the key for double espresso will slowly dim on/off. After approx. 20 seconds, the heating process is completed and the keys light up constantly.
- Page 19 Prior to initial use Approx. 90 °C of hot water will now run out of the steam/hot water nozzle into the drip tray . The quantity of hot wa- ter is pre-set to approx. 200 ml. To stop the HOT-WATER function, please press the key again.
-
Page 20: Use
Only grind roasted coffee beans in this appli- NOTICE! ance. Do not process any other foods, such as nuts, spices or liquids, to avoid damaging the appliance. Please do not operate the appliance when it is empty, i.e. without coffee beans. We recommend always grinding coffee beans fresh, shortly prior to use, not for stock. -
Page 21: Prepare Espresso
Prepare espresso WARNING! Scalding hazard! If you remove the fi lter holder while dispensing coffee, hot water droplets will spray from the espresso machine. You may scald yourself. Always make sure that the brewing fi lters and fi lter holders are clean and do not contain any coffee residues. - Page 22 With the large brewing fi lter, two single espressos can also be prepared, if you place two cups next to one another under the fi lter holder. The MAX marks in both of the brewing fi lters are intended to assist in identifying the correct quantity of com- pressed, ground coffee more easily.
- Page 23 10. Let the grinding process run until the required coffee quantity is ground. Afterwards, pull the fi lter holder out of the bracket. The grinding process can be interrupted at any time. For this, pull the fi lter holder back slightly in the fi lter holder bracket.
- Page 24 14. Press the appropriate key for double espresso or single es- presso . The key fl ashes slowly on/off. The ON/OFF keys and the standby indicator of the grinding mechanism light up. After preparing espresso, the keys will light up continuously and you can prepare another espresso.
- Page 25 Too little pressure Coffee ground too coarsely or not pressed into the brewing fi lter suffi ciently. Coffee is thin when running into the cup. The fl avour is very sour or fl avourless. The crema hardly exists, is very light and not stable.
-
Page 26: Empty Brewing Fi Lter
Empty brewing fi lter WARNING! Scalding hazard! The metal parts of the fi lter holder and the brewing fi lter used become hot during use. 1. Swing the fi lter holder to the left and remove it from the fi l- ter holder bracket Avoid releasing the fi... - Page 27 It is recommended to use a small, hygienic stainless steel jug. You can also use your hand easily to estimate the temperature on the outside. The frothed milk should not be hotter than approx. 60 °C. At this temperature, the container can still just be held in the hand. Allow the frothed milk to stand for approx.
- Page 28 9. You will hear hissing, please make sure that the milk whirls around. The volume of the milk will increase over time. Move the container gradually downwards, so that the nozzle is held on the surface. As soon as the container heats up, hold the nozzle in the milk and just let the milk foam roll.
-
Page 29: Hot Water Function
Hot water function WARNING! Scalding hazard! The water discharged from the steam nozzle/hot water nozzle is very hot. You may scald yourself. 1. Connect the power plug to a socket. A beep tone sounds. 2. Press the ON/OFF button. The grinding mechanism standby indicator lights up and the HOT-WATER keys , the key for single espresso... -
Page 30: Change Water Quantity For Coffee Preparation
Change water quantity for coffee preparation You can adapt the quantity of water and thereby adapt the quantity of espresso for the single or double espresso. 1. Switch the espresso machine on and let it heat up. 2. Keep the keys for a single and double espresso pressed down at the same time for 5 seconds. -
Page 31: Water Tank Empty
Water tank empty If the water tank is empty or if it is emptied during preparation, a beep tone will sound three times and the keys will light up red. In this case, fi ll water into the water tank. Please note the MAX mark. -
Page 32: Cleaning
Cleaning Cleaning WARNING! Electric shock hazard! Incorrect handling of the article can cause an electric shock. • Do not immerse the product or the power cable or the power plug into water or other liquids. • Remove the power plug from the socket before cleaning the product. -
Page 33: Cleaning The Grinding Mechanism
Cleaning Cleaning the grinding mechanism The grinding mechanism must be removed from the es- presso machine for cleaning. 1. Always switch the espresso machine off and remove the power plug. Allow it to cool off completely. 2. Take the coffee bean container off by releasing it anti-clock- wise and removing it upwards. - Page 34 Cleaning NOTICE! Risk of damage! The grinding mechanism must not be cleaned with a damp cloth. Never use hard objects to clean the grinding mechanism. 6. Clean the removed parts with the cleaning brush After you have carefully removed the grinding mechanism, re- sidual coffee grounds inside of the grinding mechanism can be carefully removed.
-
Page 35: Clean Brewing Fi Lter
Cleaning Clean brewing fi lter Empty the used brewing fi lter after each use and rinse it out thor- oughly with water before refi lling it. Cleaning during daily use 1. Clean the brewing fi lter thoroughly with dish soap and water and then rinse all parts with clear water. -
Page 36: Descale Espresso Machine
Descale espresso machine Descale espresso machine With the constant use of hard water, limescale deposit will accumulate at an early stage. These residues must be re- moved on a regular basis, as the limescale impairs the fl avour of many internal functional components, the water fl ow, the brew- ing temperature and the performance of the espresso machine. -
Page 37: Storage
Storage 1. Empty the water out of the water tank and fi ll it with the pre- pared descaler up to the MAX mark. 2. Place an appropriate container (fi lling quantity the same as the water tank) on the draining rack under the fi lter holder and under the steam nozzle/hot water nozzle. -
Page 38: Faults And Rectifi Cation
Faults and rectifi cation Faults and rectifi cation Fault Possible cause and rectifi cation No function - No power. Insert the power plug into a live socket. No steam, no coffee fl ow. - Too little water in the water tank, the pump cannot suck. - Page 39 Faults and rectifi cation Espresso not strong enough. Reduce the level of the degree of grinding pre-selection or compress the ground coffee more forcefully in the brewing fi lter. Espresso not hot enough. Rinse through the brewing unit once without the fi lter holder. To do this, place a wide coffee cup under the fi...
- Page 40 Faults and rectifi cation Grinding mechanism not The grinding mechanism has a functioning, the standby temperature protection device. indicator for the grinding Please switch the appliance off, mechanism is fl ashing red. as soon as the grinding mecha- nism has become too hot and the standby indicator for the grinding mechanism is fl...
-
Page 41: Technical Data
Technical data / Conformity declaration / Disposal Technical data Mains voltage: 230 V~, 50 Hz Power consumption: 1490 W Water pump pressure: Max. 20 bar Water tank capacity: 2.7 l Coffee bean container capacity: approx. 250 g Protection class: Conformity declaration The conformity of the product with the legally prescribed stand- ards is guaranteed.
Need help?
Do you have a question about the AMBIANO and is the answer not in the manual?
Questions and answers