Advertisement
Quick Links
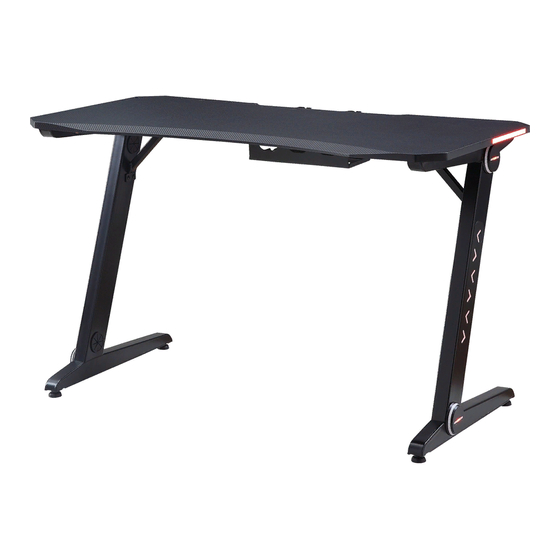
Mounting Instructions
Directives de Montage / Instrucciones de Instalación
CAUTION : DO NOT
EXCEED MAXIMUM
LISTED WEIGHT
CAPACITY. SERIOUS
INJURY OR PROPERTY
DAMAGE MAY OCCUR.
Tabletop
Plateau
Tablero
Left leg
Patte gauche
Pata izquierda
Gaming Desk
Pupitre d'ordinateur
Escritorio de Juego
LLR84390
≤80kg
(≤176.4lbs)
ATTENTION : VEUILLEZ
PRECAUCIÓN: NO
RESPECTER LA
SOBREPASE LA CAPACIDAD
CHARGE MAXIMALE
MÁXIMA DE PESO LISTADA.
INDIQUÉE AFIN D'ÉVIT-
¡NO SEGUIR ESTA
ER LES RISQUES DE
PRECAUCIÓN PODRÍA
OCASIONAR LESIÓN GRAVE
BLESSURE OU DE
O DAÑO A LA PROPIEDAD.
DOMMAGE MATÉRIEL.
Right leg
3
Patte droite
Pata derecha
Cross-bar
4
Traverse
Barras cruzadas
Plug board holder
5
Tools
Support pour connecteurs
Outils
Soporte del conector del tablero
Herramientas
A) Cable hole
B) Adjustable pad
Ouverture pour les fils
Appui-bras
Orificio para el cable
Almohadilla ajustable
×4
×4
F) Cable management
G) Decorative cover
Serre-fils
Panneau décoratif
Gestión del cable
Cubierta decorativa
×2
INSTALLATION STEPS
DIRECTIVES D'INSTALLATION/PASOS DE INSTALACIÓN
1
A ×4
C) Cable clamp
D) M6×12mm
E) Knob
Bride
M6Å~12 mm
Abrazadera del cable
M6Å~12 mm
×4
×4
H) Remote
I) Power cord
Télécommande
Fil d'alimentation
Remoto
Cable de alimentación
×4
A
B
Bouton
Perilla
×2
B ×4
×4
×4
Advertisement

Related Manuals for Lorell LLR84390


Summary of Contents for Lorell LLR84390
- Page 1 Ouverture pour les fils Appui-bras Bride M6Å~12 mm Bouton Orificio para el cable Almohadilla ajustable Abrazadera del cable M6Å~12 mm Perilla LLR84390 Directives de Montage / Instrucciones de Instalación ×4 ×4 ×4 ×4 ×2 F) Cable management G) Decorative cover H) Remote...
- Page 2 Connect either wire interfaces on the upper leg Reliez les fils à la partie supérieure des pattes Conecte cualquier de las interfaces de alambre en la pata superior D ×4 Lock G (x2) on both legs Fixez le panneau G sur les deux pattes Fije G (x2) en ambas patas ×4 Tighten the screws on the cross-bar with an allen key...
- Page 3 Firstly, gently press the pins to lock, the desktop can be installed Tout d’abord, appuyez doucement sur les broches pour verrouiller, le bureau Connect wire interfaces between tabletop peut être installé and both legs Primero, oprima con cuidado las clavijas para bloquear, se puede instalar el tablero del escritorio Reliez les fils des pattes au plateau Secondly, tighten E (x2) to fix...
- Page 4 Tips /Conseils/Consejos Cables ×2 Câbles Cables Shake remote to reactivate after 30 seconds of non-use. Secouez la télécommande pour la réactiver après 30 secondes d'inutilisation. Agite el control remoto para reactivarlo después de 30 segundos de inactividad. Power Key: Alimentation : Appuyez pour allumer ou éteindre. Botón de encendido: Oprima para encender/apagar.
- Page 5 Mode Keys (M+, M-) Modes (M+, M-) Mode Keys: Press the keys to adjust modes. There’s a total of 11 Modes : Appuyez s pour régler les modes. Il existe absolument 11 modes (modes as below table). modes (tableau ci-après). M+ : Next mode M+ : Mode suivant M- : Previous mode...
- Page 6 Teclas de modo (M+, M-) Teclas de modo: Oprima las teclas para ajustar los modos. Hay Instructions un total de 11 modos (modos según la siguiente tabla). CALL US FIRST! DO NOT RETURN TO STORE. M+ : Siguiente modo For immediate help with assembly or product information call our toll-free number: 1-888-598-7316 Mon.
- Page 7 Remote control INSTRUCTIONS FOR THE USE OF REMOTE 1. Touch remote have 64 touch key, each keys function below: Power button Pause on the dynamic mode,you can make the controller to stop the current state now. Color pulley Multicolor pulley touch key, static mode choose key, more than 60 touch points. The button has two functions: ①Pulley static color choice key,so when the current control mode is M key mode (color), if must realize pulley static color,can press this key.
Need help?
Do you have a question about the LLR84390 and is the answer not in the manual?
Questions and answers