Table of Contents
Advertisement
Quick Links
Advertisement
Table of Contents

Subscribe to Our Youtube Channel
Related Manuals for AVer AW200


Summary of Contents for AVer AW200
- Page 1 AVer AW200 User Manual...
- Page 2 ©2020 AVer Information Inc. All rights reserved. All rights of this object belong to AVer Information Inc. Reproduced or transmitted in any form or by any means without the prior written permission of AVer Information Inc. is prohibited. All information or specifications are subject to change without prior notice.
- Page 3 Radio Equipment Directive (2014/53/EU) Contact Information Global AVer Information Inc. www.aver.com 8F, No.157, Da-An Rd., Tucheng Dist., New Taipei City Taiwan European Headquarters AVer Information Europe B.V. Westblaak 140, 3012KM, Rotterdam, Netherland Tel: +31(0)10 7600 550 Technical support: EU.RMA@aver.com...
-
Page 4: Table Of Contents
AVer Transmitter Light Indicator ..............2 AW200 Main Screen ..................3 AW200 Icon Function Descriptions ............... 3 Installation ......................4 AVer Receiver Connects to HDMI Monitor ........... 4 Connects to PC ..................... 5 Connects to the iPhone/iPad ................. 6 Connects Android Mobile Phones/Tablets ............ 7 Return Control to Computer ................ - Page 5 Device Management ................... 16 Network Management ................. 17 Admin Setting ....................17 About ......................19 Download Android apk ................19 Troubleshooting ....................20...
-
Page 6: Aver Aw200
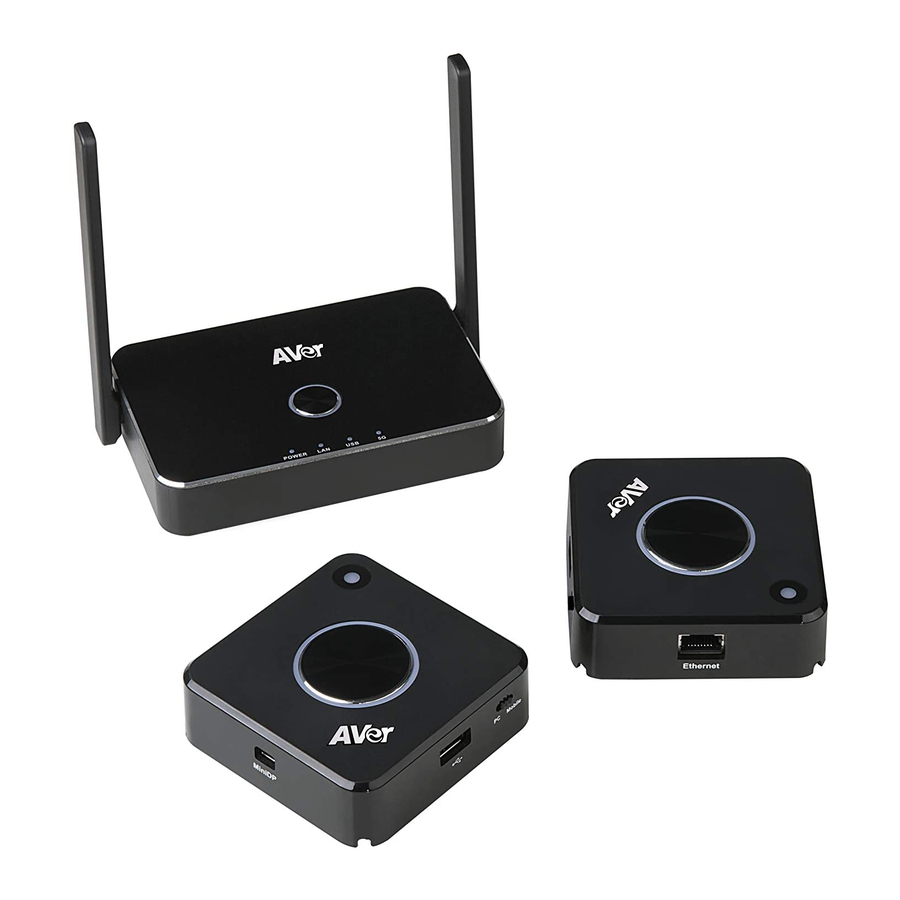
Product Overview AVer Receiver 1. DC IN 2. Power Switch 3. Reset Switch 4. USB port 5. Ethernet port 6. HDMI output 7. Pairing Button (including indicator light) 8. Status Light Indicator AVer Transmitter 1. Projection Button (including indicator light) 2. -
Page 7: Aver Transmitter Light Indicator
3. Mini Display port 4. Ethernet port 5. USB port 6. PC / Mobile Switch 7. HDMI port AVer Transmitter Light Indicator Indicator Status Pairing done. 1. Connecting. 2. Pairing / Transmitter OTA download and installation. 3. Fail to connection (blinking for 1minutes or more). -
Page 8: Aw200 Main Screen
Display of white background means that the network cable has been properly connected Wireless connection icon AVer Receiver is connected to a 5G network and displays the name of the connected router OTA firmware update icon When this icon appears, it indicates that newer firmware is available and can be... -
Page 9: Installation
Installation AVer Receiver Connects to HDMI Monitor ETHERNET POWER DC IN HDMI OUT RESET HDMI After connecting with HDMI monitor, press power button of AVer Receiver to turn on. -
Page 10: Connects To Pc
Connects to PC 5V1A HDMI / Mini DP ++ When AVer Transmitter lights in “ ” status. Press control button to share the PC/laptop’s screen to HDMI monitor. [Note] Chromebook device doesn't support split screen in current version. -
Page 11: Connects To The Iphone/Ipad
Connects to the iPhone/iPad 5V1A Switch to Mobile The screen prompts with selections. Please click "Trust" Trust This Computer? Trust Don’t Trust Press the projection key of the AVer Transmitter to project the screens. -
Page 12: Connects Android Mobile Phones/Tablets
1. Please visit Google Play Store to download AW Share App (name: AW Share) 2. Use a mobile phone to connect to AVer Receiver via Wi-Fi. 3. Select AW share App, click the AVer Transmitter projection key on the App to begin projection... - Page 13 2. Click Build Number for 7 times to enable Developer Option. 3. Go to Developer option→USB Debugging→ On. 4. Plug to AVer Transmitter and allow USB debug. [Note]Please select MTP or File Transferring in the notifications when USB is connected.
- Page 14 5. Connect to device. If AVer Receiver cannot connect with your device, please do the pairing setup again. Plug in AVer transmitter’s USB cable to receiver to do the pairing Setup. Switch to PC Download the pairing file to USB disk and plug USB disk to AVer transmitter to do pairing setup manually.
-
Page 15: Return Control To Computer
When the AVer Receiver is connected to a touch screen, please follow the following connection method to set up return control to computer. 1. Connect the USB port of the touch screen to the USB port of AVer Receiver. 2. Connect the USB cable from AVer Transmitter to the computer and switch to PC side. -
Page 16: Specifications
Specifications Product AW200 AAW200WPK Rx Output HDMI Out x 1 (up to 4096 x 2160p 24Hz, 3840 x 2160p 30Hz, 1920x1080p 60Hz) Tx Interface HDMI In Mini DP In Gigabit Ethernet USB for Mobile Devices (iOS) Rx Interface HDMI / USB / Gigabit Ethernet AR200 Receiver: DC Power Input or PoE (IEEE 802.3AT) -
Page 17: Web Login
2. Go to [Settings] on a mobile device and search for wireless network devices (e.g.: AerRD01_BF90178B). 3. Enter the Wi-Fi password (e.g.: 66079830). 4. Run the Chrome browser and enter the IP address of AVer Receiver(default IP is 192.168.168.1. 5. Input the Admin Password (default password [000000]). For the initial login, the system will ask for password change. -
Page 18: Update Firmware
4. Click [Update] and wait for a reboot of the devices To pair device with Pairing File 1. Prepare a blank USB flash drive and insert it to the USB port on AVer Receiver. 2. Log in AVer Receiver web screen. -
Page 19: Reset To Default
Reset to Default On the Web Screen 1. Select [Admin Setting] from the top-left menu 2. Select [Reset to Defaults] and select the equipment to be reset to defaults [Remark] RX is receiver; TX is transmitter. Reset Button Press and hold the Reset button on the back of the product unit (at least for 10 seconds) and wait about 1 minute for the product to completely reboot. -
Page 20: Web Screen Setup
Web Screen Setup 1. Login: Connect to AVer Receiver’ Wi-Fi. Then, open the Chrome browser on your PC/Laptop to enter the IP address of the AVer Receiver (Default IP is 192.168.168.1). After log in, the main web screen is displayed as above figure shown. -
Page 21: Device Management
4 users 8 users Maximum Set up the maximum number of connections number of 16 users of the AVer Transmitter connections 32 users 64 users This function can achieve the goal of pairing Download via downloaded pairing files. Please refer to “File name”... -
Page 22: Network Management
When not connecting to wired Scan 5G Close after plugging in network, “Blank” is displayed SSID and the network cable Description: AW200 only supports 5G connect Router On: If the router to be connected has been set up, it will be connected automatically Remember... - Page 23 Function Option Description Enable AirPlay functions to project the video and audio output of Apple equipment to the receiver. AirPlay On/Off ※ After the setting is modified, the receiver will reboot. Change the administrator login password for the receiver. New Password Administrator ※...
-
Page 24: About
About Display the receiver and transmitter equipment, connection, and version information. Download Android apk Using Android mobile devices to enter the receiver web page. After selecting Android apk for download, install AW Share App to simulate the actual transmitter in projecting screens. Please refer to Connects to Android Mobile Phone/Tablet for operation methods. -
Page 25: Troubleshooting
Troubleshooting This Chapter describes questions frequently asked during the use of AW200 and suggests methods and solutions. Problems Solutions The AVer Transmitter is connected to Please reference the AVer Transmitter's pairing the device, but it can't share screen. steps to pair it again. - Page 26 Please confirm whether the network is connected following figure). to the internet correctly Please confirm if the IP setting of AVer Receiver is the same as other IP address settings within the Local Area Network (LAN). The wireless network icon on the...
Need help?
Do you have a question about the AW200 and is the answer not in the manual?
Questions and answers