Advertisement
You must read the Usage and Safety Precautions before use.
The Operation Manual can be downloaded from the ZOOM website (www.zoom.jp/docs/h6).
This page has files in PDF and ePub formats.
The PDF file format is suitable for printing on paper and reading on a computer.
The ePub format can be read with electronic document readers and is designed for reading on smart-
phones and tablets.
© 2020 ZOOM CORPORATION
Copying or reprinting this manual in part or in whole without permission is prohibited.
Product names, registered trademarks and company names in this document are the property of their respective companies.
You might need this manual in the future. Always keep it in a place where you can access it easily.
The contents of this manual and the specifications of the product could be changed without notice.
Windows® is a trademark or registered trademark of Microsoft® Corporation.
Mac is a trademark or registered trademark of Apple Inc.
Handy Recorder
Quick Guide
Advertisement
Table of Contents

Related Manuals for Zoom H6


Summary of Contents for Zoom H6
- Page 1 Quick Guide You must read the Usage and Safety Precautions before use. The Operation Manual can be downloaded from the ZOOM website (www.zoom.jp/docs/h6). This page has files in PDF and ePub formats. The PDF file format is suitable for printing on paper and reading on a computer.
-
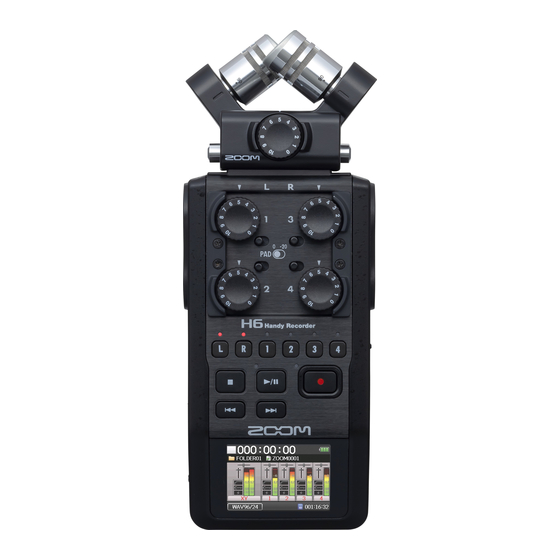
Page 2: Parts And Connections
Parts and Connections ■ Left side ■ Front XY mic Input volume L/R Input 1 Input volume 3 Input volume 1 PAD switches (1–4) Input 2 Input volume 2 Input volume 4 Track buttons Stop button and indicators SD card slot Play/pause button (L, R, 1–4) &... -
Page 3: Using Batteries
• Use MENU > SYSTEM > Battery to set the type of battery so that the amount of remaining battery charge can be shown accurately. HINT AC power can also be used by connecting a dedicated AC adapter (ZOOM AD-17) to the USB port. - Page 4 > Format. Turning the power on and off Slide right. HINT • To turn the power off, slide until the ZOOM logo appears on the display. • Sliding to the left (toward HOLD) will disable button operations. NOTE • If “No SD Card!” appears on the display, confirm that an SD card is inserted properly.
- Page 5 Setting the language (first time starting up) The first time you turn the power on after purchase, set the display language when the Language setting screen opens. to select the language, and press HINT The language setting can be changed later using MENU > LANGUAGE. Setting the date and time (first time starting up) When the Date and Time setting screen opens after the Language settings screen, set the date and time.
-
Page 6: Display Overview
Display overview ■ Home/Recording Screen Recording Name of project that Status icon Battery charge indicator time will play when the button is pressed Full Stopped (when recording, name of project being Recording recorded) Paused Empty Folder name Panning Clipping indicators Monitoring volume Level meter Low cut indicator... -
Page 7: Recording Process
Recording process Recording follows the process shown below. • Install batteries • Insert an SD card • Connect mic capsule Prepare for • Connect mics, instruments and other sources to Inputs 1–4 recording • Turn the power on • Set the recording format •... - Page 8 Recording format settings Consider audio quality and file size when selecting the format. Select MENU > REC > Rec Format, and then select the setting. Open the MENU screen, go back Select up/down Confirm the item or value to set NOTE • WAV format is better for recording when high audio quality is important. • Since the MP3 format uses compression, the audio quality is reduced, but the file size is smaller.
-
Page 9: Input And Output Settings
Input and output settings Setting input sources Set according to the devices connected to Inputs 1–4. ■ Connecting a mixer or other device with a +4 dBu standard output level PAD switch Set the corresponding PAD switches to –20. HINT When connecting an ordinary mic, set the PAD switch to 0. - Page 10 Enabling tracks Select which tracks to record (L, R and 1–4). These tracks (L, R and 1–4) correspond to the same inputs. When the Home Screen is open, press the track keys for the tracks to record so that the corresponding LEDs light red. HINT •...
- Page 11 Adjusting the input signal monitoring mix You can adjust the volume and panning of each input signal when monitoring. Select MENU > INPUT&OUTPUT > Monitor Mixer in order. Open/Close the MENU screen Select up/down Confirm the item or value to set Adjust parameter settings. Move cursor/change value Select parameter to edit/confirm Parameter Setting range...
- Page 12 Recording Press when the Home Screen is open. This starts recording. ■ Operations during recording Function Control operation Add a mark Press Pause Press Stop Press NOTE • When recording is paused, a mark is added at that point. • A maximum of 99 marks can be added in one project. • If the file size exceeds 2 GB during recording, a new file will be created automatically in the same project and recording will continue without pause.
-
Page 13: Playing Recordings
Playing recordings Press when the Home Screen is open. This starts playback. ■ Playback operations Function Control operation Select playback project/ Press move to mark Search forward/backward Press and hold Pause/resume playback Press Adjust the volume Press +/– Add a mark Press HINT •... - Page 14 List of functions and settings When the Home Screen is open, press to open the MENU screen where the following functions and settings can be used. Item Explanation PROJECT LIST Select and play recorded projects, set the folder used to save recorded data, etc. INPUT&...
-
Page 15: Specifications
• Continuous battery operation times were determined using in-house testing methods. They will vary greatly according to use conditions. Power 4 AA batteries AC adapter (ZOOM AD-17): 5V/1A DC (supports USB bus power) External dimensions : 77.8 mm (W) × 152.8 mm (D) × 47.8 mm (H) XYH-6: 78.9 mm (W) × 60.2 mm (D) × 45.2 mm (H) - Page 16 ZOOM CORPORATION 4-4-3 Kanda-surugadai, Chiyoda-ku, Tokyo 101-0062 Japan www.zoom.co.jp Z2I-3865-01...
Need help?
Do you have a question about the H6 and is the answer not in the manual?
Questions and answers