Advertisement
Quick Links
Advertisement

Subscribe to Our Youtube Channel
Related Manuals for Workhorse Freedom 6/8


Summary of Contents for Workhorse Freedom 6/8
- Page 1 PN: 67-1500, REV: A, 4/12...
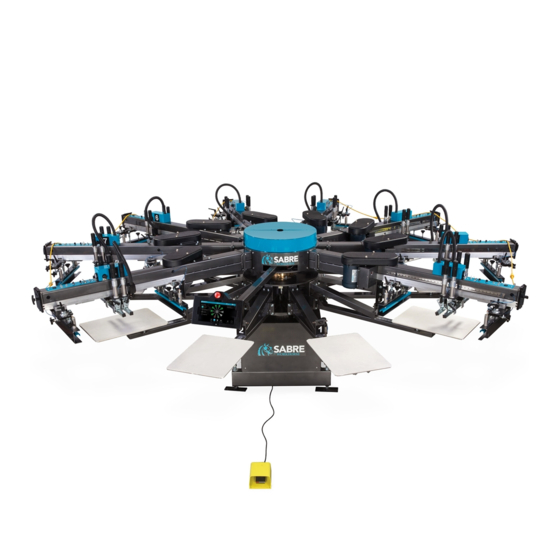
- Page 2 Freedom’s fast indexing speed, simple to use controls and precise micro registration ensure that setups are as fast and easy as with your manual press. Add our patented FlashBack to the Freedom and Workhorse has re-written the book on affordable high production while keeping it simple.
- Page 3 Press Foot Print Compressor HP Rating CFM @ 120psi Volts Amps FRD-6/8 10'5" (3.2m) 7.5hp 22cfm (7.6bar), (623 l/m) 110V, 50-60Hz, Max Print Area Portrait Positioning Landscape Positioning FRD-6/8 16 x 18” 30 x 18” Accessory Foot Print Watts Volts Amps Phase FlashBack 16”...
-
Page 4: Safety First
1. MAIN AIR LOCKOUT VALVE: When servicing of the printer is required a special Lockout Valve has been provided as an added safety precaution. This valve is located before the main filter/regulator. This has a padlock hole through it. A padlock may be inserted to prevent air from being supplied to the printer. - Page 5 It is necessary that you pre-register your screens when burning them for the automatic. The highest printed part of your total image should be no closer then 6-1/2" from the top outside edge of your screen frames. You must also center your total image (left to right).
- Page 6 1. Print Head Selector Switch: Each print head has its own selection switch that is independent of all others and may be set in any one of the following positions; OFF - Single, Print Stroke & Double Stroke. During a print cycle those heads in the OFF position will remain at rest.
- Page 7 9. Begin/ End Production: Begin Production is used when first starting a production run. Engage Auto Start, then push Production Begin/End Button within 3 seconds. The pallet table will rotate and activate each head in turn as it proceeds around. When all heads have begun printing Auto Mode automatically begins.
- Page 8 MICRO LOCKING HANDLES: These Handles must be loosened to the Micro Screens. Loosen these Handles only enough to allow Micro adjustment. Excessive play will result in registration movement when Handles are re-tightened FRONT MICRO UP / DOWN ADJUSTMENT: Turning the tip of these knurled knobs to the left will cause the image to move upwards on the shirt.
- Page 9 FRONT MICRO LEFT / RIGHT ADJUSTMENT: Turning this knurled knob away from you will result in the print moving right on the shirt. Movement towards you will cause the image to move left on the shirt. MICRO REGISTRATION REQUIREMENTS AND TIPS: All Micros should be centered on grids before set-up. Rear clamps should be released when adjusting front micros more then 1/2”.
- Page 10 Insert the squeegee tab into flipper block slot. Align the squeegee with flipper block hole and insert retaining pin. Questions? Give us a call! 800.778.8779 Visit our website at workhorseproducts.com...
-
Page 11: Important Note
To adjust the squeegee angle and pressure, turn the “print off”, loosen the squeegee pressure lock lever. To gain squeegee pressure turn the squeegee pressure knob clockwise until the desired pressure is reached. To lighten squeegee pressure turn the squeegee pressure knob counter clockwise until the desired pressure is reached. Do not use pliers or extension pipes on any of When in the flood position the print blade has about 1/2"... - Page 12 Required tools: (2) 9/16" combination wrench. (2) 1" square 31" long steel tubing or 31" long screen frame w/mesh Set-Up Inspection: A: Insert 31" screen or (2) pieces of 1" steel tubing in the screen clamps. When using steel tubing, align outside edges of steel 1"...
- Page 13 Note: the number indicated in the picture above does NOT reflect what the shock setting is on each press. Always consult a trained Workhorse products technician before any adjustments are made. Questions? Give us a call! 800.778.8779...
- Page 14 WARNING! RISK OF ELECTRICAL SHOCK! Turn ALL power to unit OFF before service. All service should be done by or under the supervision of a trained technician...
- Page 17 Note: Diagrams only represent up to a 6 color press for further instructions contact Workhorse Products...
- Page 18 Head Valves: Wiring / Plumbing...
- Page 19 Screen Clamp Plumbing...
- Page 20 Flip Cylinder and Valve Plumbing...
-
Page 21: Maintenance And Upkeep
MAINTENANCE AND UPKEEP lubricating should be performed a minimum of every 5,000 prints. Grease the aluminum track that the indexing carriage travels in. Place a small amount of white lithium grease on your finger and apply to the inside of this track in the grooved area that the bearing plastic carriage slides in. -
Page 22: Limited Warranty
Workhorse Products reserves the right to alter specifications in the manufacture of its products. It is understood and agreed that Seller’s liability for any equipment whether liability in contract, in tort, under any warranty, in negligence, in strict liability or otherwise shall not exceed the return of the amount of the purchase price paid by Buyer.
Need help?
Do you have a question about the Freedom 6/8 and is the answer not in the manual?
Questions and answers