Advertisement
sauder.com
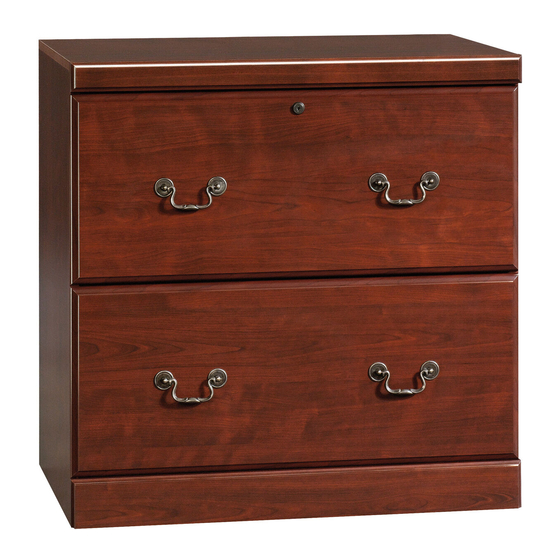
Lateral File
Heritage Hill Collection | 102702
Need help? Visit Sauder.com to view video assembly tips or chat with a live rep.
Prefer the phone? Call 1-800-523-3987.
Share your journey!
Get all organized
and stuff .
NOTE: THIS INSTRUCTION
BOOKLET CONTAINS IMPORTANT
SAFETY INFORMATION.
PLEASE READ AND KEEP FOR
FUTURE REFERENCE.
English pg 1-22
Français pg 23-25
Español pg 26-28
Lot # 361775
04/10/14
Purchased: __________________
Be sure to give us a ring before
making any returns. 1-800-523-3987
Advertisement

Related Manuals for Sauder Heritage Hill Lateral File 102702


Summary of Contents for Sauder Heritage Hill Lateral File 102702
- Page 1 Heritage Hill Collection | 102702 NOTE: THIS INSTRUCTION BOOKLET CONTAINS IMPORTANT SAFETY INFORMATION. Need help? Visit Sauder.com to view video assembly tips or chat with a live rep. PLEASE READ AND KEEP FOR FUTURE REFERENCE. Prefer the phone? Call 1-800-523-3987.
- Page 2 LEFT END (1) LOWER DRAWER FRONT (1) TOP (1) BASE (1) LARGE BACK (1) DRAWER BACK (2) BOTTOM (1) RIGHT DRAWER SIDE (2) SMALL BACK (1) LEFT DRAWER SIDE (2) TOP MOLDING (1) D729 DRAWER BOTTOM (2) Page 2 102702 www.sauder.com/services...
- Page 3 Part Identifi cation D729 D729 www.sauder.com/services 102702 Page 3...
- Page 4 FILE BRACKET - 2 AA SLIDE CAM - 4 29G CABINET ACTUATOR - 2 DRAWER ACTUATOR - 2 LOCK PACK - 1 TWIST-LOCK ® FASTENER - 12 PULL MOUNT - 8 PULL - 4 REAR FILE BRACKET - 2 Page 4 102702 www.sauder.com/services...
- Page 5 30S BLACK 1-9/16" FLAT HEAD SCREW -8 SILVER 5/8" MACHINE SCREW - 8 BLACK 9/16" LARGE HEAD SCREW - 20 BROWN 7/16" LARGE HEAD SCREW - 8 GOLD 5/16" FLAT HEAD SCREW - 16 NAIL - 10 www.sauder.com/services 102702 Page 5...
- Page 6 Assemble your unit on a carpeted fl oor or on the empty å carton to avoid scratching your unit or the fl oor. To begin assembly, push a SAUDER TWIST-LOCK® å FASTENER (JJ) into the large holes in the RIGHT END (A4) and LEFT END (B3).
- Page 7 Insert two CABINET ACTUATORS (29G) into the holes å shown in the RIGHT END (A4). This pin must insert into the location holes in the RIGHT END (A4). www.sauder.com/services 102702 Page 7...
- Page 8 The interlock system is a safety feature that prevents more than one drawer from opening at the same time. Do not use excessive force to open the drawers. Do not slide the CABINET ACTUATORS onto the INTERLOCK TRACK. Page 8 102702 www.sauder.com/services...
- Page 9 CABINET ACTUATOR should touch the top edge of the RAILS. If the gap is larger than 1/16", the drawers could lock up and not open. If this happens, open two drawers at the same time to override the interlock system. Remove the drawers to re-adjust the INTERLOCK TRACK assembly. www.sauder.com/services 102702 Page 9...
- Page 10 BASE (J) to the BOTTOM (E2). Use six BLACK 9/16" LARGE HEAD SCREWS (CC). These holes must be near the top edge. BLACK 9/16" LARGE HEAD SCREW (12 used in this step) (6 used) This hole must be here. Page 10 102702 www.sauder.com/services...
- Page 11 Step 6 Fasten the LEFT END (B3) to the TOP (C3). Tighten two å TWIST-LOCK® FASTENERS. How to use the SAUDER TWIST-LOCK ® FASTENER 1. Insert the dowel end of the FASTENER into the hole of the Fasten the LARGE BACK (D) to the LEFT END (B3).
- Page 12 Step Step 7 Fasten the RIGHT END (A4) to the TOP (C3), å LARGE BACK (D), and BOTTOM (E2). Tighten six TWIST-LOCK® FASTENERS. Page 12 102702 www.sauder.com/services...
- Page 13 Fasten the BASE (J) to the ENDS (A4 and B3). Use two å BLACK 9/16" LARGE HEAD SCREWS (CC) through the ANGLE BRACKETS on the ENDS and into the BASE. NAIL Notch (10 used in this step) BLACK 9/16" LARGE HEAD SCREW (6 used in this step) www.sauder.com/services 102702 Page 13...
- Page 14 Fasten the DRAWER BACK (D61) to the DRAWER SIDES (D87 and D88). Use four BLACK 1-9/16" FLAT HEAD SCREWS (30S). å NOTE: Be sure the DRAWER BOTTOM (D729) inserts into the groove of the DRAWER BACK (D61). å Repeat this step for the remaining drawer using the LOWER DRAWER FRONT (I3). å Page 14 102702 www.sauder.com/services...
- Page 15 SLIDE. GOLD 5/16" FLAT HEAD SCREW (4 used in this step) Screw head - turn CAM to line up holes in Open end the SLIDES with holes in DRAWER SIDES www.sauder.com/services 102702 Page 15...
- Page 16 Screw head - turn CAM to line up holes in the SLIDES with holes in DRAWER SIDES Slot These tabs must insert into the slots. GOLD 5/16" FLAT HEAD SCREW (4 used in this step) Post Seated Page 16 102702 www.sauder.com/services...
- Page 17 FRONT (H3) and REAR FILE BRACKET (12B) to the DRAWER BACK (D61). Use four BROWN 7/16" LARGE HEAD SCREWS (DD). Repeat this step for the other drawer. å BROWN 7/16" LARGE HEAD SCREW (8 used in this step) www.sauder.com/services 102702 Page 17...
- Page 18 RIGHT DRAWER SIDE (D87). Slide another FILE GLIDE (S) onto the other end of the å FILE RODS (Q), then press this FILE GLIDE over the LEFT DRAWER SIDE (D88). Repeat this step for the other drawer. å Page 18 102702 www.sauder.com/services...
- Page 19 Fasten four PULL MOUNTS (QQ) and two PULLS (PP) to å the UPPER DRAWER FRONT (H3). Use four SILVER 5/8" MACHINE SCREWS (EE). Repeat this step for the other drawer. å SILVER 5/8" MACHINE SCREW (8 used in this step) www.sauder.com/services 102702 Page 19...
- Page 20 NOTE: When the upper drawer is locked, the CAM should å be positioned behind the TOP MOLDING. This end of the CAM must be closer to the UPPER DRAWER FRONT than the other end of the CAM. SCREW WASHER LOCK Page 20 102702 www.sauder.com/services...
- Page 21 RAILS on the unit and push the drawer into the unit until the drawer is fully inserted. The drawer will push in hard until it is all the way in, then it will slide in and out easier. 40 lbs. 40 lbs. 40 lbs. www.sauder.com/services 102702 Page 21...
- Page 22 #4. The higher the screw in the oblong hole, the higher your drawer front will be. The lower the screw, the lower the drawer front. Page 22 102702 www.sauder.com/services...
- Page 23 QUANTITÉ d’ a chat de cet élément et conserver le livret pour future référence. EXTRÉMITÉ DROITE ..........1 GLISSIÈRE D'EXTENSION ........4 Pour contacter Sauder EXTRÉMITÉ GAUCHE ..........1 COULISSE D'EXTENSION ........4 en ce qui concerne cet DESSUS ................1 TIGE DE DOSSIER ............4 élément, faire référence...
- Page 24 REMARQUE : L'extrémité fi letée de la FIXATION doit rester complètement insérée Pour commencer l'assemblage, enfoncer une FIXATION TWIST-LOCK® SAUDER (JJ) dans le trou de la pièce attenante lorsque l'on bloque la FIXATION. dans les gros trous de l'EXTRÉMITÉ DROITE (A4) et l'EXTRÉMITÉ GAUCHE (B3).
- Page 25 Répéter cette étape pour l'autre tiroir. ÉTAPE 14 Fixer quatre MONTURES DE POIGNÉE (QQ) et deux POIGNÉES (PP) sur le DEVANT DE TIROIR SUPÉRIEUR (H3). Utiliser quatre VIS À MÉTAUX 16 mm ARGENTÉES (EE). Répéter cette étape pour l'autre tiroir. www.sauder.com/services 102702 Page 25...
- Page 26 CARRIL DE UNIÓN ............1 et conserver le livret pour future référence. EXTREMO IZQUIERDO ............1 SOPORTE ANGULAR ..........8 Pour contacter Sauder PANEL SUPERIOR ..............1 PLUMA DE RETOQUE ..........1 en ce qui concerne cet DORSO GRANDE ..............1 MÉNSULA DE ARCHIVERO ........2 élément, faire référence...
- Page 27 NOTA: El extremo con cabilla del SUJETADOR debe quedarse completamente Para comenzar el ensamblaje, empuje un SUJETADOR TWIST-LOCK® SAUDER (JJ) en insertado en el agujero de la parte adjunta cuando se enclava el SUJETADOR.
- Page 28 PASO 14 Fije cuatro MONTAJES DE TIRADOR (QQ) y dos TIRADORES (PP) a la CARA DE CAJÓN SUPERIOR (H3). Utilice cuatro TORNILLOS PLATEADOS DE METAL de 16 mm (EE). Repita este paso para el otro cajón. Page 28 102702 www.sauder.com/services...
- Page 29 Les téléviseurs peuvent être très un téléviseur. téléviseur. lourds. De plus, le poids et l’emplacement du tube image ont tendance à rendre les téléviseurs instables et enclins à tomber vers l’ a vant. www.sauder.com/services 102702 Page 29...
- Page 30 Además, soportar un televisor. diseñadas para soportar un televisor. el peso y la ubicación del tubo de imagen tienden a causar la inestabilidad de televisores y son propensos a inclinarse hacia adelante. Page 30 102702 www.sauder.com/services...
- Page 31 à compter de la date d'achat la première fois et qui sont signalés à Sauder dans les limites de couverture de la contre tout défaut de matériaux ou de fabrication des composantes de mobilier Sauder.
- Page 32 Dear Valued Customer: So, how did it go? Thanks so much for choosing Sauder® furniture. I hope the Set a world record for speed? purchase and assembly process was a positive experience Feeling good about yourself? and you feel good about the furniture you just built. If you Nice.
Need help?
Do you have a question about the Heritage Hill Lateral File 102702 and is the answer not in the manual?
Questions and answers
how do i remove a file drawer for model 102702