Advertisement
Quick Links
ENGINEERING COMPANY INC.
51 Winthrop Road
Chester, Connecticut 06412-0684
Phone: (860) 526-9504
Internet: www.whelen.com
Sales e-mail: autosale@whelen.com
Customer Service e-mail: custserv@whelen.com
This guide has been designed to document the retro-fit
procedure as performed on Traffic Advisor Model
TA165NF1. Before beginning, a clean, flat work
surface of sufficient size is needed. Be sure that the
work surface will not scratch, mar or damage the unit
in any way.
Important! Many of the parts removed during the
disassembly procedure will be reused. Use all the
parts in this kit where provided. Do not discard
any original parts until the entire procedure has
been completed.
This procedure will require the following tools:
•
3/8" Nut-driver or Socket wrench
•
#2 Phillips Screwdriver
•
#1 Phillips Screwdriver
•
De-pinning Tool
•
Diagonal Cutters (for cutting strain relief
Cable Ties)
Disassembly...
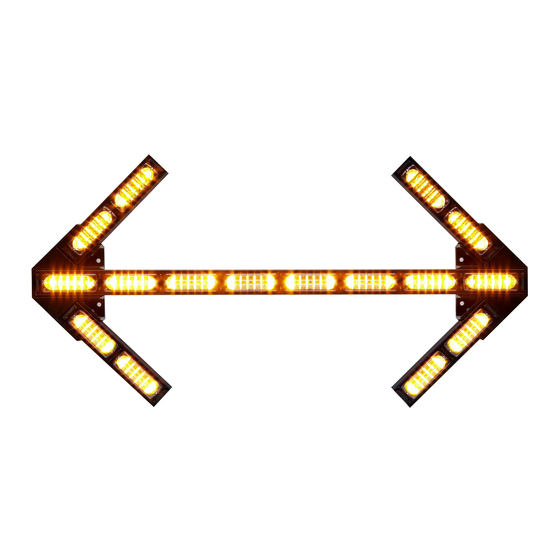
1.
Lay the arrow face down on your work
surface. Make sure that the arrow is oriented
as shown in the image at right.
©2020 Whelen Engineering Company Inc.
Form No.14D34 (042120)
®
TA165NF1 Retro-fit kit Parts List (P/N 01-0419389-00)
Description
SCREW, 6-32 X 3/8" PPH ROLOK
CLAMP, 3/8"
GROMMET, 3/8 ID 3/4 OD 1/2 THK
WASHER, #10 EXT TOOTH LOCK
EXTRUSION, TA 500 LED (13.50")
EXTRUSION, TA 500 LED (49.35")
SPACER, 2"
BRACKET, SNAP-IN HALF
CABLE TIE
For warranty information regarding this product, visit www.whelen.com/warranty
Page 1
Field Service Retrofit Guide:
Traffic Advisor Arrow Model TA165NF1
Retrofit Kit P/N 01-0419389-00
Qty.
20
2
2
4
4
1
6
2
2
Advertisement

Related Manuals for Whelen Engineering Company TA165NF1


Summary of Contents for Whelen Engineering Company TA165NF1
- Page 1 Internet: www.whelen.com Sales e-mail: autosale@whelen.com Customer Service e-mail: custserv@whelen.com This guide has been designed to document the retro-fit TA165NF1 Retro-fit kit Parts List (P/N 01-0419389-00) procedure as performed on Traffic Advisor Model TA165NF1. Before beginning, a clean, flat work Description Qty.
- Page 2 (7) 10-25 nuts and corresponding #10 lock washers (shown circled). Carefully turn the TA165NF1 over so that the light-heads are now facing upward. Now pull the three extrusions approximately 6 to 10 inches away from the castings as shown.
- Page 3 With the end plate caps removed, slide the lightheads out of the small extrusions. With the lightheads removed, unplug the lighthead harness from the main harness. Now extract the main harness cables from the end casting. Remove the end casting from the main extrusion as shown here.
- Page 4 Locate the two (Left and Right) 9-position connectors that go to the control head. Accurately record the wire locations in each connector by color and pin position. Using a de-pinning tool, remove all wires from the connector. With the connectors removed, the harness may now be extracted from the extrusion.
- Page 5 Place the extrusion face up on your work surface with the end cap plate on the left. Working left to right, install the following components in this order: Half-clamp Lighthead Full Clamp Lighthead Half clamp Important! Make sure that the lightheads are oriented so that the end of the lighthead Y-harness...
- Page 6 Flip the assembly over and insert the two (2) original 10-24 hex head bolts into the channel in the back of the extrusion. These bolts will be needed to install the assembly onto the end casting. IMPORTANT! Locate the four (4) notched end cap plates used on the short extrusions.
- Page 7 After the end cap plate has been attached, the snap-in brackets should now be tightened using a #1 Phillips screwdriver. This secures the components within the extrusion. This completes the reassembly of the short sections of the Arrow. Remember, there must be approx.
- Page 8 11. Locate one of the new wire grommets. Insert the pinned wires through the grommet and slide the grommet along the length of the input cable to the extrusion. Work the grommet into the grommet hole until it is fully and properly seated in the hole.
- Page 9 14. Before proceeding any further, slide the two (2) 2” spacers in to the middle of the extrusion. extrusion populated with its lightheads. To install the lightheads in the extrusion, simply place them straight down in the extrusion where they will sit on the rails.
- Page 10 17. The end cap plates with the foam pad can now be installed onto the extrusion using two (2) #6-32 x 3/8” Phillips pan head screws included with your kit. 18. Once the cover has been secured, all the installed components should be in their correct location.
- Page 11 20. The arrow casting will now be installed onto the end of the extrusion. Make sure that the wire harnesses are routed through their respective slots. With the arrow casting aligned with its three (3) mounting bolts (installed in step 16), place the casting onto the extrusion as shown.
- Page 12 23. Carefully position the entire assembly so the light-heads facing upwards. IMPORTANT! Exercise extreme care so as not to damage the assembly or any of the sub-assemblies! 24. The main harness can now be connected to each of the Arrow harnesses. Make sure the connector is fully seated and snapped together.
-
Page 13: Wiring Diagram
When all of the wires in each connector are properly inserted in its connector, reassembly is complete. WIRING DIAGRAM (Model TA165NF1 Traffic Advisor Arrow) LAMP 2C LAMP 3 LAMP 4A LAMP 4B...
Need help?
Do you have a question about the TA165NF1 and is the answer not in the manual?
Questions and answers