Advertisement
Available languages
Available languages
Quick Links
Advertisement

Related Manuals for Kronan DUO/S


Summary of Contents for Kronan DUO/S
- Page 1 MANUAL KRONAN duO S...
- Page 3 Innehållsförteckning Introduktion Säkerhet Montering och användarinstruktion för chassi, hjul och broms Monteringsanvisning till sittdel Avmontering av sittde len från chassi Tvättråd, skötsel och underhåll Garanti och reklamation...
- Page 5 Vi hoppas att både du och ditt barn ska få stor glädje och nytta av er nya vagn. Kronan Duo/S är säker och smidig, lika liten på utsidan som rymlig på utsidan. Funktionell för dig som förälder, säker och bekväm för ditt barn.
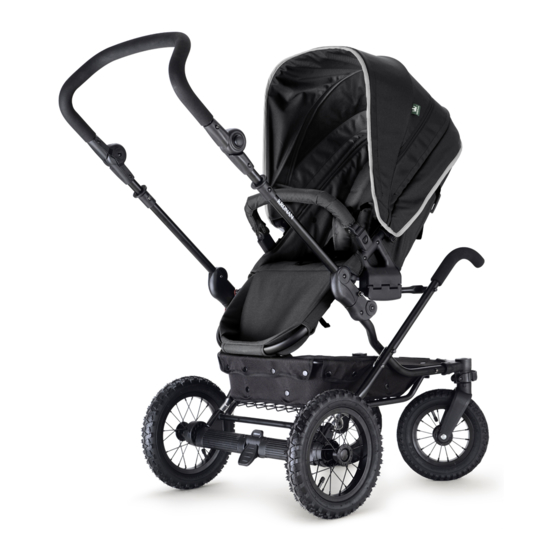
- Page 7 Översiktsillustration Sittdel...
- Page 8 Av säkerhetsskäl – • • denna produkt. använd endast reservdelar som Sittdelen är avsedd för barn är godkända av Kronan. • från 6 månader upp till 4 år. För bästa stabilitet – placera • Maxvikt 15 kg. alltid tyngre föremål i mitten Använd säkerhets-...
- Page 9 • är avsedd för max 1 barn. Montering och användarinstruktion Chassi Kronan duo/S har ett unikt chassi som är genomtänkt och har unika funktioner. Nedan har vi beskrivit några praktiska funktioner: Körhandtag Chassit är försett med ett ergonomiskt körhandtag som kan justeras i höjd och an- passas till den person som kör vagnen.
- Page 10 Monteringsanvisning för chassi Montering av hjul Bakre hjulen har en snabbkoppling för att du enkelt ska kunna ta av och på dem. Hjulen är utrustade med däck och slang med bilventil som gör det lätt att fylla på luft. Lufttrycket bör vara 30 PSI (210 kPa).
- Page 11 Säkerställ att samtliga hjul är korrekt monterade in- nan du använder vagnen. detta gör du genom att lätt VARNING dra i samtliga hjul för att säkerställa att de sitter fast. Pumpa hjulen Använd medföljande pump för att pumpa hjulen. du har alltid pumpen med dig i det praktiska fodralet som du smidigt fäster på...
- Page 13 Att fälla ihop vagnen Så här gör du: dra chassilåset mot dig samtidigt som du trycker ner handtaget med kroppen. Bild A. För handtaget framåt med höger hand, ta vänster hand och för upp den röda säkerhetsspärren på handtagets vänstra sida. Se bild B. För handtaget framåt/nedåt tills vagnen är hopfälld.
- Page 14 Broms Vagnens bromssystem ger full bromsverkan och skonar hjulen från onödigt slitage. Så här gör du: du bromsar vagnen genom att trampa ner bromspedalen. Se bild A. Lossa bromsen genom att föra upp bromspedalen. Se till att du har ett bra grepp om handtaget så att vagnen inte rullar iväg. För bästa säkerhet använd gärna medföljande handledsband.
- Page 15 Sittdel Sittdelen är avsedd för ett barn, från 6 månader upp till cirka 3 år, maxvikt 15 kg. Nedan beskriver vi några praktiska funktioner: Vändbar sittdel För att du ska kunna anpassa vagnen efter om du vill ha barnet vänt mot dig eller från dig så kan sittdelen placeras både mot dig och ifrån dig.
- Page 16 Steglöst ryggstöd med fullt liggläge du reglerar enkelt ryggstödet till den position som för stunden fungerar bäst för ditt barn. Fempunktssele Sittdelen har en fempunktssele. denna bör alltid användas då barnet vistas i barnvagnen. Solkeps Suffletten är utrustad med en solkeps som du enkelt fäller ut. den förhindrar att ditt barn får sol i ögonen eller ger en lugnare miljö...
- Page 17 Monteringsanvisning – sittdel detaljspecifikation för sittdel Klädd sittdel Bygel med överdrag Sufflett Vindskydd för sittdel...
- Page 18 Montering av bygel Bygeln är en säkerhetsdetalj som tillsammans med sele förhindrar att barnet faller ur vagnen. Så här gör du: För i bygeln i de båda fästena på sittdelen. För att säkerställa att bygeln är korrekt monterad drar du den lätt uppåt. Bild A. Användningsinstruktion för bygel För att underlätta när du ska lyfta barnet ur sittdelen kan du fälla upp bygeln.
- Page 19 Montering av sufflett på sittdel Så här gör du: Fäll upp suffletten. Montera fästena i liggdelen enligt bild A. Om fästena har olika positioner vid montering går det bra att montera det ena fästet först och sedan reglera tills det har samma position som det andra innan du monterar det andra fästet.
- Page 20 Användarinstruktion för fotstöd Justera fotstödet i den position som känns bäst för ditt barn. Så här gör du: För att fälla ner fotstödet trycker du in båda knapparna på fotstödets utsida och för fotstödet nedåt. Bild A. För att fälla upp fotstödet tar du tag i mitten av fotstödet och drar det uppåt.
- Page 21 Användarinstruktion för fempunktsele Så här gör du: Montera selen i de öglor som finns på sittdelen. Bild A, punkt 1. Trä på selen på barnet, justera ryggstroppen (Bild A punkt 3) till lagom nivå. Knäpp sedan spännet enligt bild A, punkt 2. Justera sedan selens axelband och midjebälte så...
- Page 23 Avmontering av sittdel från chassi Så här gör du: Knäpp upp de båda fästena som är placerade på sittdelens yttre långsida. Bild A. dra sittdelen uppåt. Säkerställ att sittdelen är korrekt monterat på chas- sit innan du använder vagnen. detta gör du genom att lätt dra sittdelen uppåt när den är monterad för VARNING att se så...
- Page 24 Tvättråd, skötsel och underhåll Tvätta tyget i 30 grader och använd inte sköljmedel. Följ tvättanvisningarna på etiketten som sitter på tyget. Var noga med att dra igen alla dragkedjor innan tvätt. Låt tyget dropp- torka och montera klädseln lätt fuktig för att få bästa passform. Låt tyget torka ordentligt innan du placerar ditt barn i vagnen.
- Page 25 Så här sätter du på klädseln Sittdel Så här gör du: Placera sittplattan i fickan på undersidan av sittdelstyget. Fickan är trång för att plattan ska sitta fast. Trä sittdelstyget över sittdelen. Montera sittdelsplatta samt ryggstödsplatta. Montera sele i klädsel och fäst den i sittdelen. Trä...
- Page 26 Skötsel och underhåll Chassi Håll chassi rent från smuts och vägsalt. Skölj, torka torrt och smörj in leder mm. Smörj axlar och övriga delar i metall cirka var tredje månad. Använd lämplig smörjolja. Kontrollera regelbundet att samtliga chassilås fungerar korrekt. Kontrollera även regel- bundet att skruvar och bultar är hela och ordentligt åtdragna.
- Page 27 Följ tvättrådinstruktioner på sid 22. Ställ gärna vagnen i skuggan. direkt solljus kan förutom att irritera barnet även bleka tyget vid långvarig exponering. Om du har frågor om skötsel, underhåll eller tvättråd kontakta gärna Kronans kundservice via tel: 08-694 72 82 eller e:post: info@kronan.com.
- Page 28 Vi kallar det Förlossningsgaranti. Kronans garanti När du köpt en Kronan produkt har du alltid ett års garanti samt 3 års reklamationsrätt. Om problem skulle uppstå är det viktigt att du hör av dig till oss omgående så vi kan hjälpa dig .
- Page 29 Garantin påverkar inte konsumentens rättigheter enligt gällande tillämpad lagstiftning. Om det inte finns någon tillämpad lagstiftning är köparens rättigheter begränsade till vad som nämns i garantivillkoren. Kronan Trademark är inte ansvarig för skador som följer på grund av brott mot uttalad eller underförstådd garanti för denna produkt.
- Page 31 Table of contents Introduction Safety Instructions for assembly for chassis, wheels and brake Assembly instructions for seat unit Removing seat unit from chassis Care, maintenance and cleaning Guarantee and complaints...
- Page 33 Thank you for choosing Kronan Duo/S. We’re hoping that you and your child will enjoy your new ride. Kronan Duo/S is safe and smooth, just as small on the outside as spacious on the outside. Functional for you, safe and comfy for your child.
- Page 35 Overview Seat unit...
- Page 36 Ensure that the carry cot, seat unit or car seat is cor rectly fitted on the chassis before using the Kronan duo. It is your responsibility to ensure • that safety regulations and in...
- Page 37 WARNING: The Kronan duo • Instructions for assembly and use Chassis The Kronan duo/S has a unique chassis whose ingenious design provides unique functionality. Some of the practical functions are described below: Handle The chassis has an ergonomic handle with height adjustment that can be adapted to the person pushing the pram.
- Page 38 Assembling the chassis Mounting the wheels The wheels have a quick-release mechanism that makes it easy to mount and remove them. The wheels have a tyre and inner tube fitted with a car-tyre valve, which makes it easy to inflate them. The air pressure should be 30 PSI (210 kPa). do as stated below: To mount the front wheels, insert the wheel axle in the chassi’s wheel attachment until you hear a clicking sound.
- Page 39 Ensure that all wheels are correctly mounted before using the pram. you do this by gripping it WARNING and pulling it outwards. Inflating the tyres use the pump supplied to inflate the tyres. The pump is always available in the practical cover, which is easy to attach to the chassis.
- Page 41 Folding the pram do as stated below: Pull the chassis lock towards you while pressing the handle down with your body. Figure A. Pull the handle forwards with your right hand, while using your left hand to move the red safety lock on the left side of the handle upwards. See Figure B. Move the handle forwards and downwards until the pram is folded.
- Page 42 Brake The brake system of the pram provides effective braking while preventing unnecessary wear on the wheels. do as stated below: Brake the pram by pressing the brake pedal downwards. See Figure A. Release the brake by lifting the brake pedal. Make sure that you have a firm grip on the handle when releasing the brake, so that the pram does not roll forwards.
- Page 43 Check that the fasteners of the carrycot on the frame are firmly secured before using the carrycot. WARNING you do this by pulling the foot end gently upwards. Seat unit The seat unit is designed for a single child, aged from 6 months to approximately 4 years (maximum weight 15 kg).
- Page 44 The seat unit has a five-point harness. This should always be used by a child sitting in the pushchair. WARNING Sun visor The hood is equipped with an easy-to-use sun visor. This prevents the child from having the sun in his or her eyes, and it makes for calmer surroundings when the child is to sleep. Withdraw the sun visor by holding it in the centre and moving your hand in and up into the inside of the hood.
- Page 45 Mounting the seat unit Seat unit Covered seat unit Crossbar with cover Hood Wind cover for seat unit...
- Page 46 Mounting the crossbar The crossbar is part of the safety design seat unit, and together with the harness prevents the child falling out. do as stated below: Insert the crossbar into the two attachment points on the seat unit. Check that the crossbar is correctly attached by pulling it gently upwards.
- Page 47 Mounting the hood on the seat unit do as stated below: Open up the hood. Attach the fittings in the seat unit as shown in Figure A. If the fittings are in different positions during the mounting, it is possible to attach one of them first and then adjust the placing until it has the same position as the second fitting.
- Page 48 Foot rest Adjust the footrest to the position that is most comfortable for your child. do as stated below: Lower the footrest by pressing in the two buttons on its outside, and moving it downwards. Figure A. Raise the footrest by holding it in the centre and pulling it upwards.
- Page 49 Five-point harness do as stated below: Fit the harness in to the buckles that are on the seat unit. Fig A, point 1. Fit the harness onto your child and adjust the back strap, Figure A point 3, close the buckle (click).
- Page 51 Removing the seat unit from the chassis do as stated below: undo the two fasteners located outside on the sides of the seat unit. Figure A. Pull the seat unit upwards. Check that the fasteners of the seat unit on the frame are firmly secured before using the carrycot.
- Page 52 Care, maintenance and cleaning Look after your Kronan pram: if you look after it carefully it will last longer and more people will be able to benefit from it. Follow the recommendations below concerning cleaning, care and maintenance. Keep the pram under cover or indoors when it is not in use.
- Page 53 Refitting the fabric Seat unit do as stated below: Place the seat plate in the pocket on the lower surface of the seat unit fabric. It is a tight fit, in order to ensure that the plate will be held firmly in place. Pull the seat unit fabric over the seat unit.
- Page 54 Care and maintenance Chassis Keep the chassis free of dirt and salt. Rinse it off, dry and lubricate the joints, etc. Lubricate axles and other metal parts approximately every three months. use a suitable lubricant. Check regularly that all chassis locks are working properly. Check also that screws and bolts are undamaged and properly tightened.
- Page 55 If you have questions about care, maintenance or cleaning, tel- ephone the Customer Service desk at +46 8 694 7282 or send an e-mail to info@kronan.com. Guarantee and complaints Safe birth guarantee You always have the right to return the pram and receive a refund, if anything should go wrong during the pregnancy or birth.
- Page 56 Kronan has the right to decline to carry out service under guarantee if it is clear that the recommended care instructions have not been followed. These instructions are detailed under “Care, maintenance and cleaning”...
- Page 57 As soon as we have received the form, we will contact you and make sure that you receive the best possible help. It is of the highest importance for us that you are satisfied with your KRONAN product, even if the period with right of complaint has expired. In this case, feel free to contact us and make your opinion known.
- Page 60 If you have a combination lock or similar device, please note the lock’s combination and keep it together with the pushchair’s registration number. This can be good to have close by if you need to identify your pushchair. Each registration plate is unique! Serienummer/Serialnumber: Registenngsskylt/Registration plate: Låsuppgifter/Lock details: www.kronan.com...
Need help?
Do you have a question about the DUO/S and is the answer not in the manual?
Questions and answers